Introduction
Thank you very much for choosing our application. We truly appreciate and really hope that you'll enjoy our script!If you like this script, Please support us by rating us 5 stars (Rate us Here)
WriteBot - AI Content Generator as SaaS Platform
Used Technologies
- Laravel
- Ajax
- jQuery
User Panels
- User Panel
- Admin Panel
- Website Frontend
Core Features
- AI Content Generator
- AI Image Generator
- AI Code Generator
- AI Speech to Text Generator
- Staff Management
- Project Management
- Folder Management
- Popular Templates
- Favorite Templates
- Contact Us Queries
- Multi-currency
- Multilingual
- Media Manager
- Newsletters
- User Management
- Subscription Management
Need Support?
If you have any questions about the script, please create ticket on our Ticketing System.Server Requirements
If you are not sure about how to configure these settings, please contact your hosting provider.
- Minimum PHP version 8.0 or greater.
- OpenSSL PHP Extension
- PDO PHP Extension
- Mbstring PHP Extension
- Tokenizer PHP Extension
- XML PHP Extension
- Ctype PHP Extension
- JSON PHP Extension
- ZIP PHP Extension
- FileInfo PHP Extension
- BCMath PHP Extension
- Apache Server Recommended (nginx configuration and installation up to you, we don't provide support on that)
PHP configuration limits
| Setting | Value |
| max_execution_time | 300 |
| max_input_time | 300 |
| memory_limit | 1024M |
| post_max_size | 1024M |
| upload_max_filesize | 1024M |
| max_input_vars | 2000+ |
Upload Files
- Login to your cpanel
- e.g “https://yourdomain.com/cpanel”
- Click "File Manager"
- Go to the "public_html" folder
- Upload here the "upload_this.zip" file which is in the downloaded file from “CodeCanyon”
- Go back to the "public_html" folder
- "Right click" on the Zip File, you will see some options there
- Now, Click on "Extract"
- Confirm Extract Files. The Zip File is now extracted successfully. You are all set to go to the next step
- Do not forget to delete "upload_this.zip" file after successful extraction.
Video Tutorial
You can follow the video below to get a good overview.
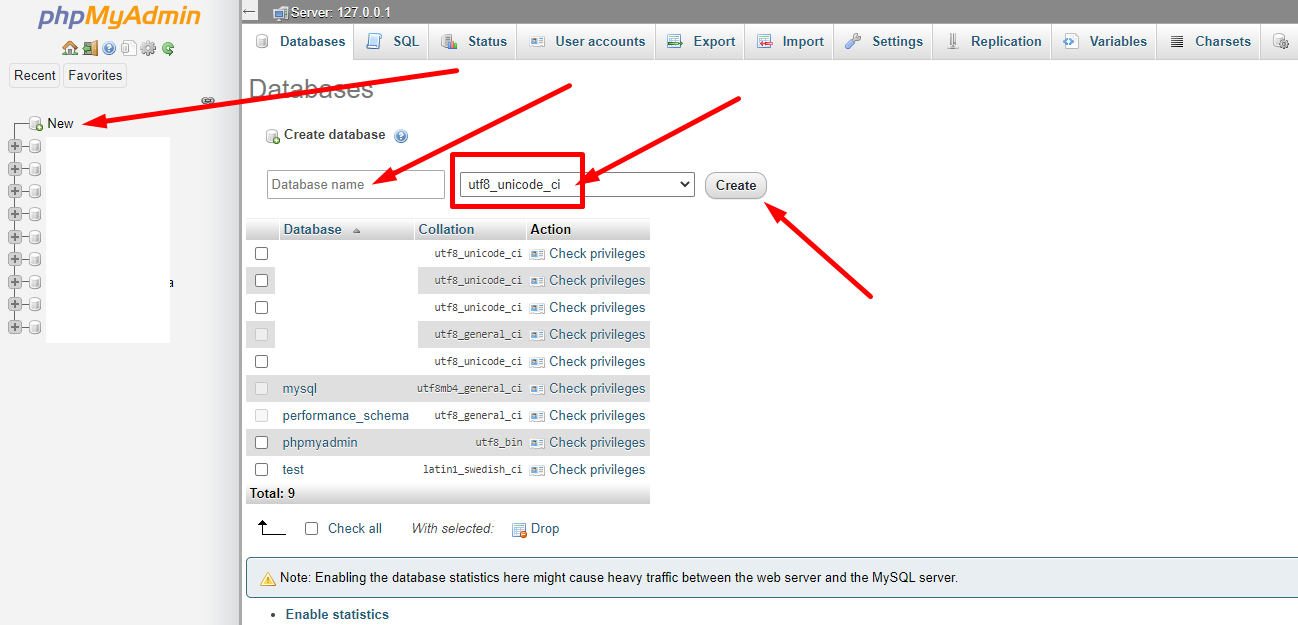
Create Database
- Login to your cpanel
- e.g “https://yourdomain.com/cpanel”
- Type "MySQL" in the Search Box
- Select "MySQL Databases". A page will come
- Type database name in the input field and click "Create Database". A new page will come with successful notification
- Click Go Back
- Now create an user for the database. To create an user, scroll down to "MySQL Users" on the same page
- Insert Username & Password, Click Create User. A new page will come with successful notification. Click Go Back
- Now Add User to Database so that the user can use the database. Scroll down to "Add User to Database"
- Select the User & Database you just have created
- Click on "Add". A new page will come
- Click on "Make Changes"
- Click on Go Back
Video Tutorial
You can follow the video below to get a good overview.
Installation On Server
- Navigate to the link below replacing "yourdomain" with your original domain
- http://yourdomain.com Or (for SSL) https://yourdomain.com
- Click "Proceed to Next". A page will come.
- Check Your server Configuration
- If your php version does not match the requirement (8.0 =+), contact your server provider
- If your curl is not enabled, contact your server provider
- Now you need to set Database Host, Database Name, Database Username, Database Password
- Database Host - Type “localhost”
- Database Port - your_port (e.g 3306)
- Database Name - yourdomain_databasename
- Database Username - yourdomain_username
- Password - Type the password of the user you created from MySQL Database
- Click Save the configuration
- Click on Run Migration
- Name, Email, Phone no, Password to create an Admin
- Save and that's all, use your system.
Video Tutorial
You can follow the video below to get a good overview.
Installation on Localhost
Step 1 - Copy Files
- Create a folder in your local server, name it "WriteBot" ( inside htdocs folder if you are using xampp )
- Copy and paste here the "upload_this.zip" file which is in the downloaded file from “CodeCanyon”
- "Right click" on the Zip File
- "Extract here" the zip file
Step 2 - Create Database
- Start apache server
- Create a database in your local database, ( navigate to "localhost/phpmyadmin" if you are using xampp )
Step 3 - Install The System
- Navigate to the link below
- http://localhost/WriteBot
- A page will come. Follow the steps written there
- You need to set Database Host, Database Port, Database Name, Database Username, Database Password
- Database Host - Type “localhost”
- Database Port - your_port (e.g 3306)
- Database Name - databasename
- Database Username - username (default "root")
- Password - type your password ( keep password field blank if you didn't set any password )
- Click Save the configuration
- Click on Run Migration
- Name, Email, Phone no, Password to create an Admin
- Save and that's all, use your system.
Video Tutorial
You can follow the video below to get a good overview.
Update Application
- Login to the system as Admin
- https://yourdomain.com/dashboard/settings/update-system
- Go to Manage Settings > Update
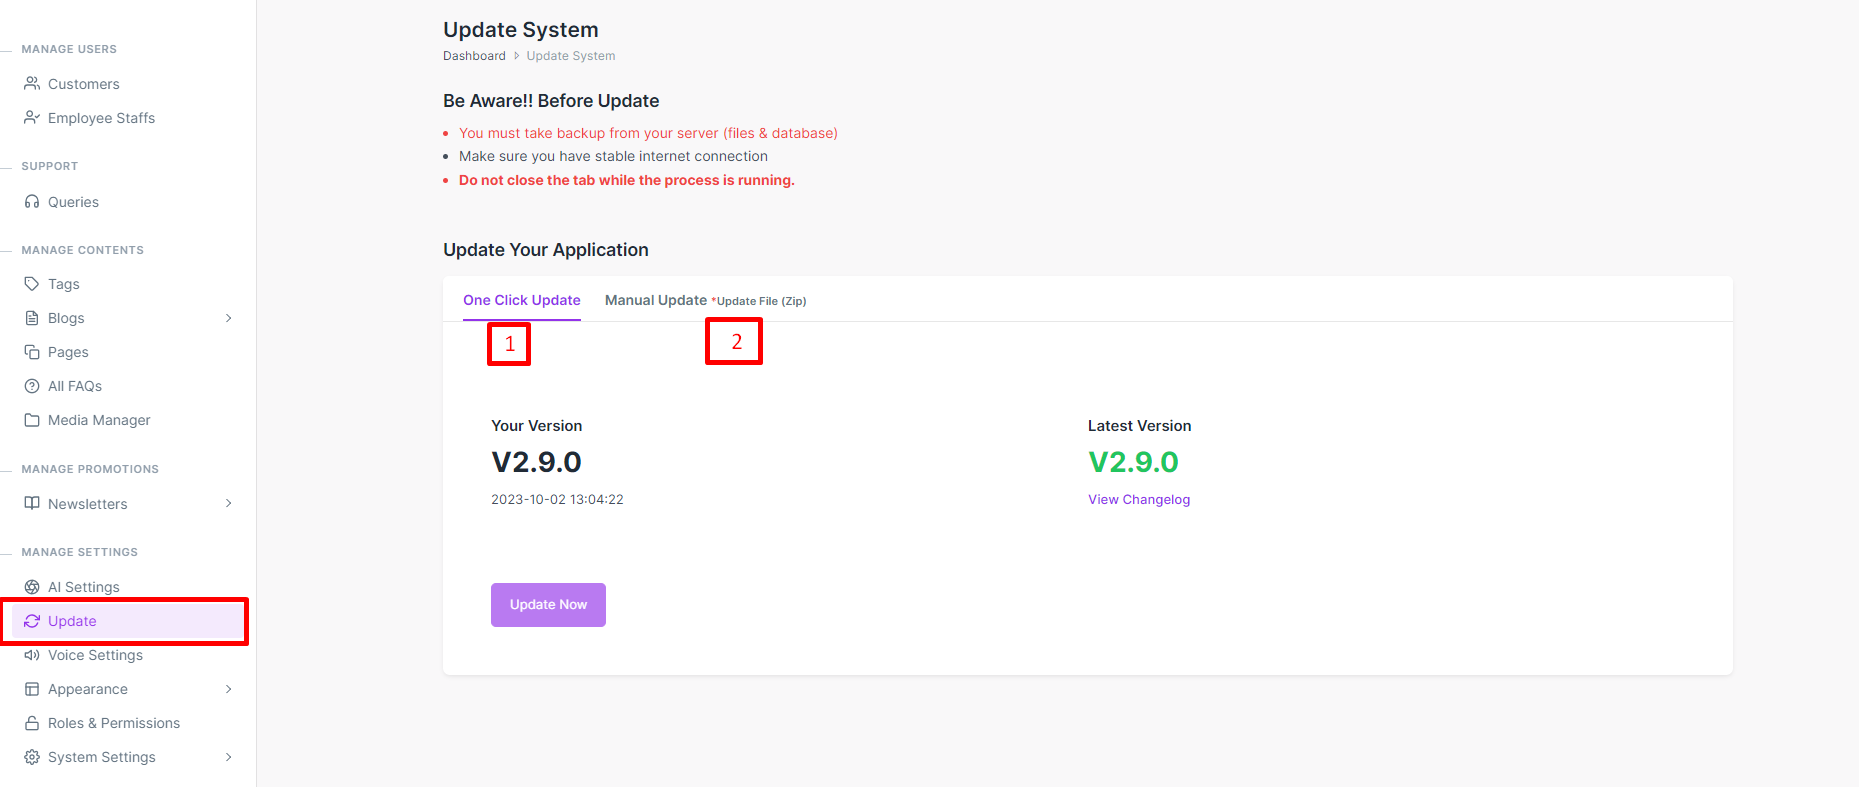
1 : One Click Update
-
Here Can see Current version and latest Veriosn
Note : No need to downloaded zip file . Just click it, system will be updated himself automatically and Only Admin can do this
2 : Menual Update
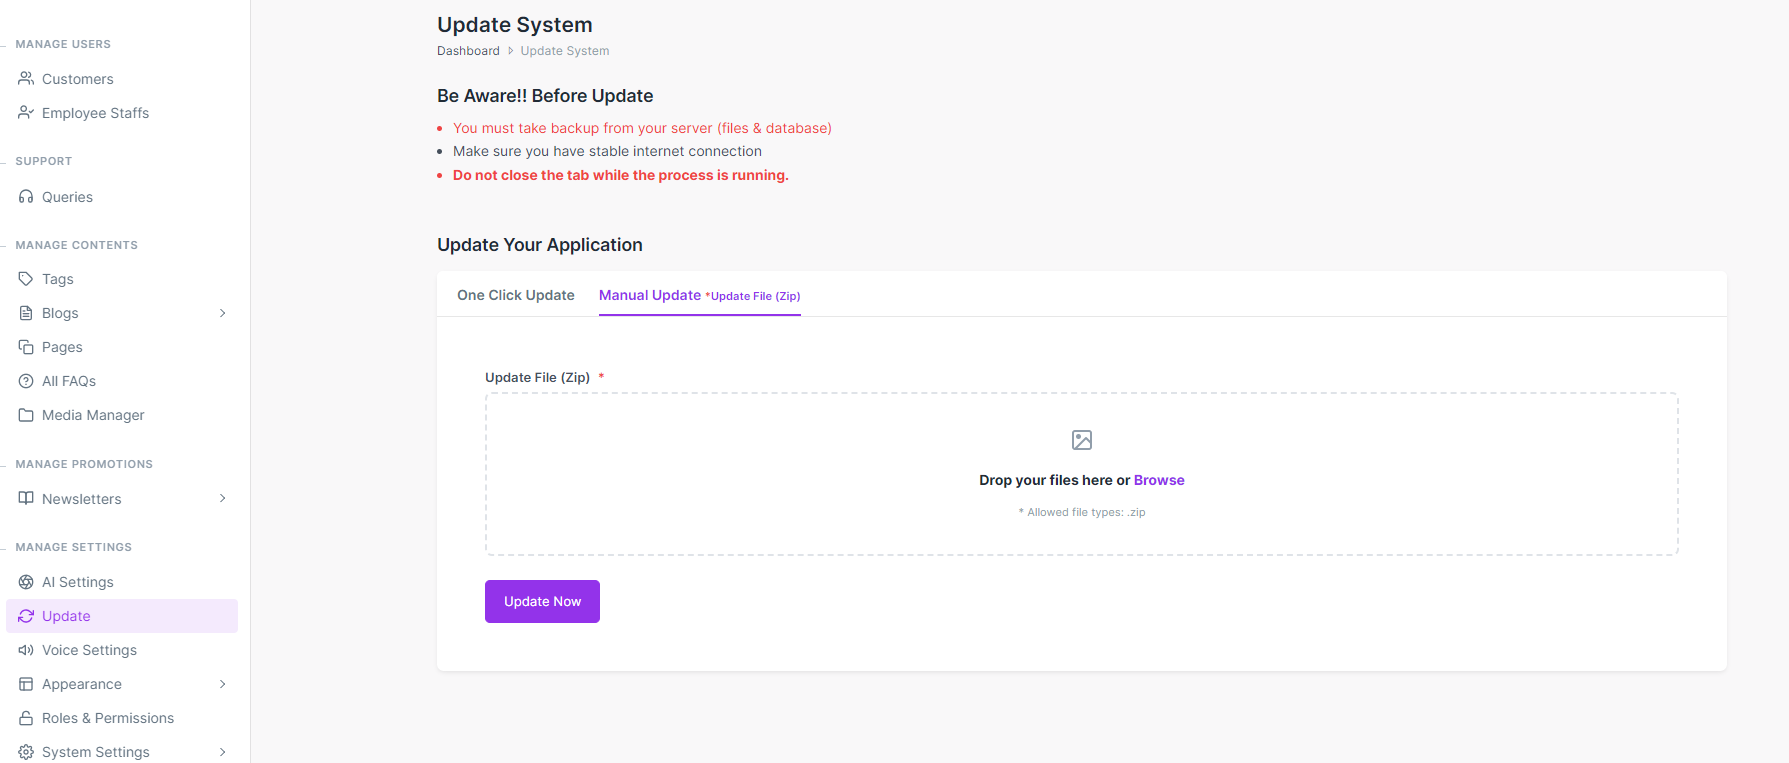
-
alert: If you are immediate latest version , download zip file and upload here
If You skip any version and you want to update latest version it will be not work try to One Click update
example : your version 2.8.0 and latest version comming (2.9.0) then you can update it from here
- Click on Proceed
Update File Permissions
- If you are using Shared Hosting & cPanel
- 1. Go to your application directory & Folder
- 2. Right-Click on Folder Name
- 3. Check the boxes as per screenshots
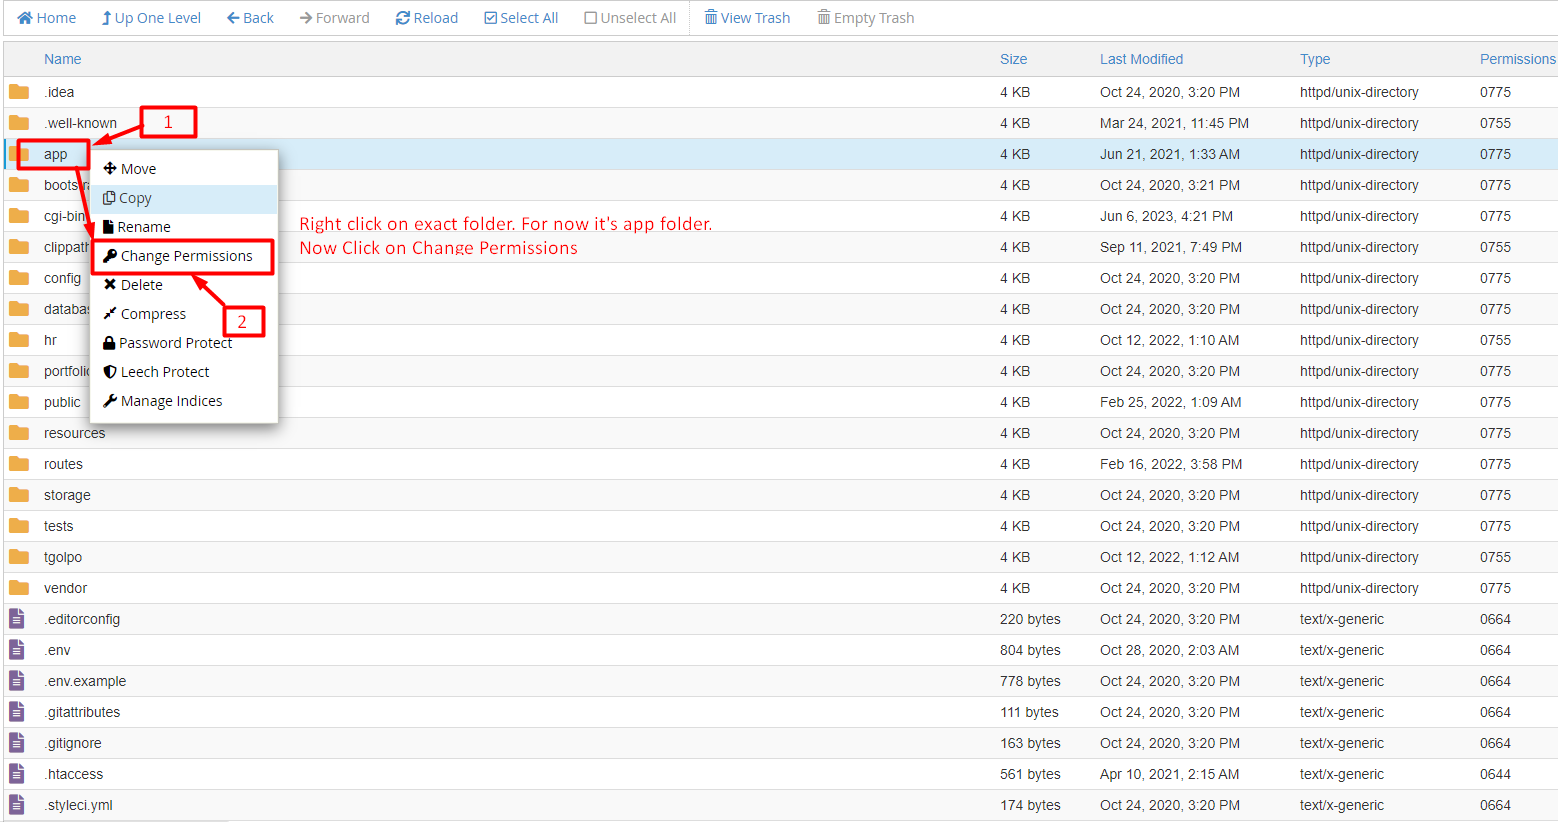
- Ex. Let's assume you are trying to give permission to your app folder as per image reference
- 1. You just have to right-click on app folder.
- 2. And you should see the list as image, Click on Change Permissions.
After click on Change Permissions.
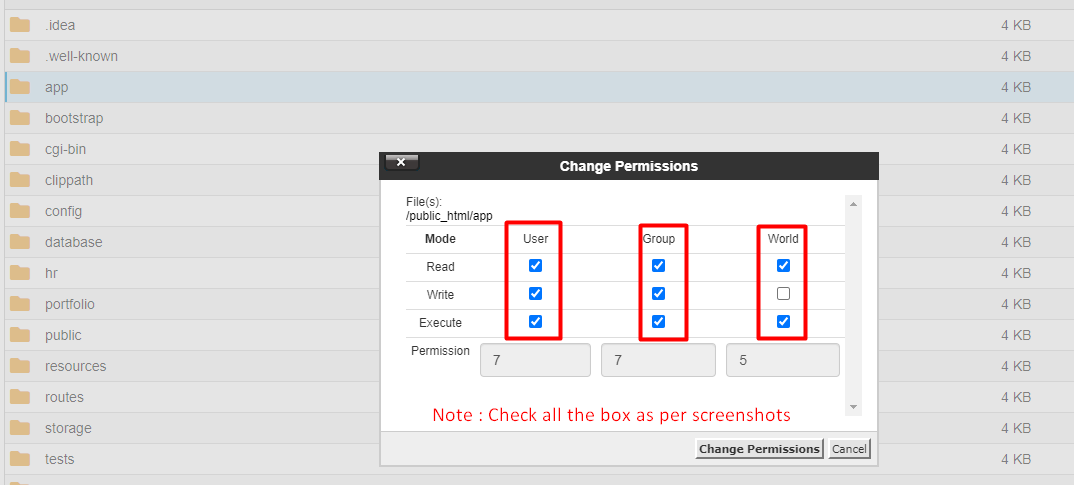
- Just mark check all the boxes as image
- Note : Same for file permissions(Ex. .php, .html, .css, .js, .yml, .png/jpg/webp/bimp/svg etc)
If you are using Linux Server
- 1. To give permission on specific folder
- 2. To give permission on specific file
1. To give permission on specific folder
sudo chmod -R 777 /var/www/html/yourApplicationFolder/app
-
Note: Here, sudo chmod -R 777 /var/www/html/yourApplicationFolder/app
app is a folder. And /var/www/html/html/yourApplicationFolder is a hosted directory
2. To give permission on specific file
sudo chmod -R 777 /var/www/html/yourApplicationFolder/app/Http/Controllers/MyAppController.php
-
Note: Here, sudo chmod -R 777 /var/www/html/yourApplicationFolder/app/Http/Controllers/MyAppController.php
MyAppController is a php file.
Social Login: Google App Setup
Sing in to continue to Google Cloud PlatformGo to https://console.cloud.google.com and sing in to enter the Google Cloud console.
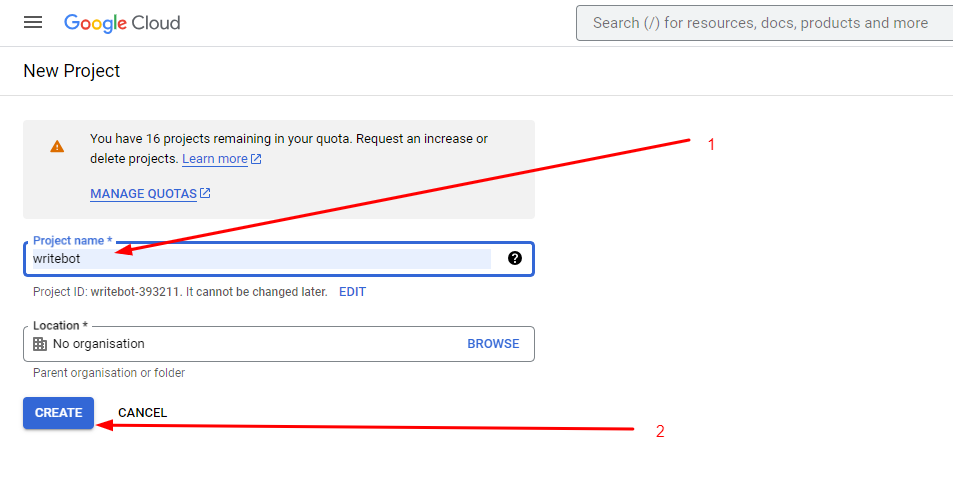
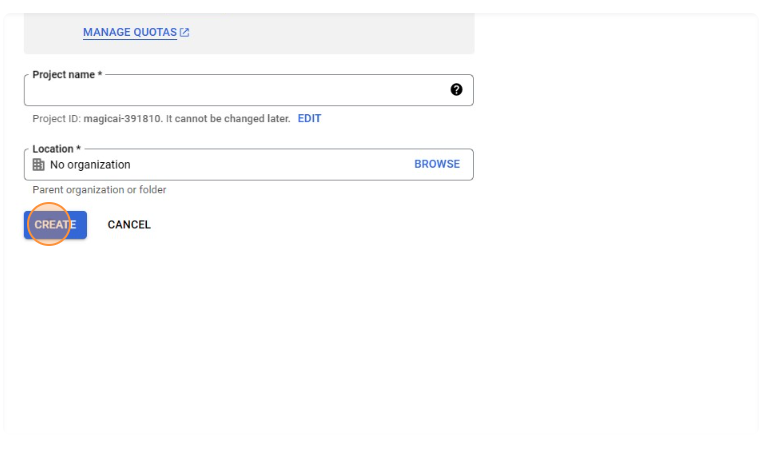
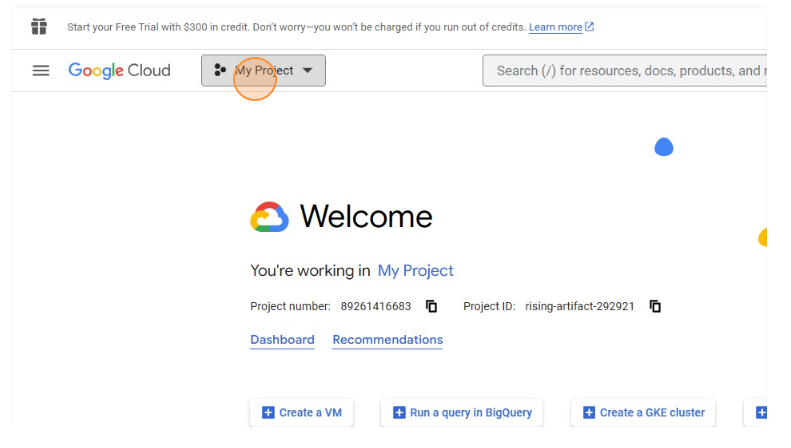
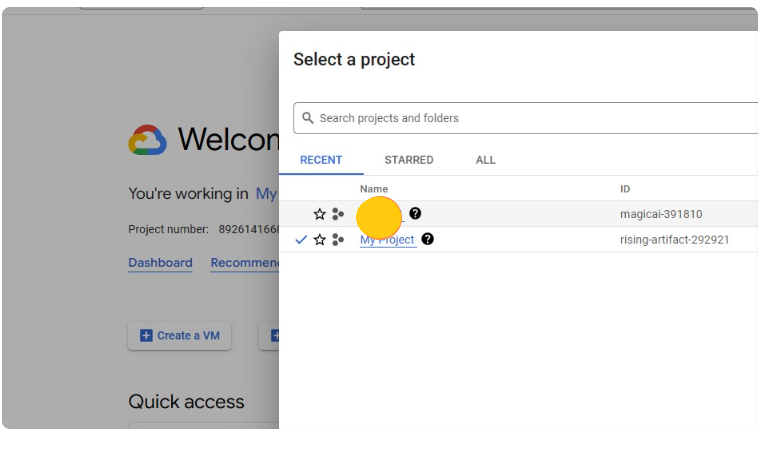
Create a projectClick the project button in the top menu and you'll see the Select a project pop-up. Click the NEW PROJECT button create a project.
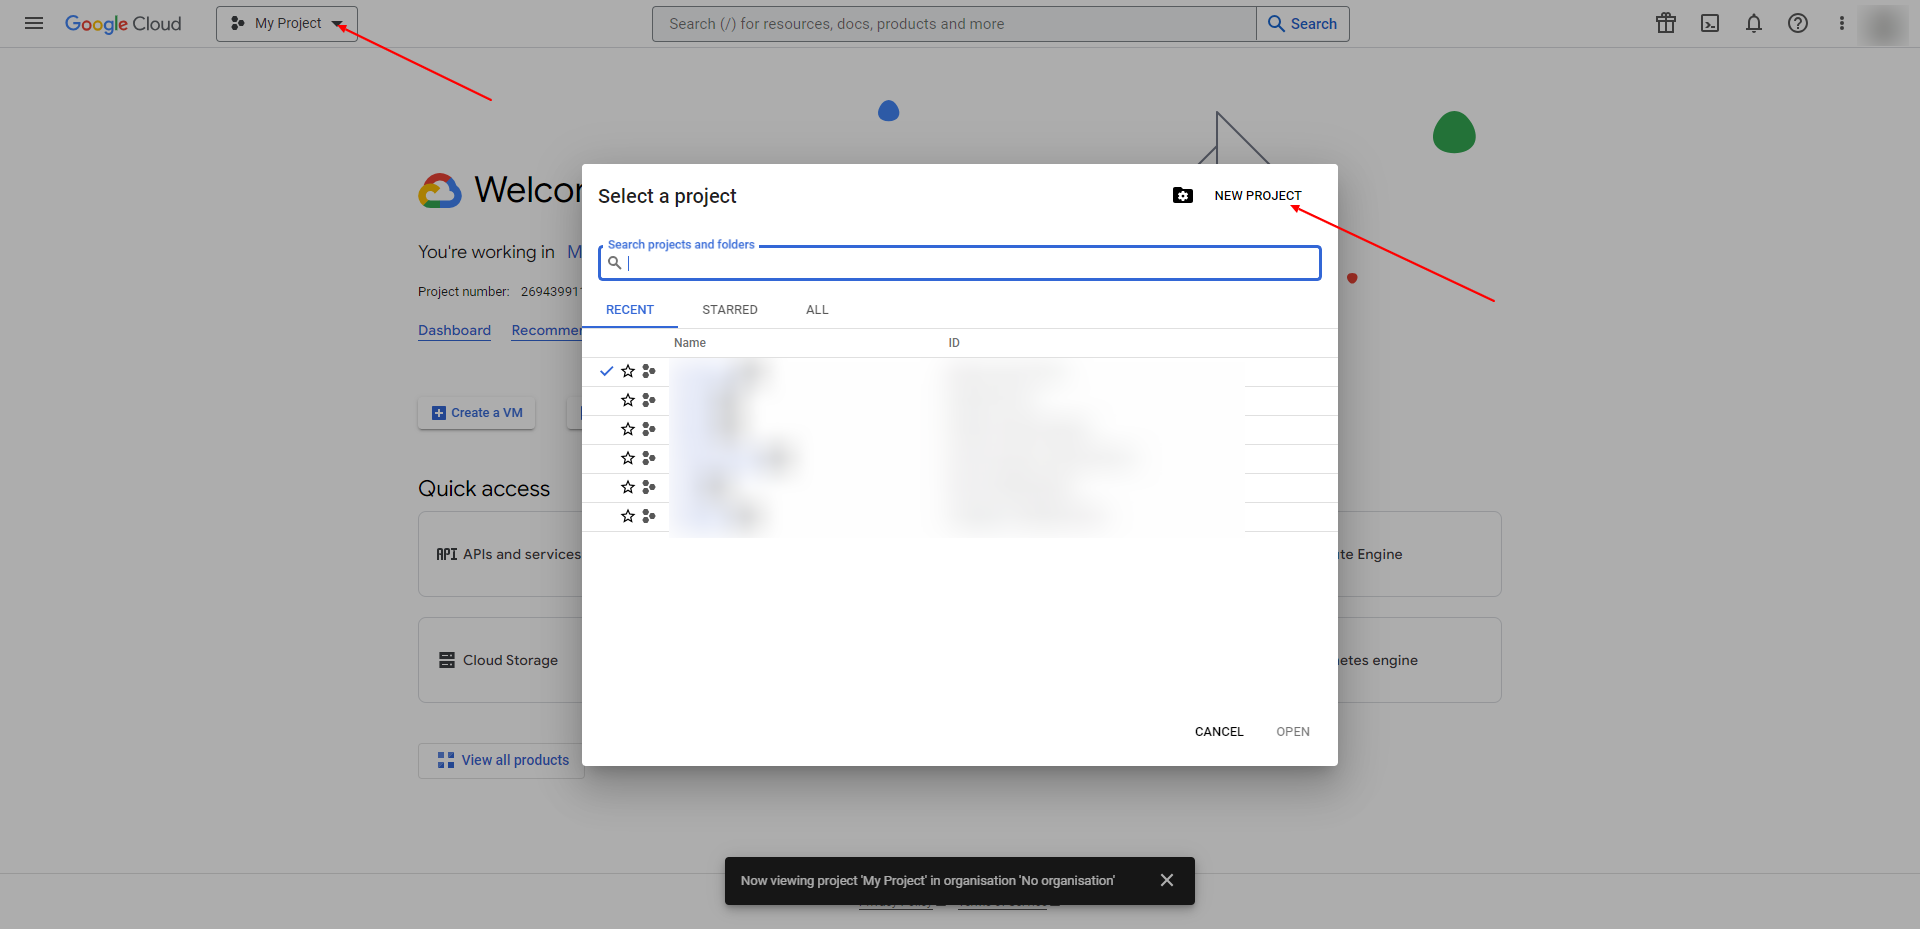
Enter the Project name and click the CREATE button.
 Start to configure the OAuth consent screen
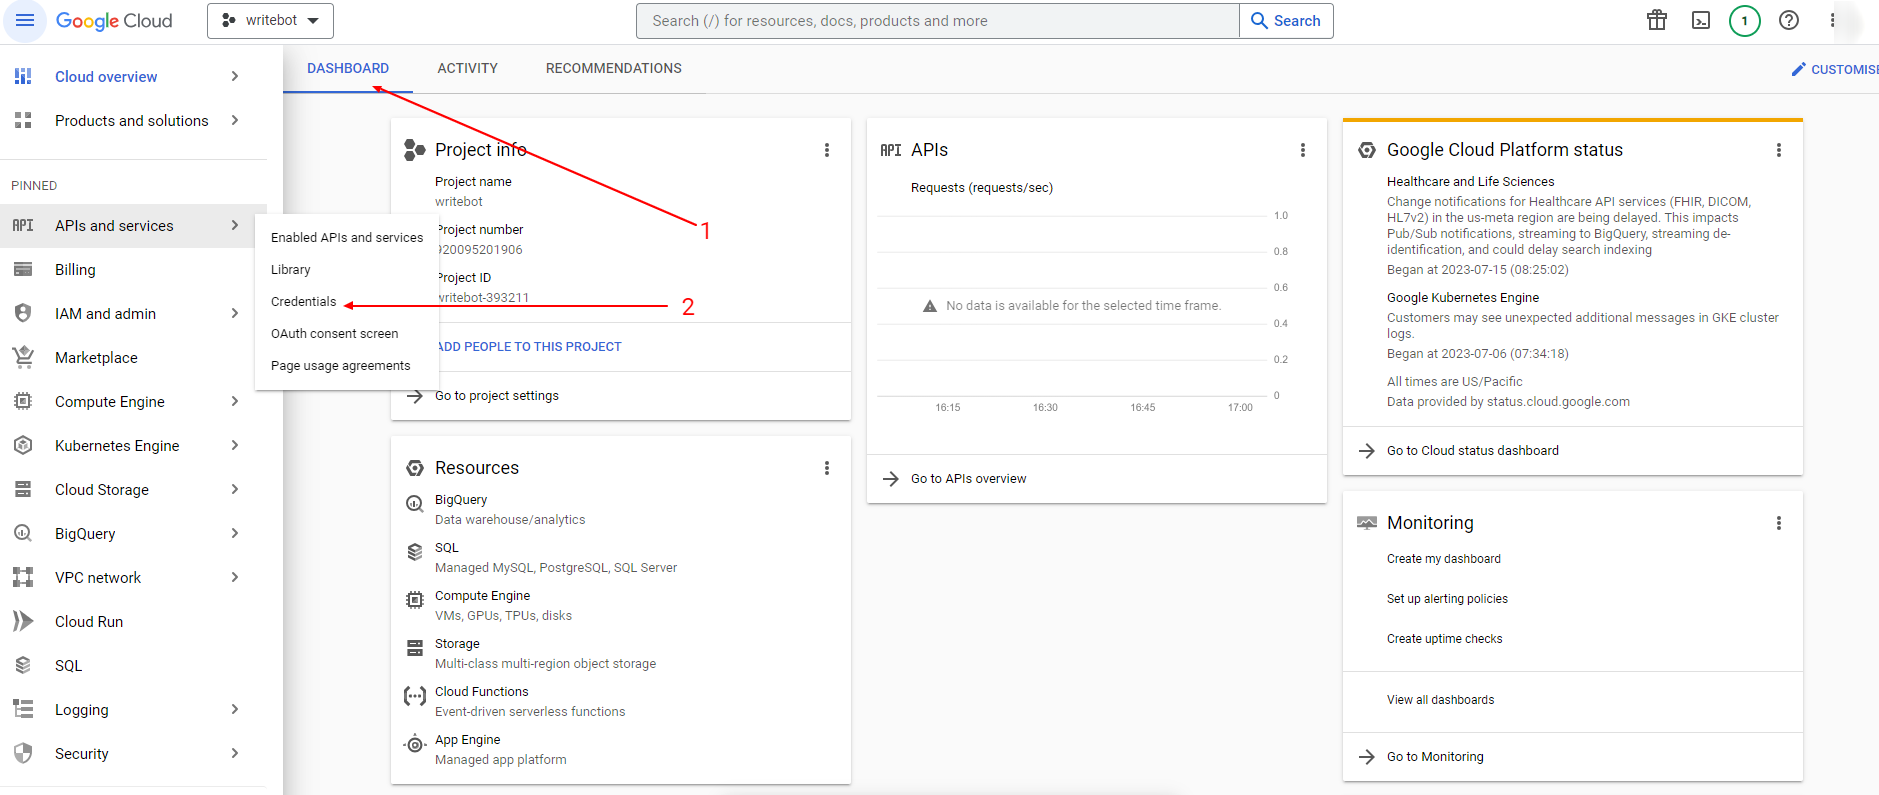
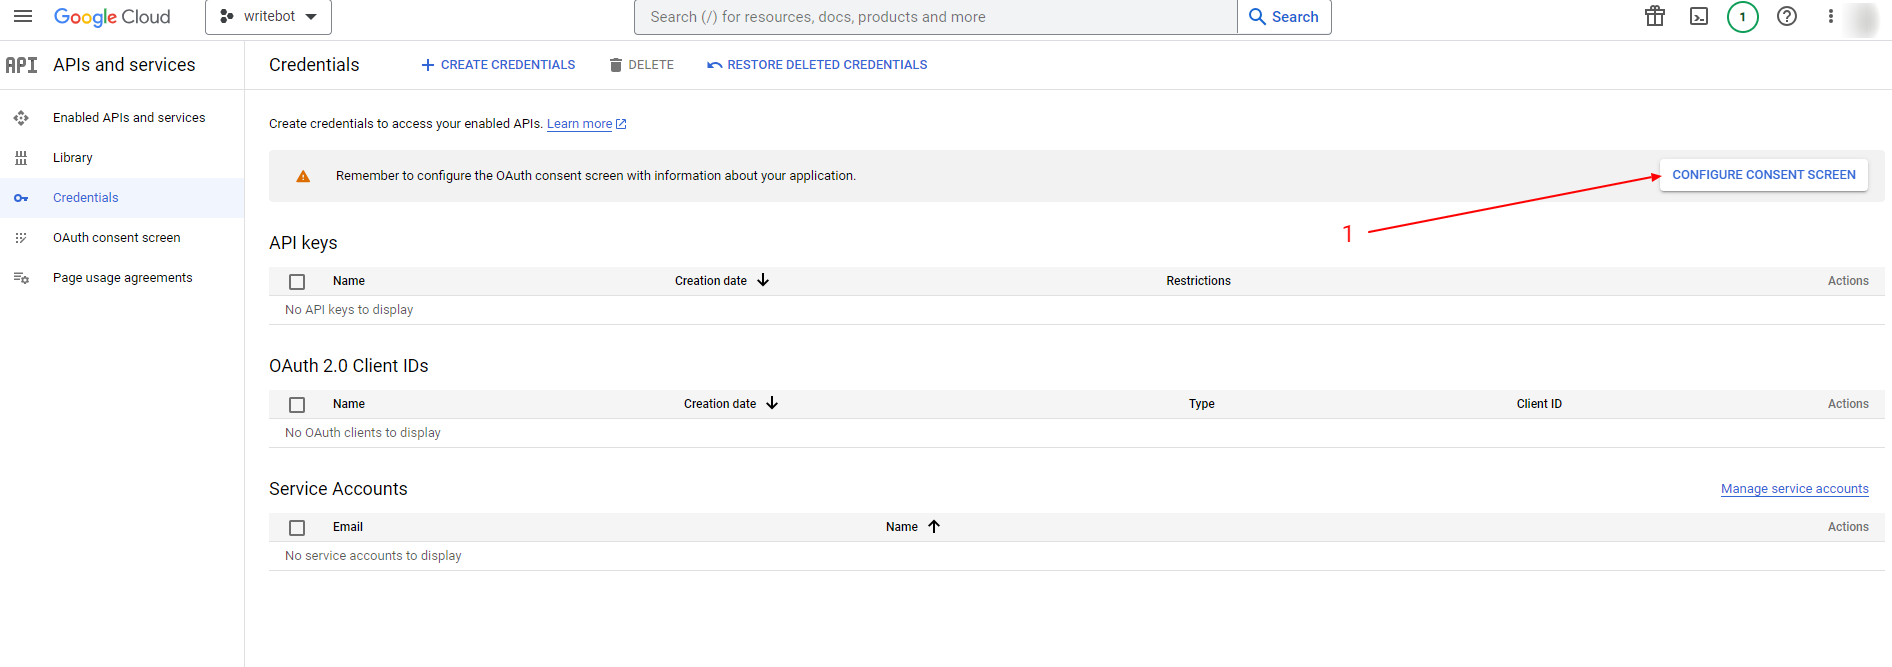
Once a project is created, go to . Select Credentials from the left-side menu then click the CONFIGURE CONSENT SCREEN button.
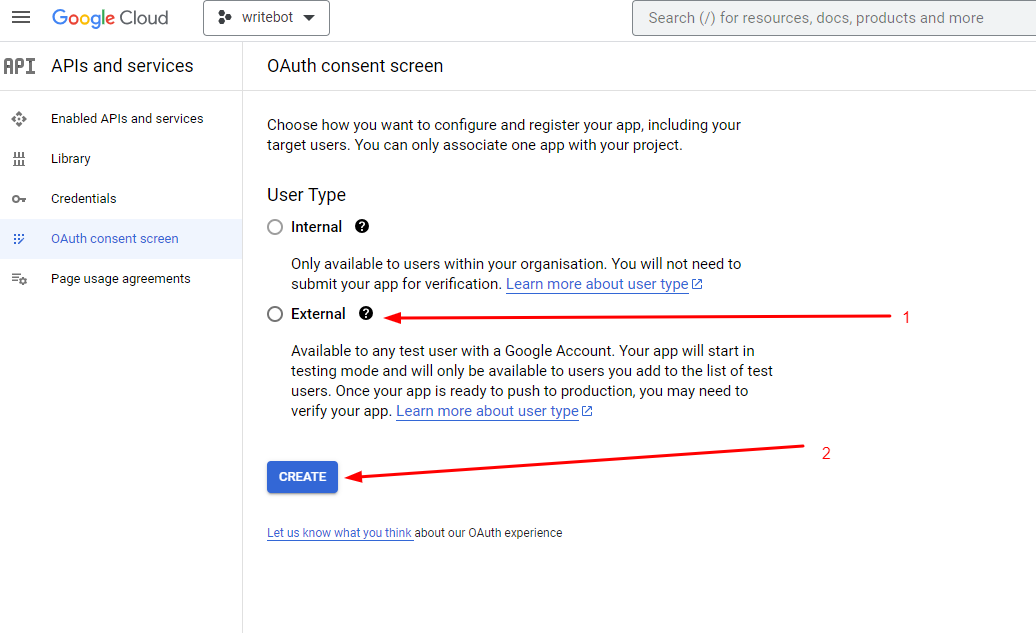
Choose the External in the User Type options, then click the CREATE button.
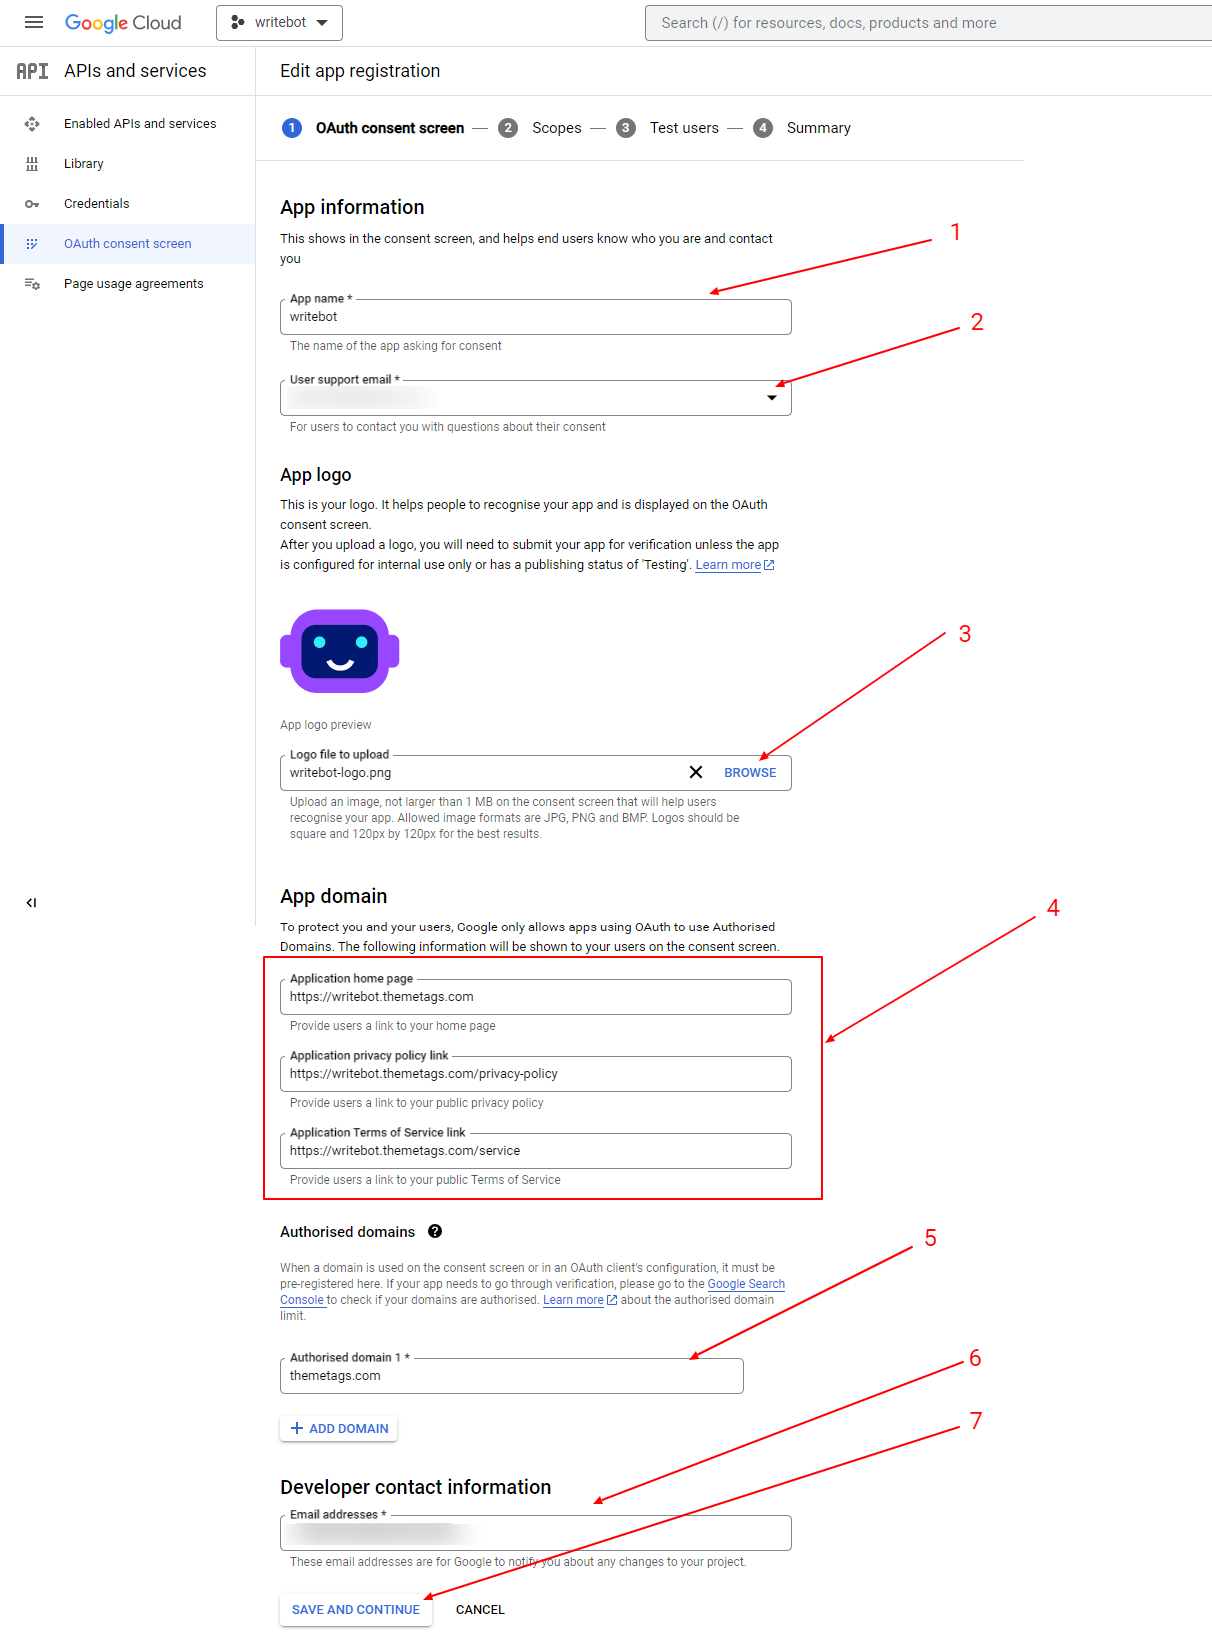
4. Edit app registration
Enter the App name, User support email, uploadApp logo.
Enter the Application home page, Application privacy policy link, Application terms and service link.
Enter your website domain.
Enter your contact Email addresses.
Continue to the next step by clicking the SAVE AND CONTINUE button.
You'll be on the step Scopes. Click the ADD OR REMOVE SCOPES button to select the scopes.
Select three required API Scopes:
- .../auth/userinfo.email
- .../auth/userinfo.profile
- openid
Once selected click on the UPDATE button.
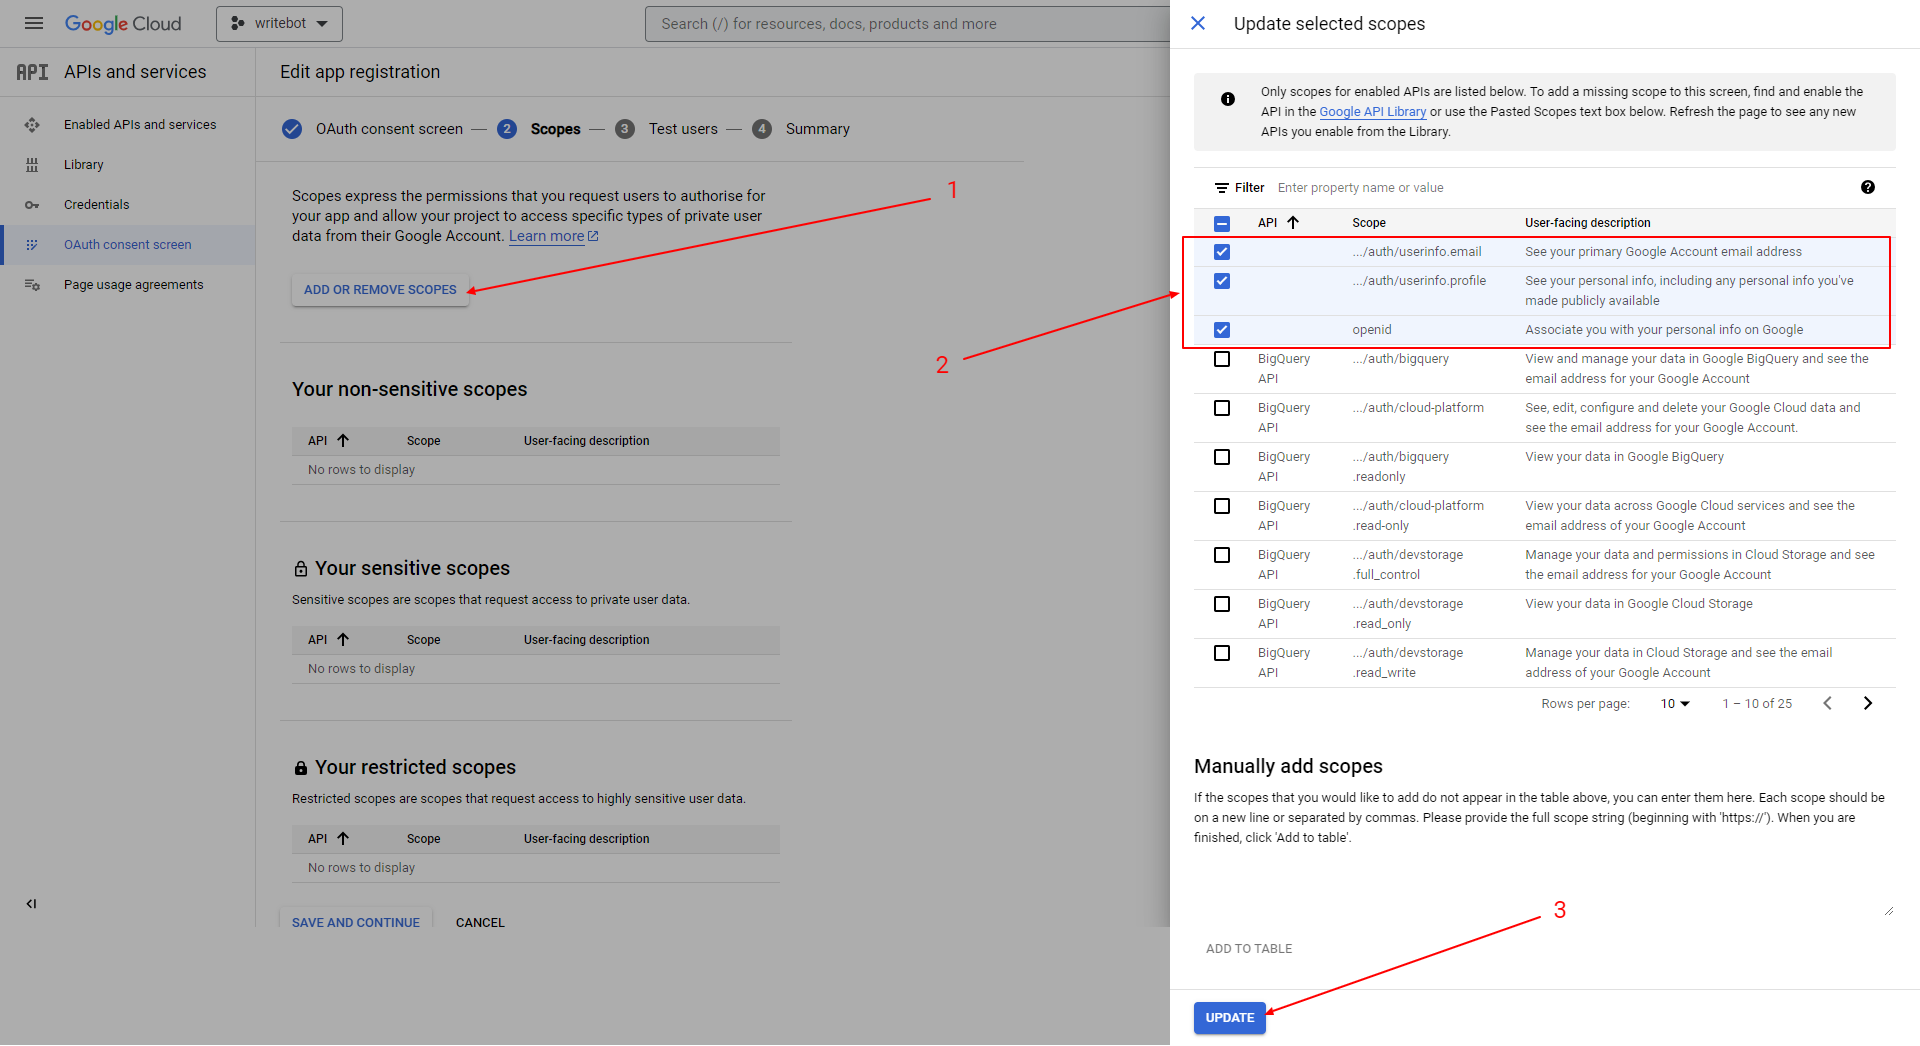
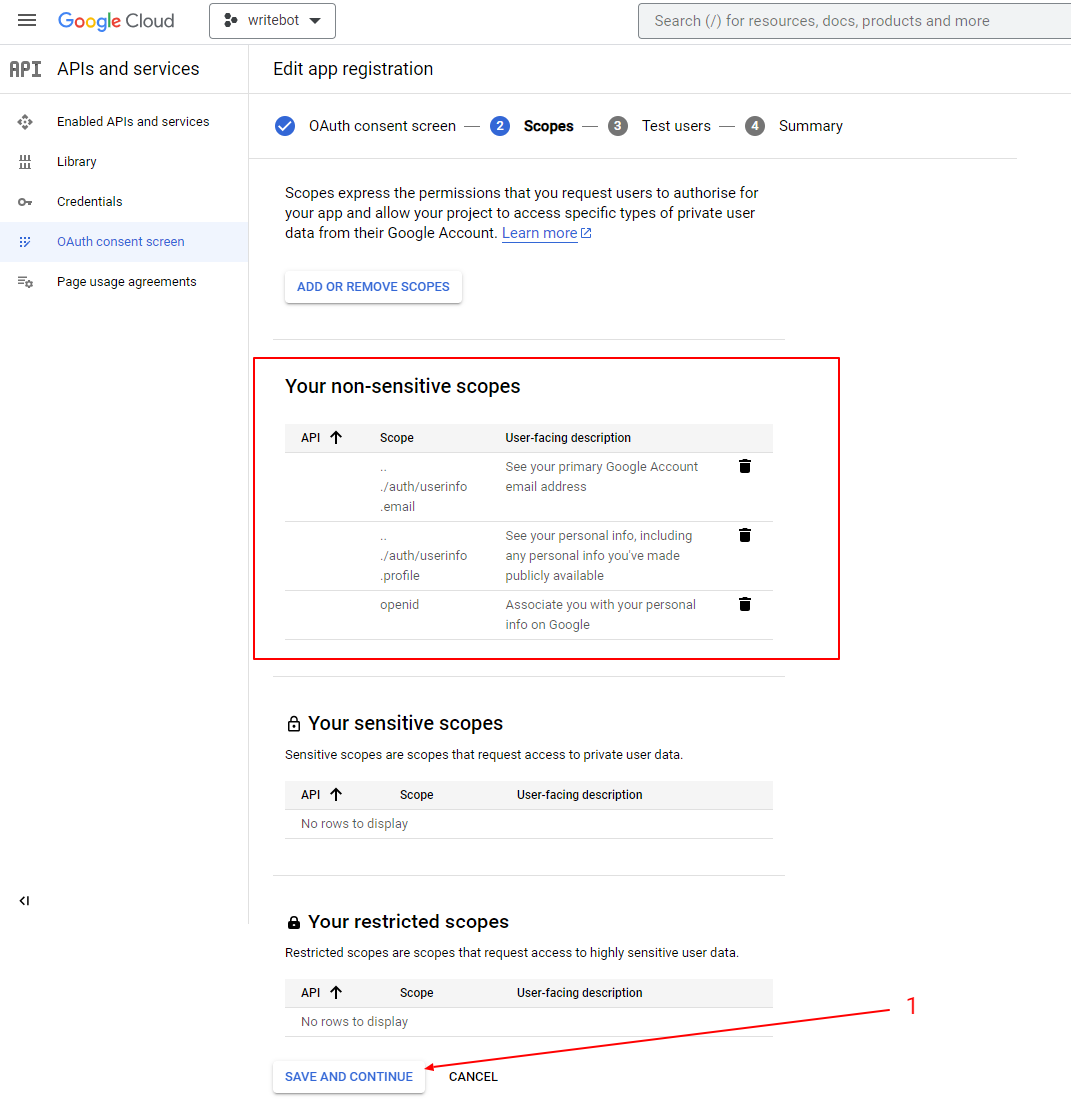
The selected scopes will now appear on the Your non-sensitive scopes section.
Continue to the next step by clicking on the SAVE AND CONTINUE button.
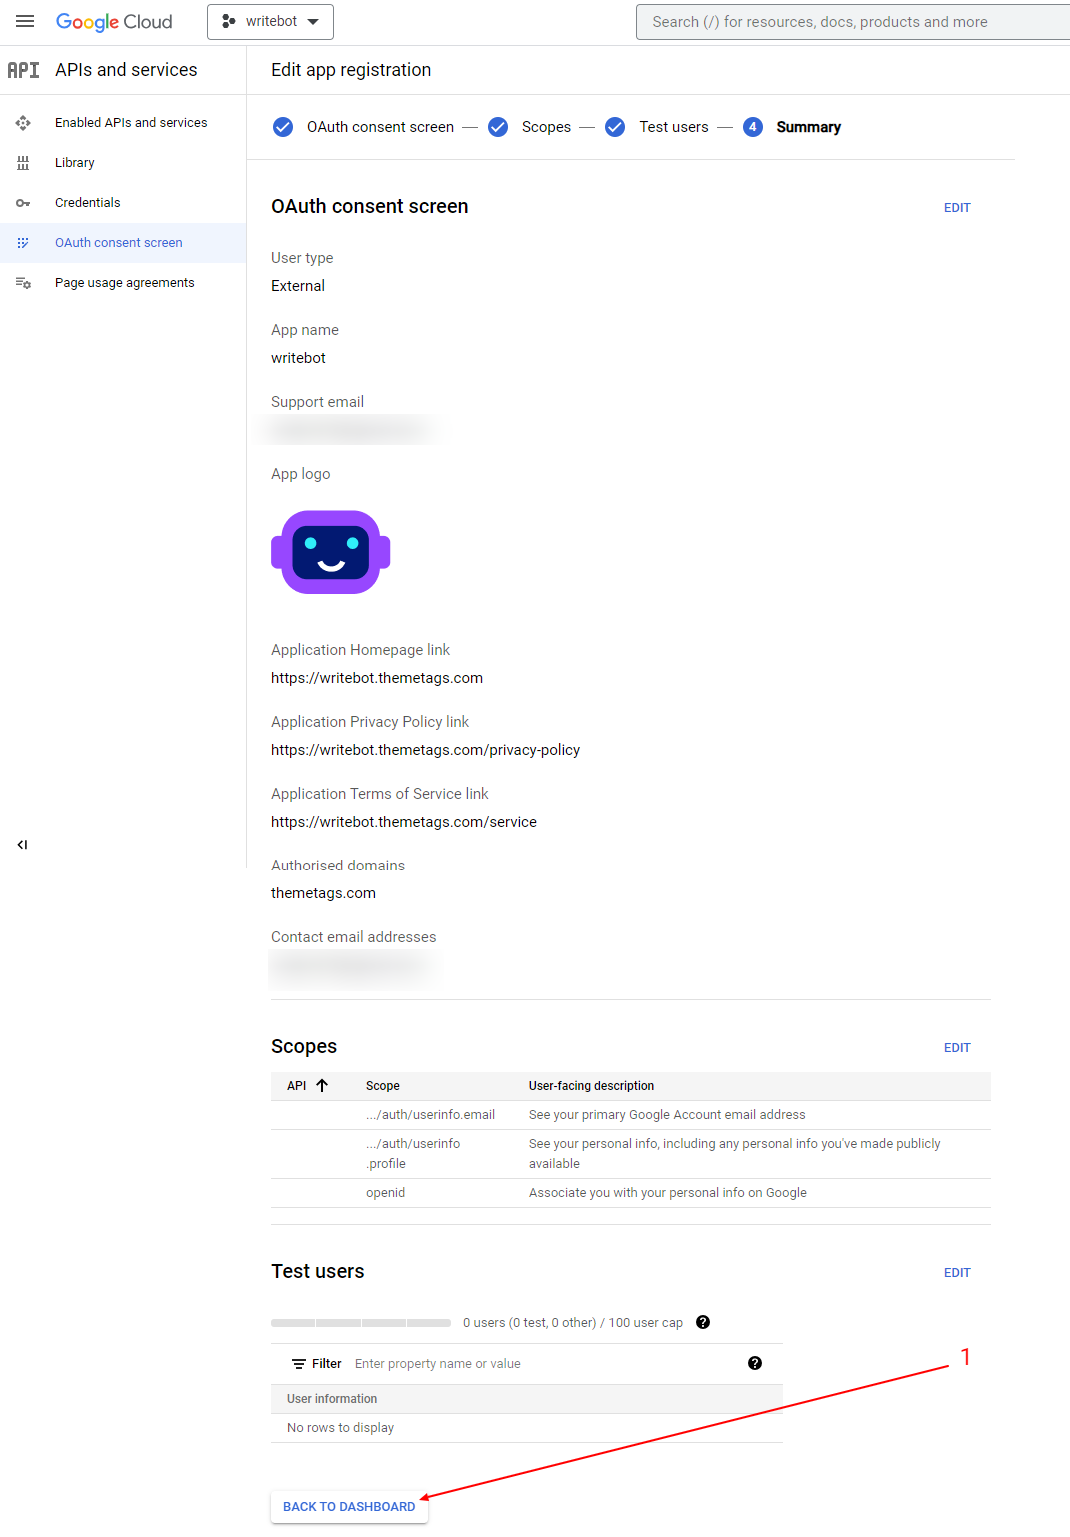
You'll be on the step Summary that shows you the outline of your app registration. Click the BACK TO DASHBOARD button.
Select Credentials from the left-side menu. Click the CREATE CREDENTIALS button and select the OAuth client ID item.
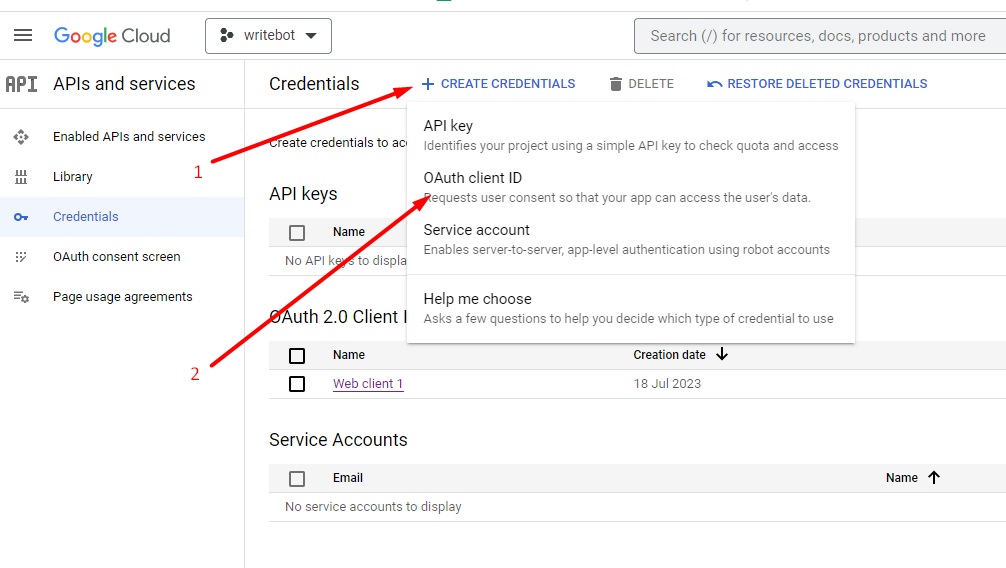
Once clicked, it'll take you to the Create OAuth client ID page.
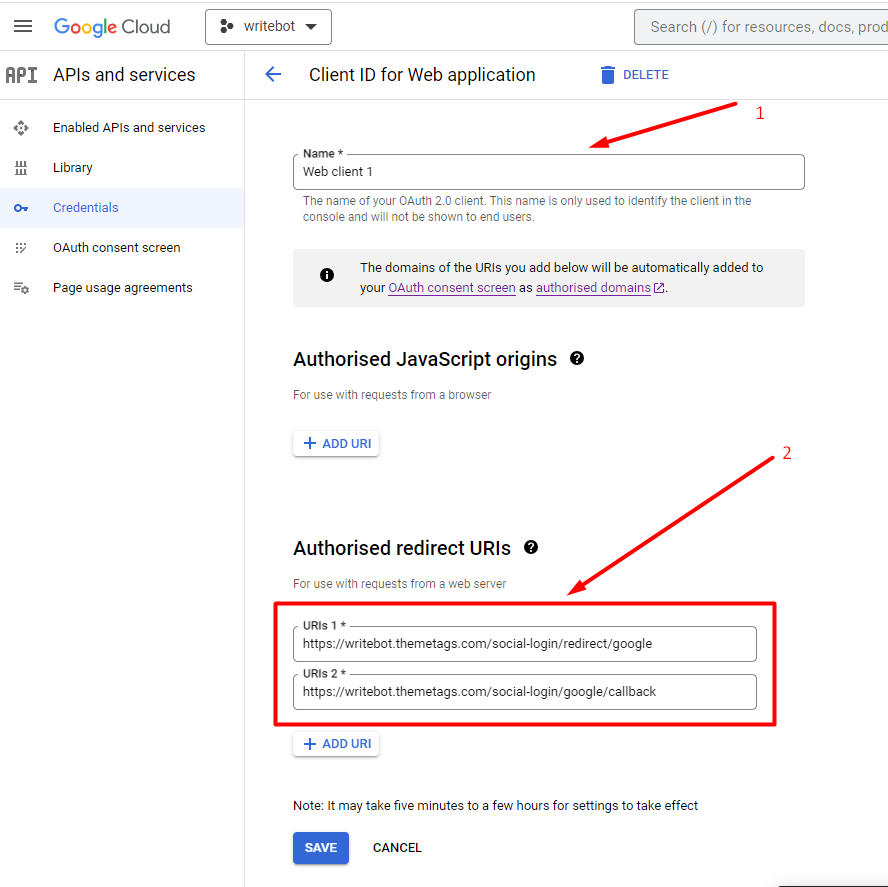
Select the Web application option in the Application type . Enter a name of your OAuth 2.0 client in the Name field.
Enter allowed redirect URLs in the Authorized redirect URIs section.
- https://writebot.themetags.com/social-login/redirect/google
- https://writebot.themetags.com/social-login/google/callback
Click the CREATE button.
Once you click the button, the OAuth client created pop-up will appear or you can see like this images of and you'll see your application keys.

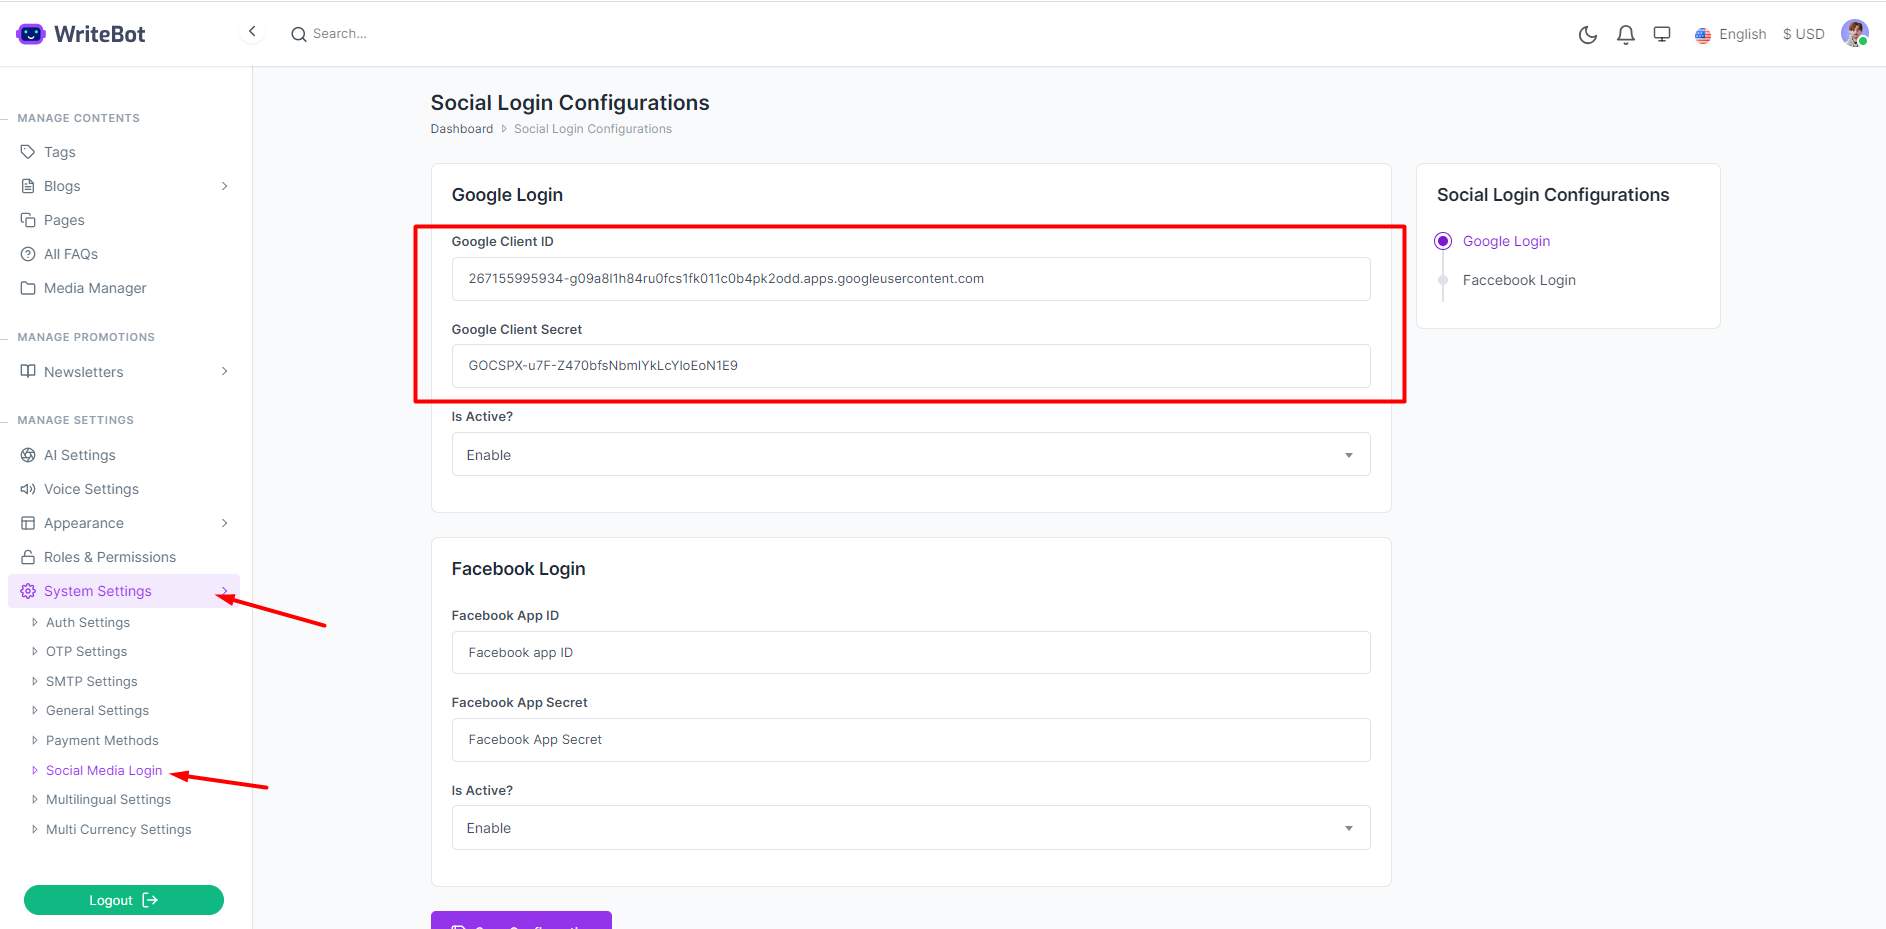
Now got to writebot admin panel System setting Social media setting, Then input the Google Client ID and Google Client Secret id.
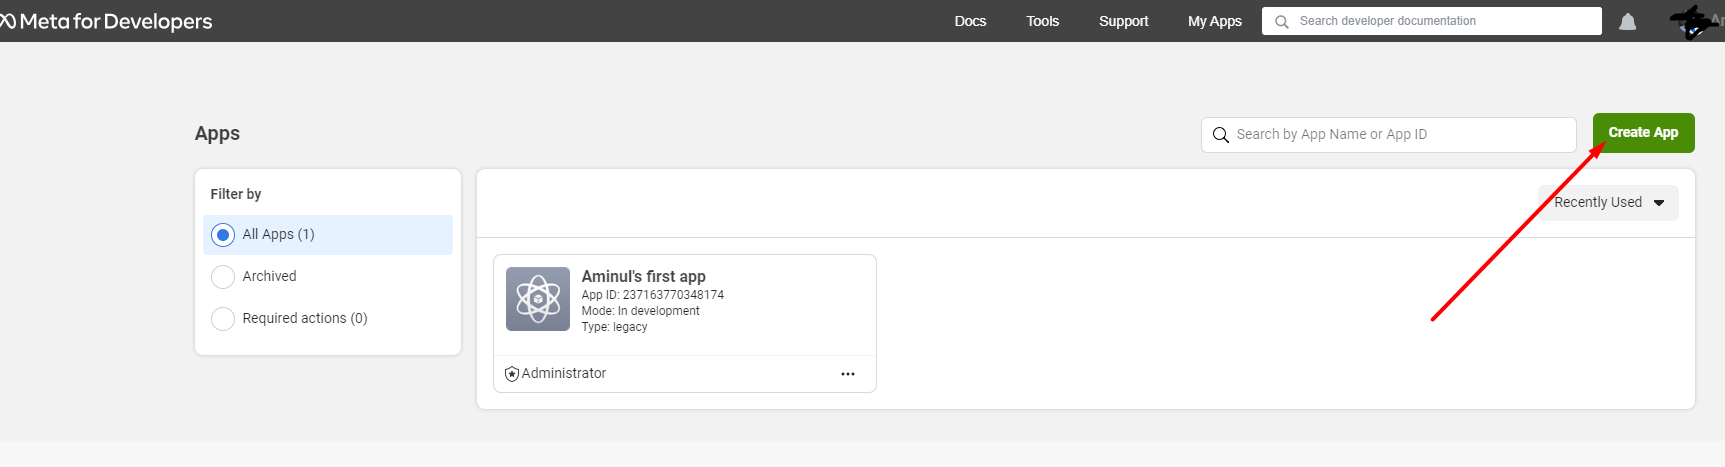
- You need to create a Facebook app to allow users to log in to your site with their Facebook account. To create a new Facebook app, please do the following:
- Go to the Facebook Developers site: https://developers.facebook.com/.
- If you are not logged in, log in to the site using your Facebook account details.
- Once logged in, go to My Apps.

- Click on Create App button. It will lead you to the app
creations page.
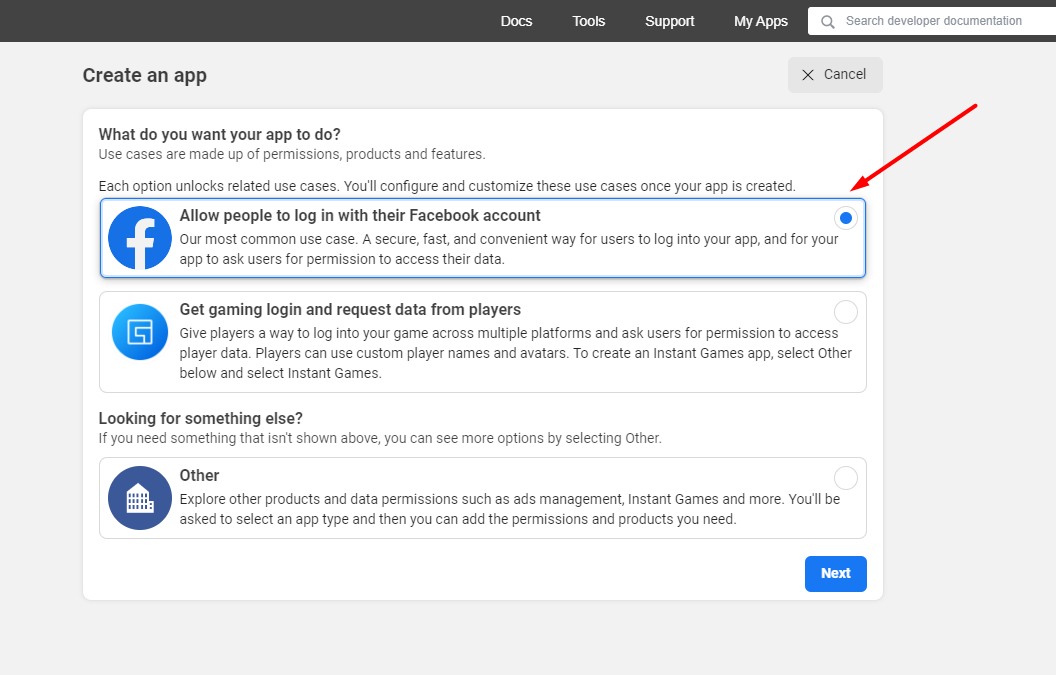
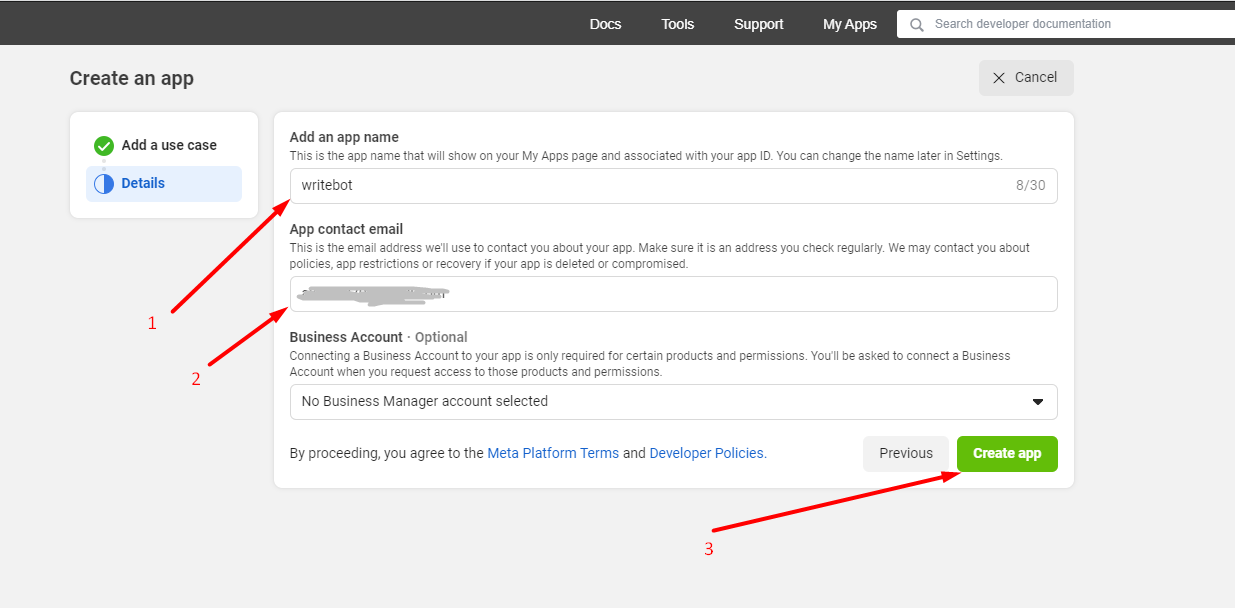
You'll be asked here " Which use case do you want to add to your app?" Select "Set up Facebook Login" then click on the Next button to continue.
- Fill out the App Name, and App Contact
Email. Then click the Create App button.
Overview
This document provides instructions on properly setting up a Facebook application so that users can log in/register via Facebook on your site. You will need to purchase the social login extension if you want users to log in via Facebook.
Creating a new app
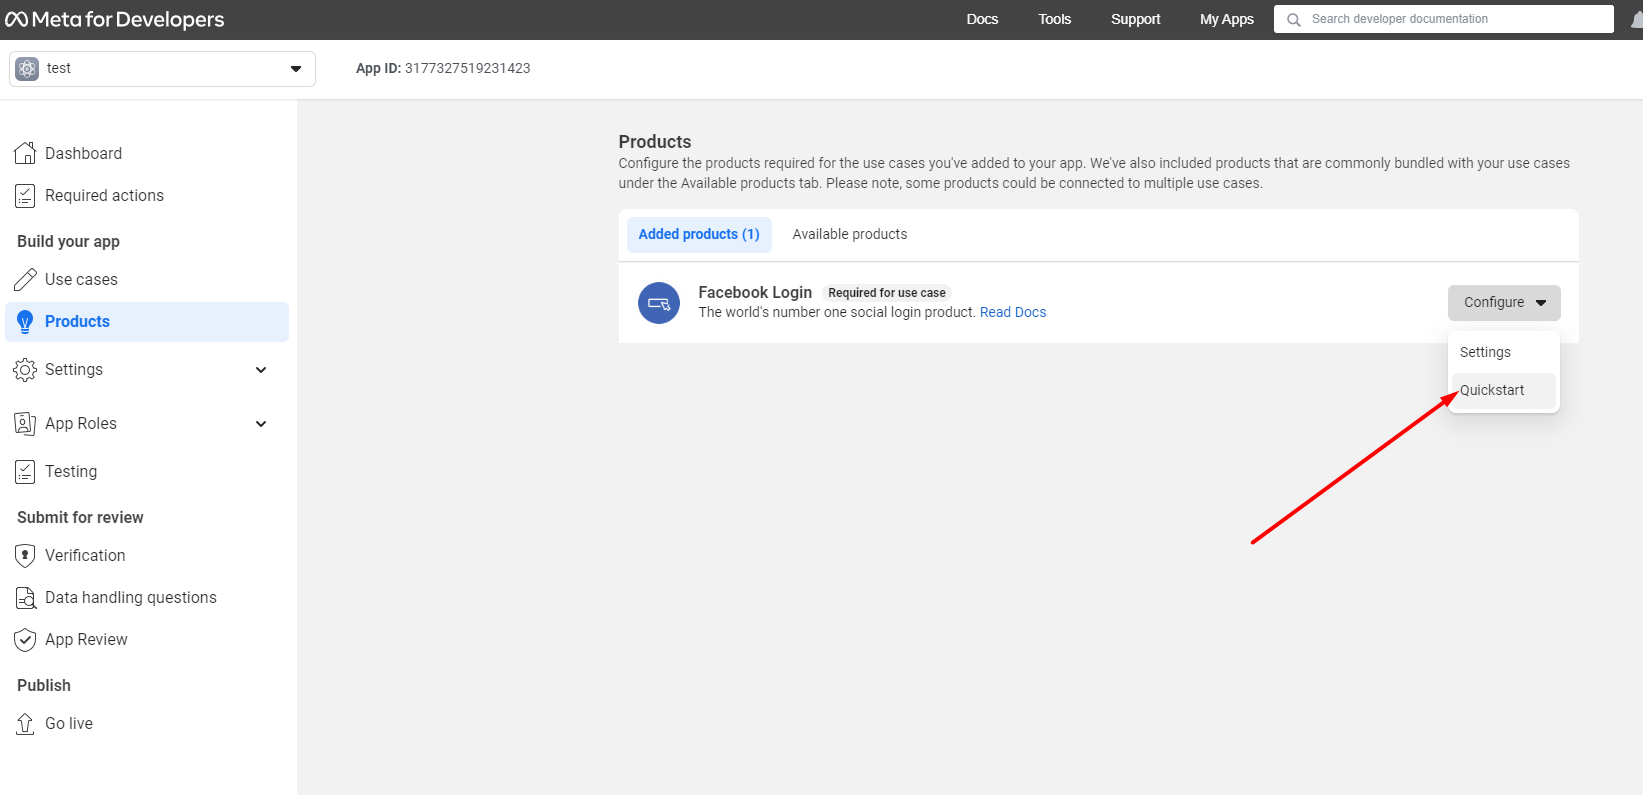
You will then get redirected to the App Dashboard page. On the left-side menu, go to Products

Click on Quickstart from
the Configure drop-down in the Facebook
Login product.
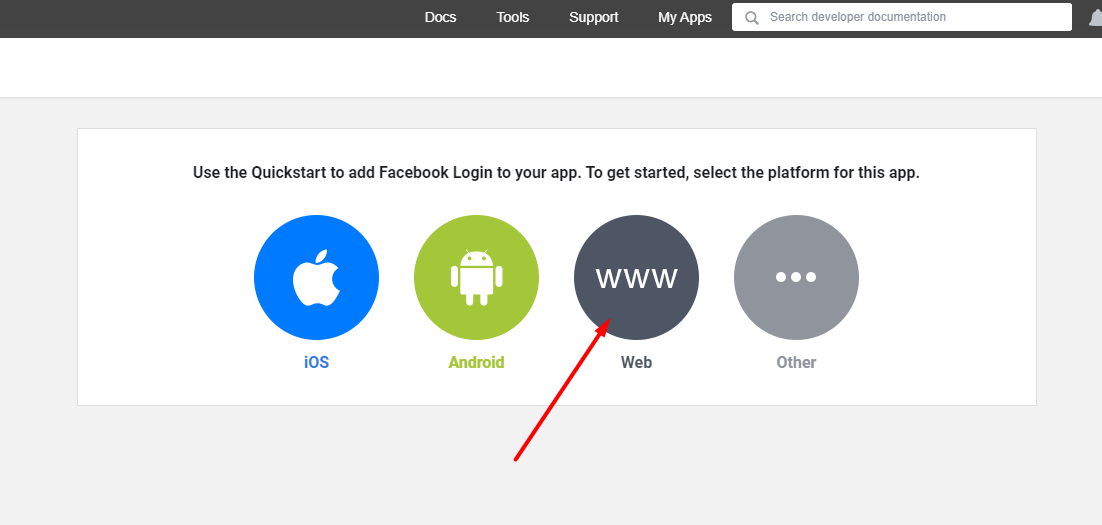
Select the Web from the platform if you want to add a Facebook login to your app.
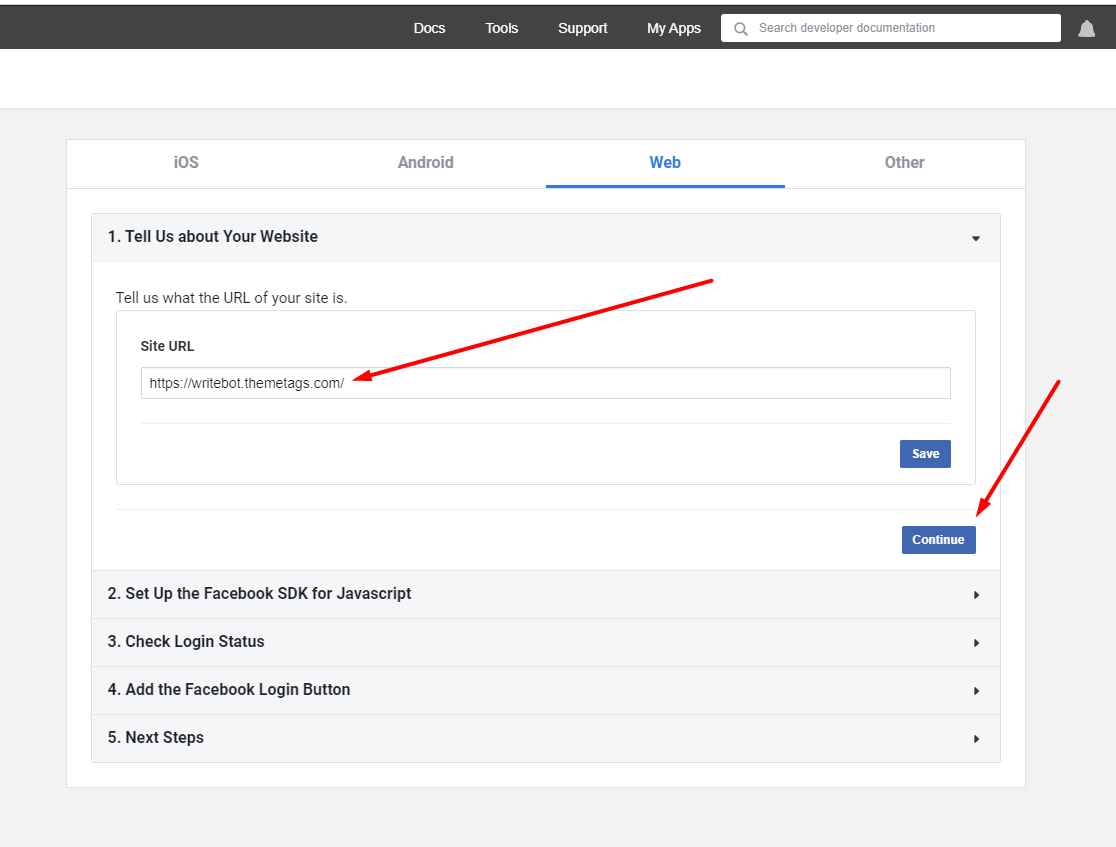
Note: Add your website URL to the " Site URL " field as shown in the image below. Then click on the Save & Continue buttons.
Setting up the app
After you've completed creating the app, head to the app's navigation menu. You need to do the steps below before your app setup is complete.
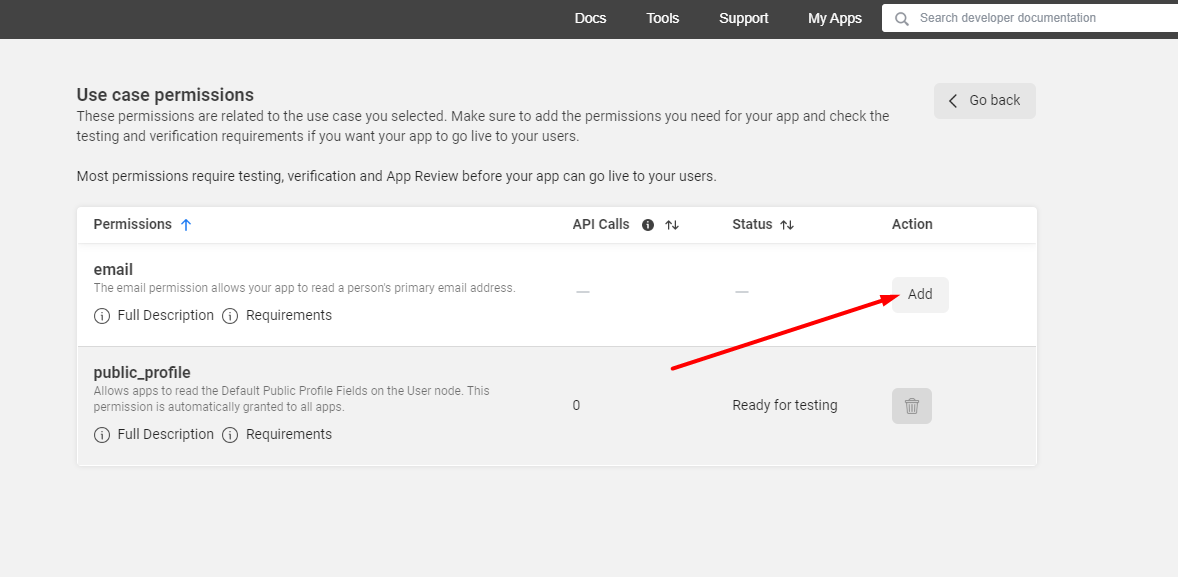
Go to App Review > Request Permissions and Features 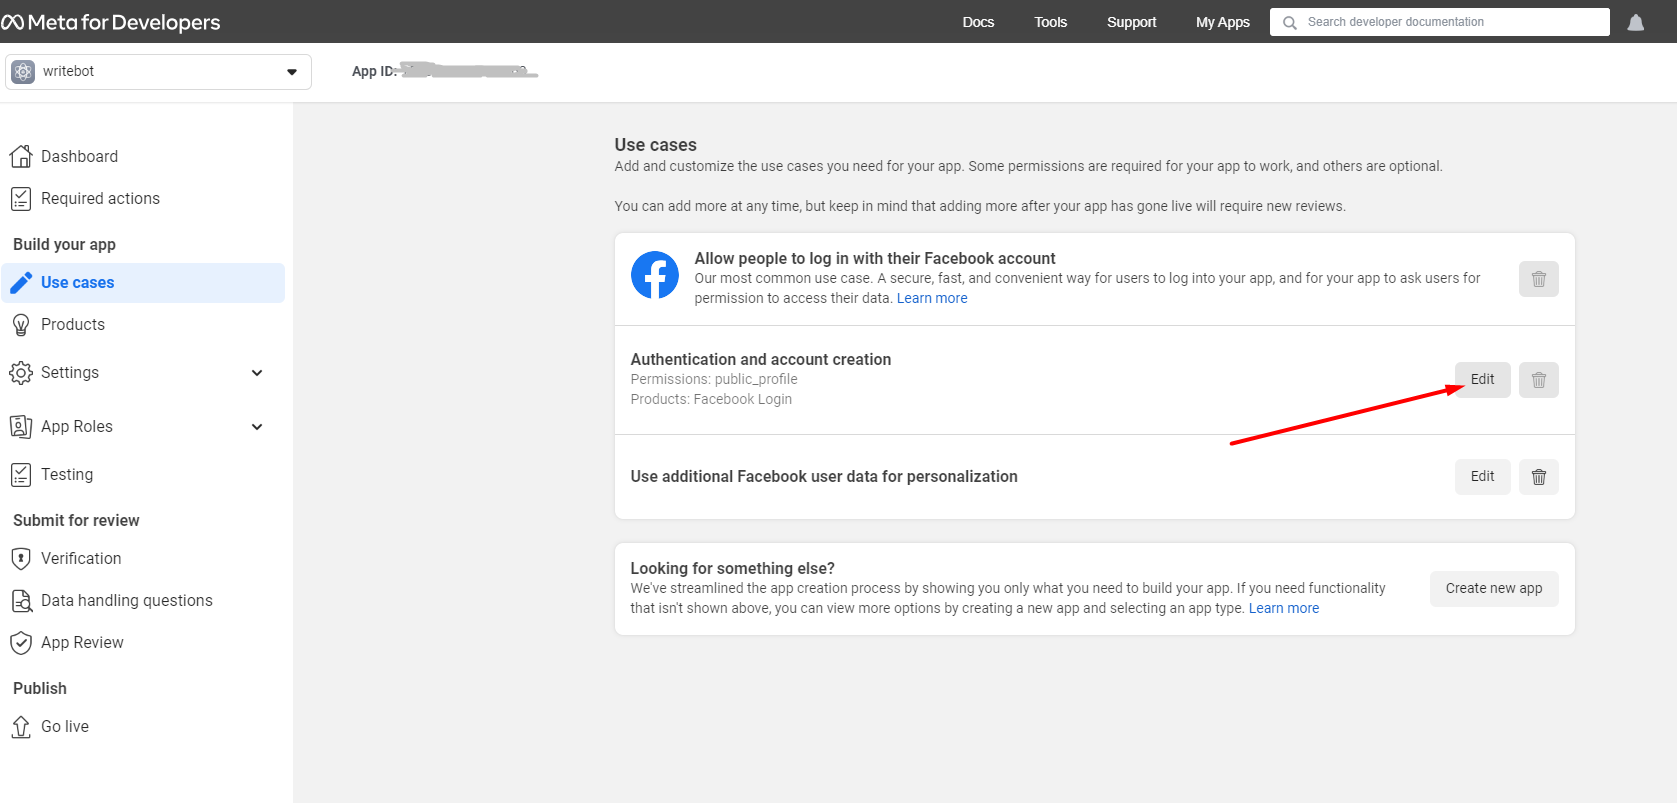
When you click on the Request Permissions or Features button, you'll be redirected to Facebook Login Use Cases. You can set the permissions for scopes here. Add public_profile and email permission by clicking on the "Add" button.
Go to Settings > Basic

When you scroll down the page, you will find the Website section. Add your Site URL, then click the Save Changes button.
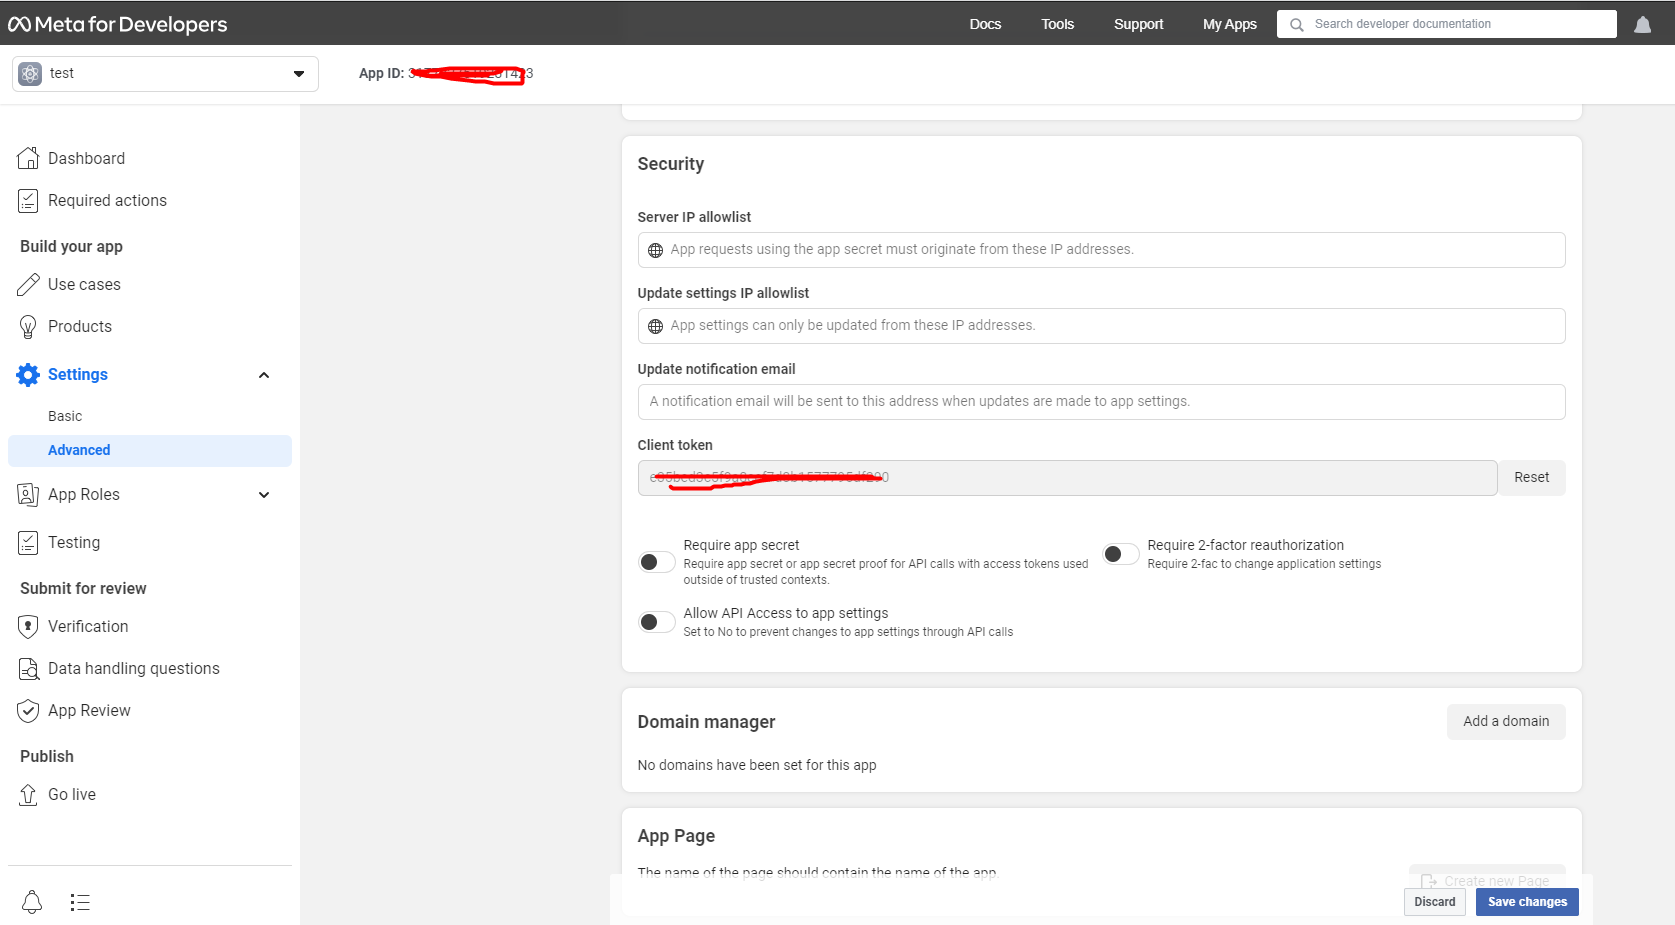
Go to Settings > Advanced
App Restrictions - You can restrict your app to a specific age range and countries if your site references alcohol or an adult nature site.
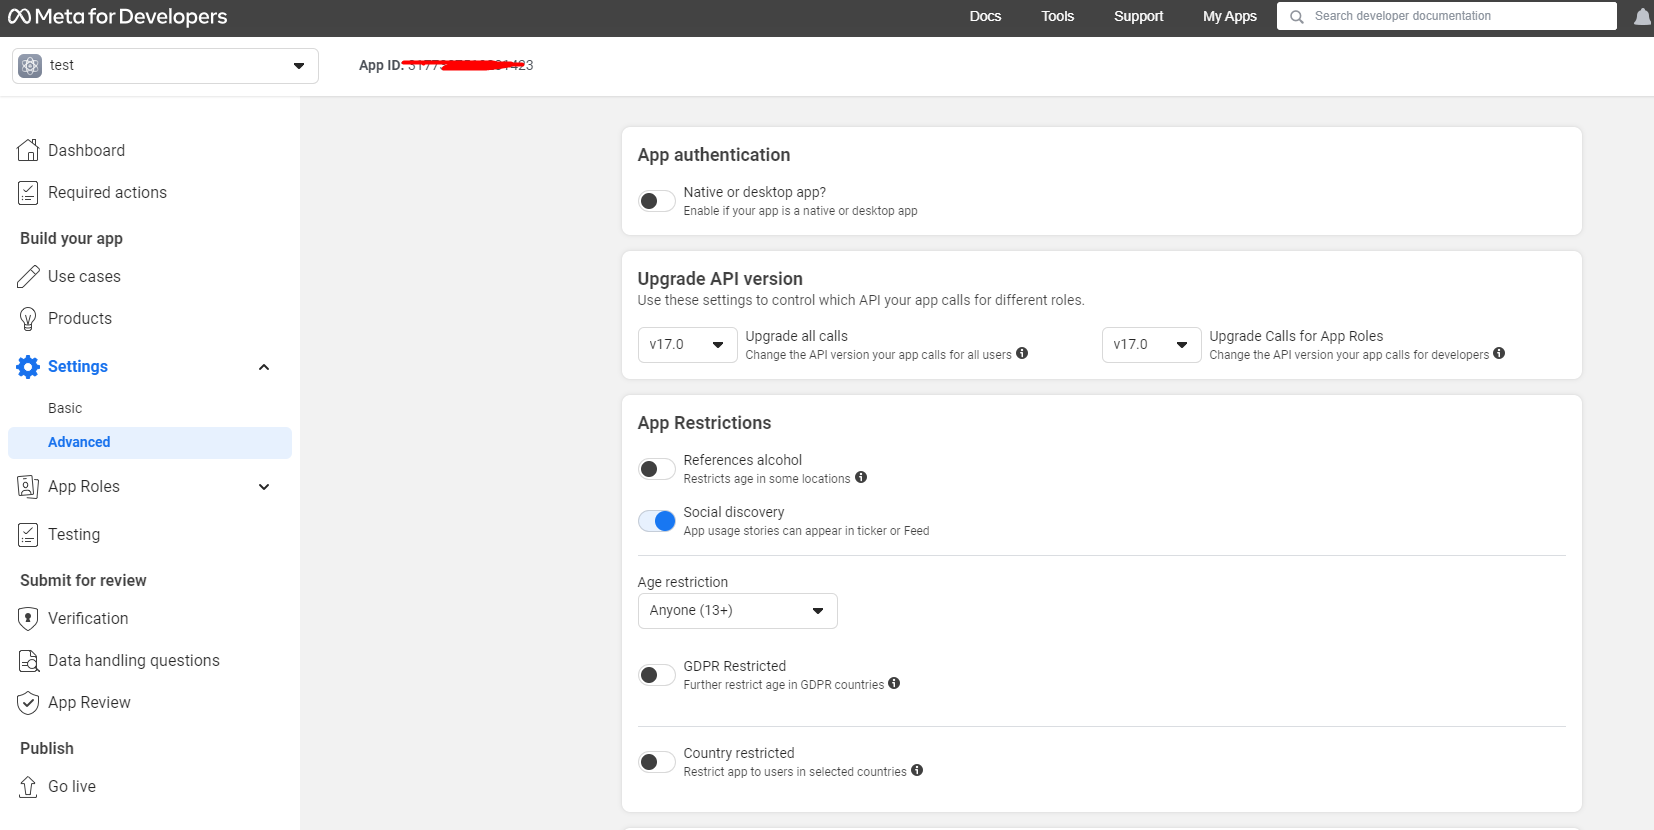
Security - These are optional if you wish to make the app more secure:
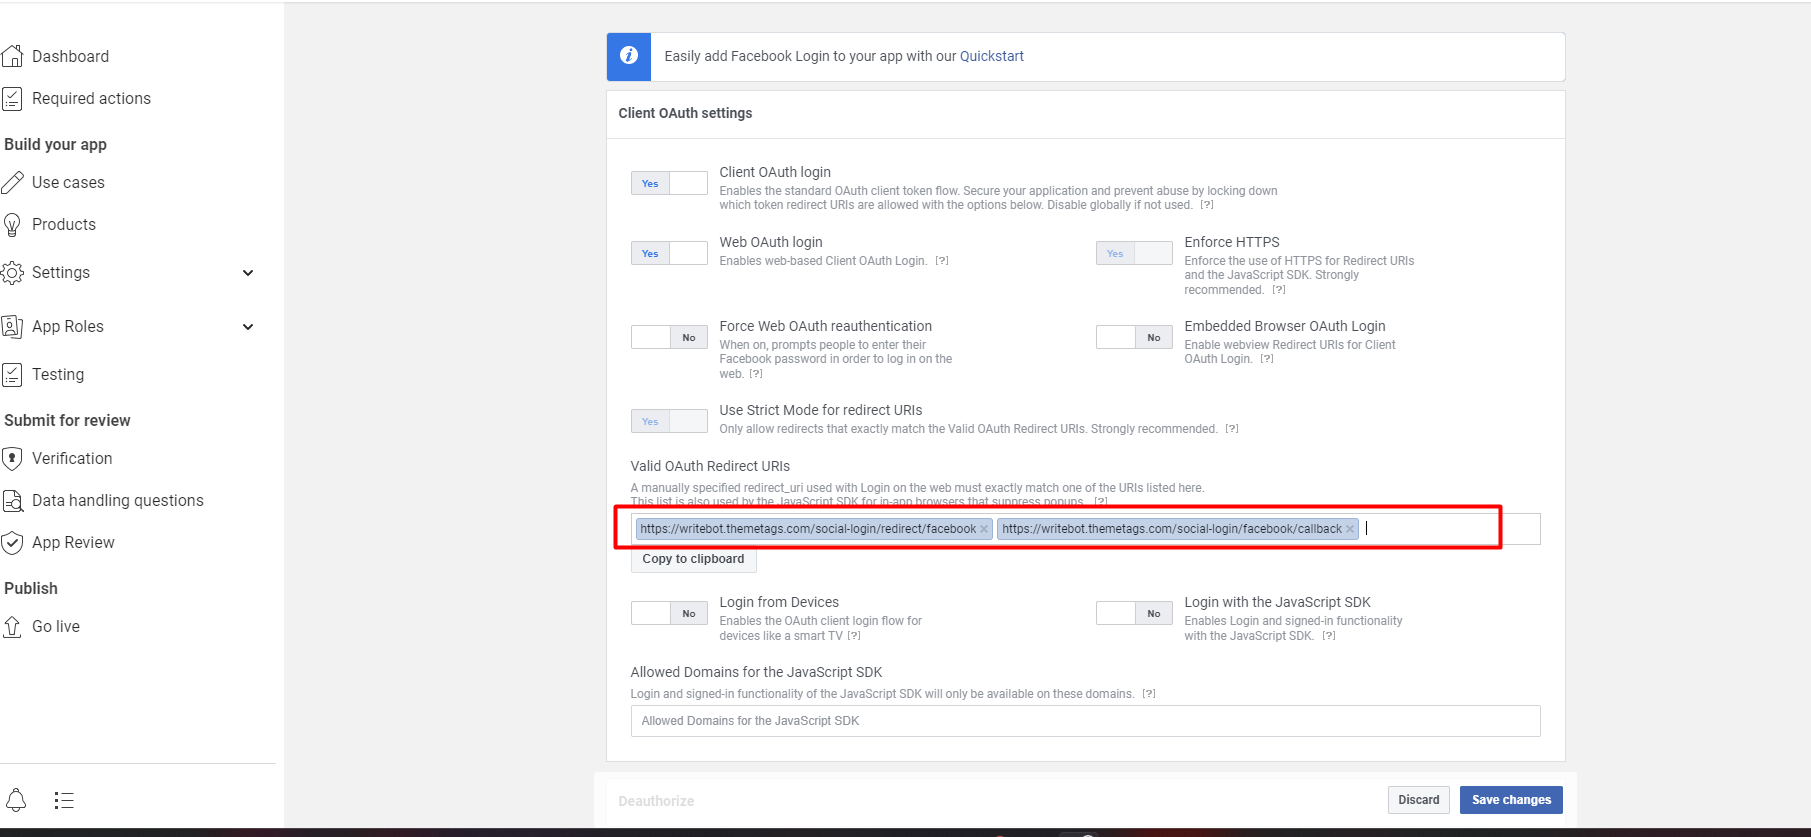
Go to Products> Added Products>Facebook Login > Configure>Settings
Client OAuth Settings - You need to enter your site's login, register, and account's social tab URIs into the field "Valid OAuth redirect URIs." Add the custom page URL if you use the social login shortcode on the custom page.
We recommend adding additional URLs with the parameter " return_provider" and "provider," see example:

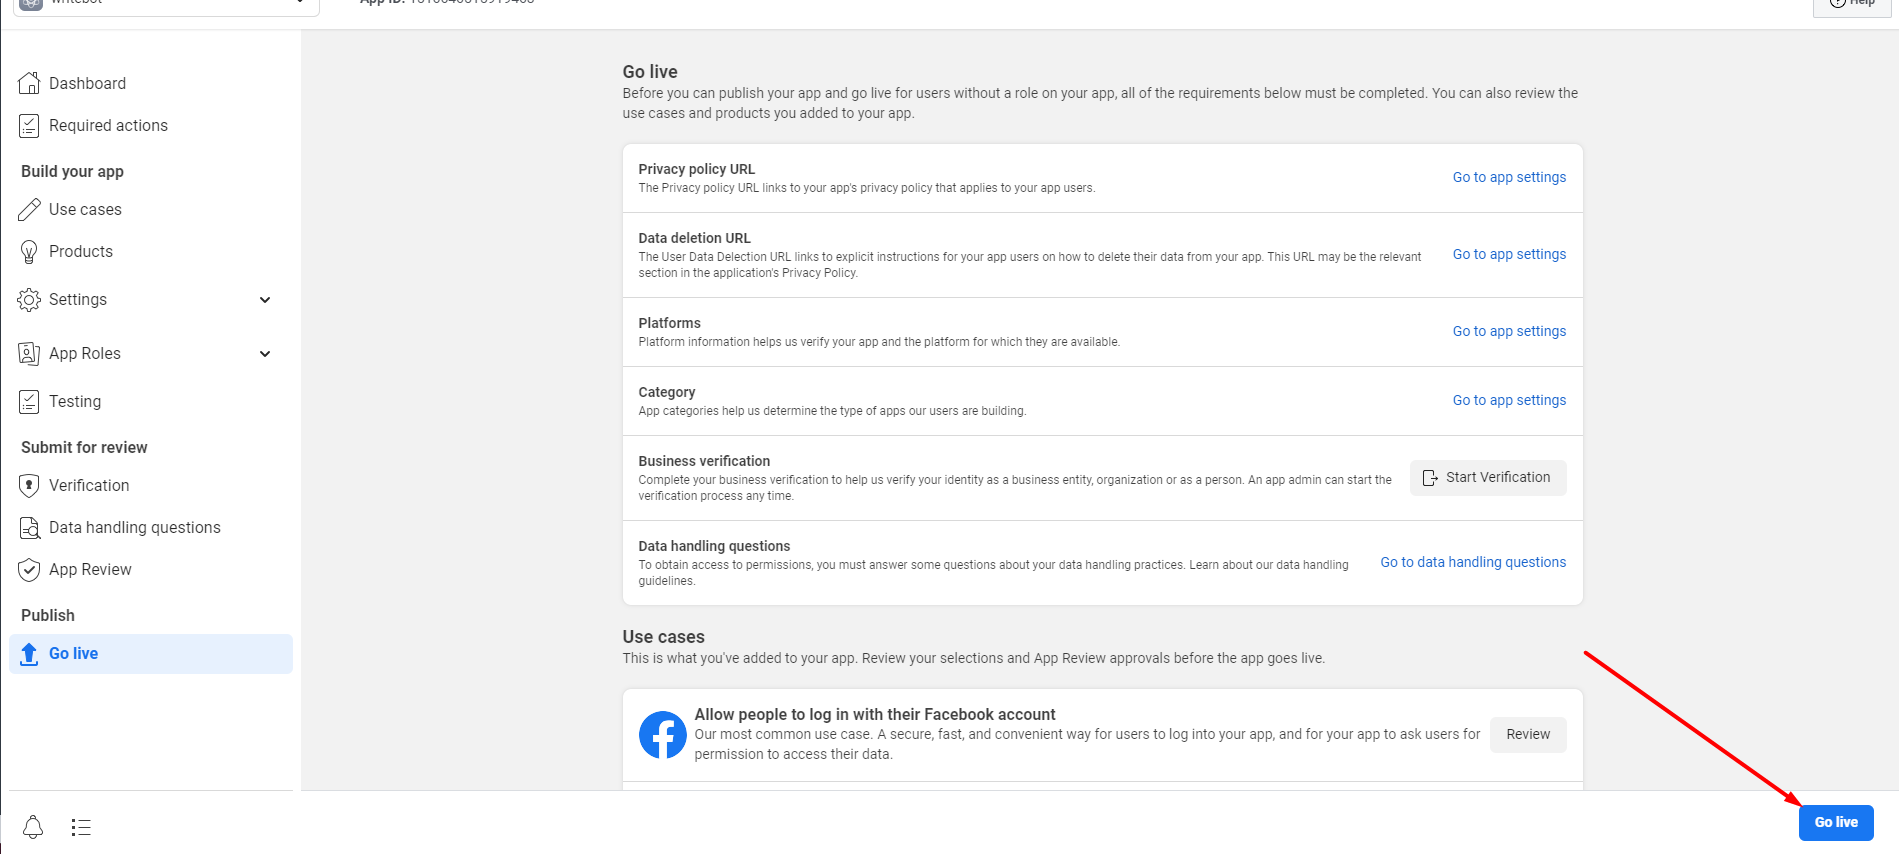
When you complete the requirements, make sure to click on the "Go Live" button on the bottom right corner of the page.
 App Setup Complete
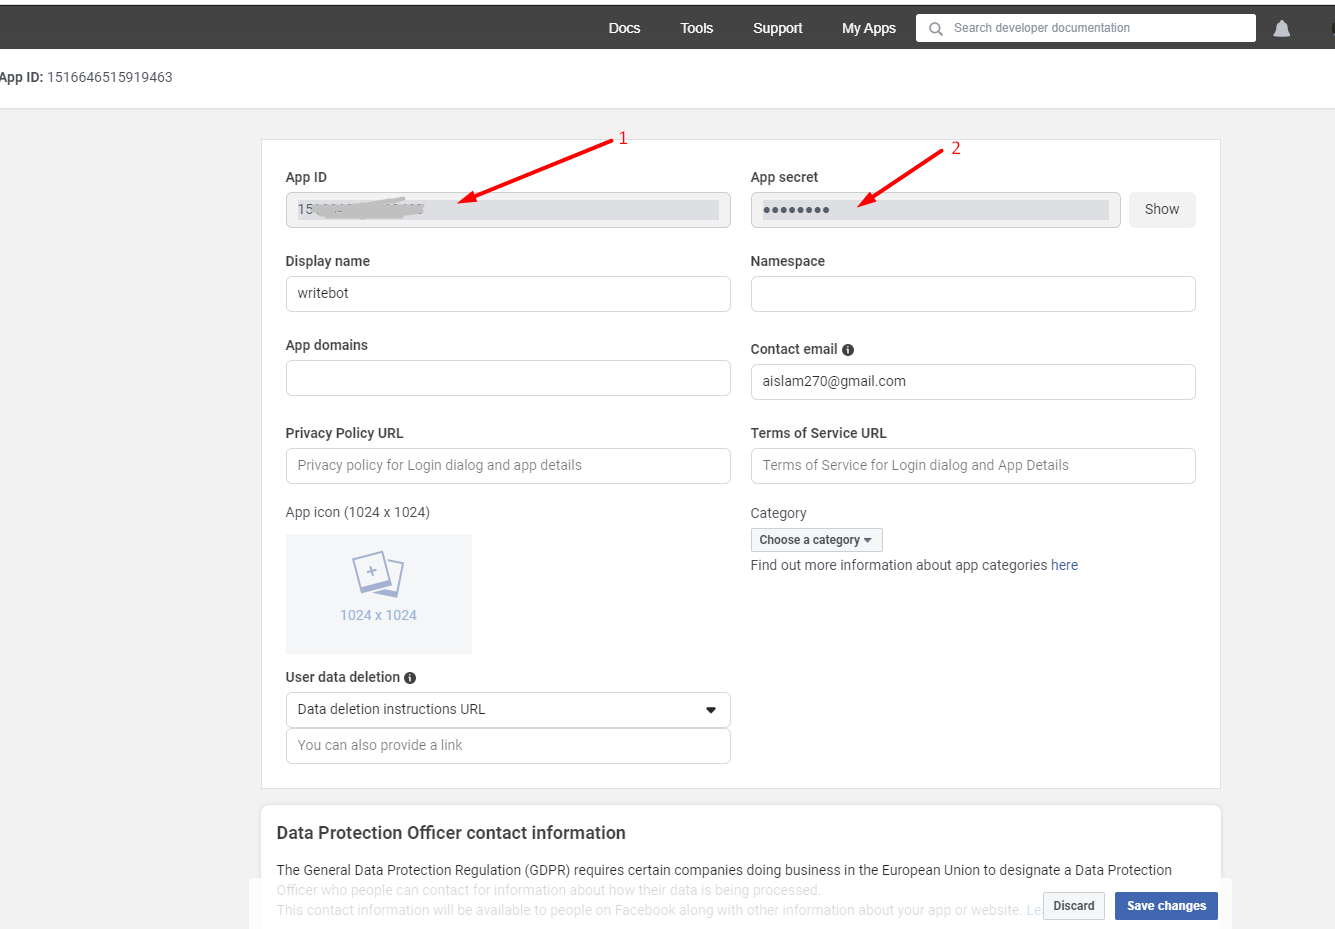
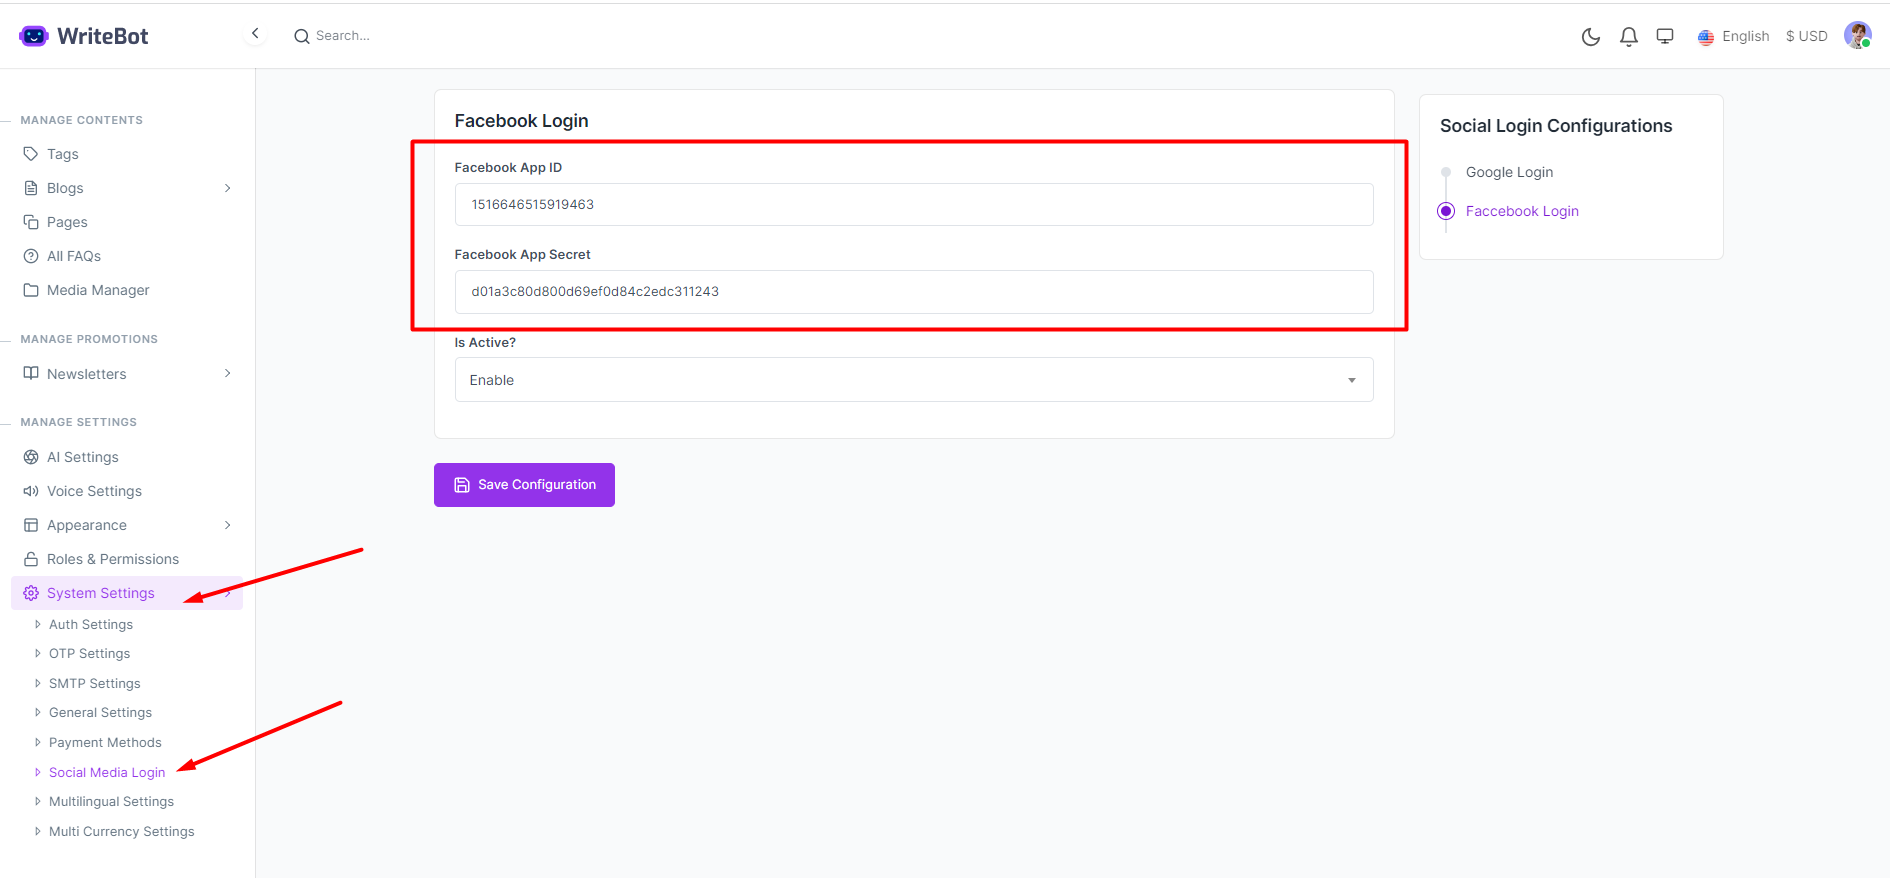
After you've done all of that, the app is complete. Add the App ID and
App Secret to the Ultimate Member Settings Facebook tab.
Go to Meta for Developers > Settings>
Basic then Copy the App ID and App Secret.

Now got to writebot admin panel System setting Social media setting, Then input the Facebook App ID and Facebook App Secret.
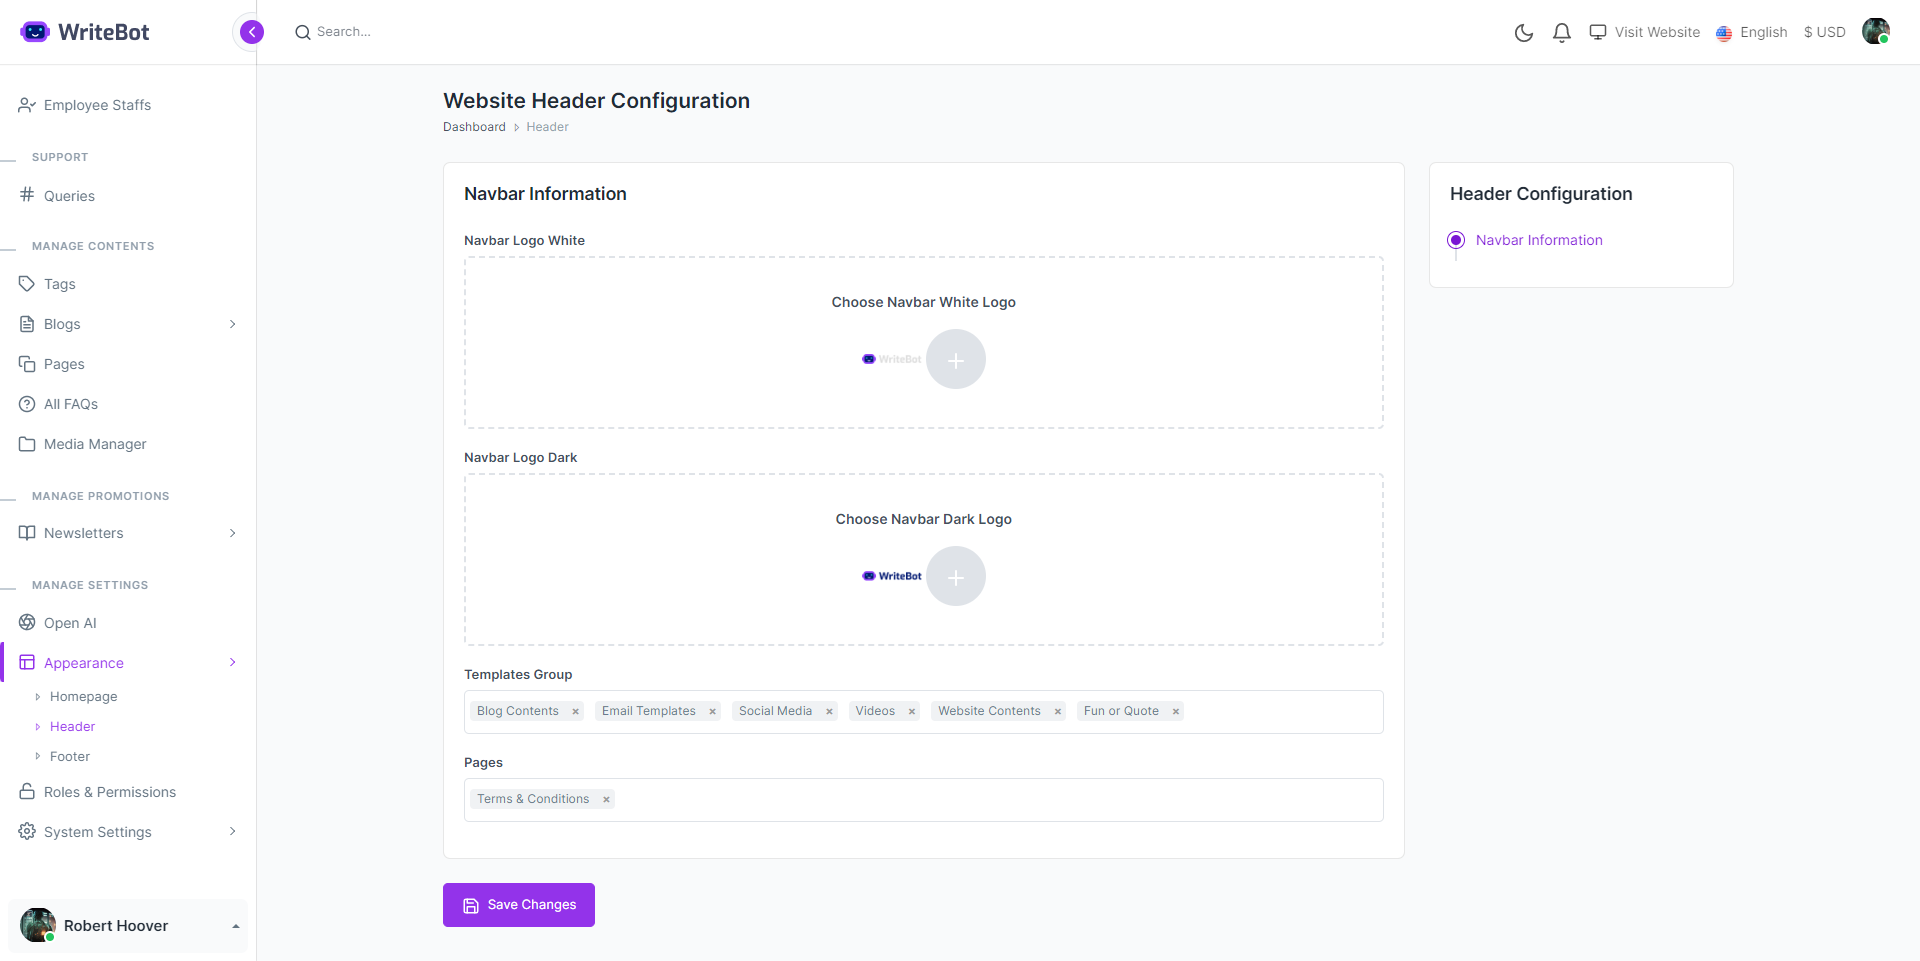
Change Logo
- Login to the system as Admin
- https://yourdomain.com/dashboard
- Go to Appearance > Header
- Update the field with your changes
- Click Save Changes
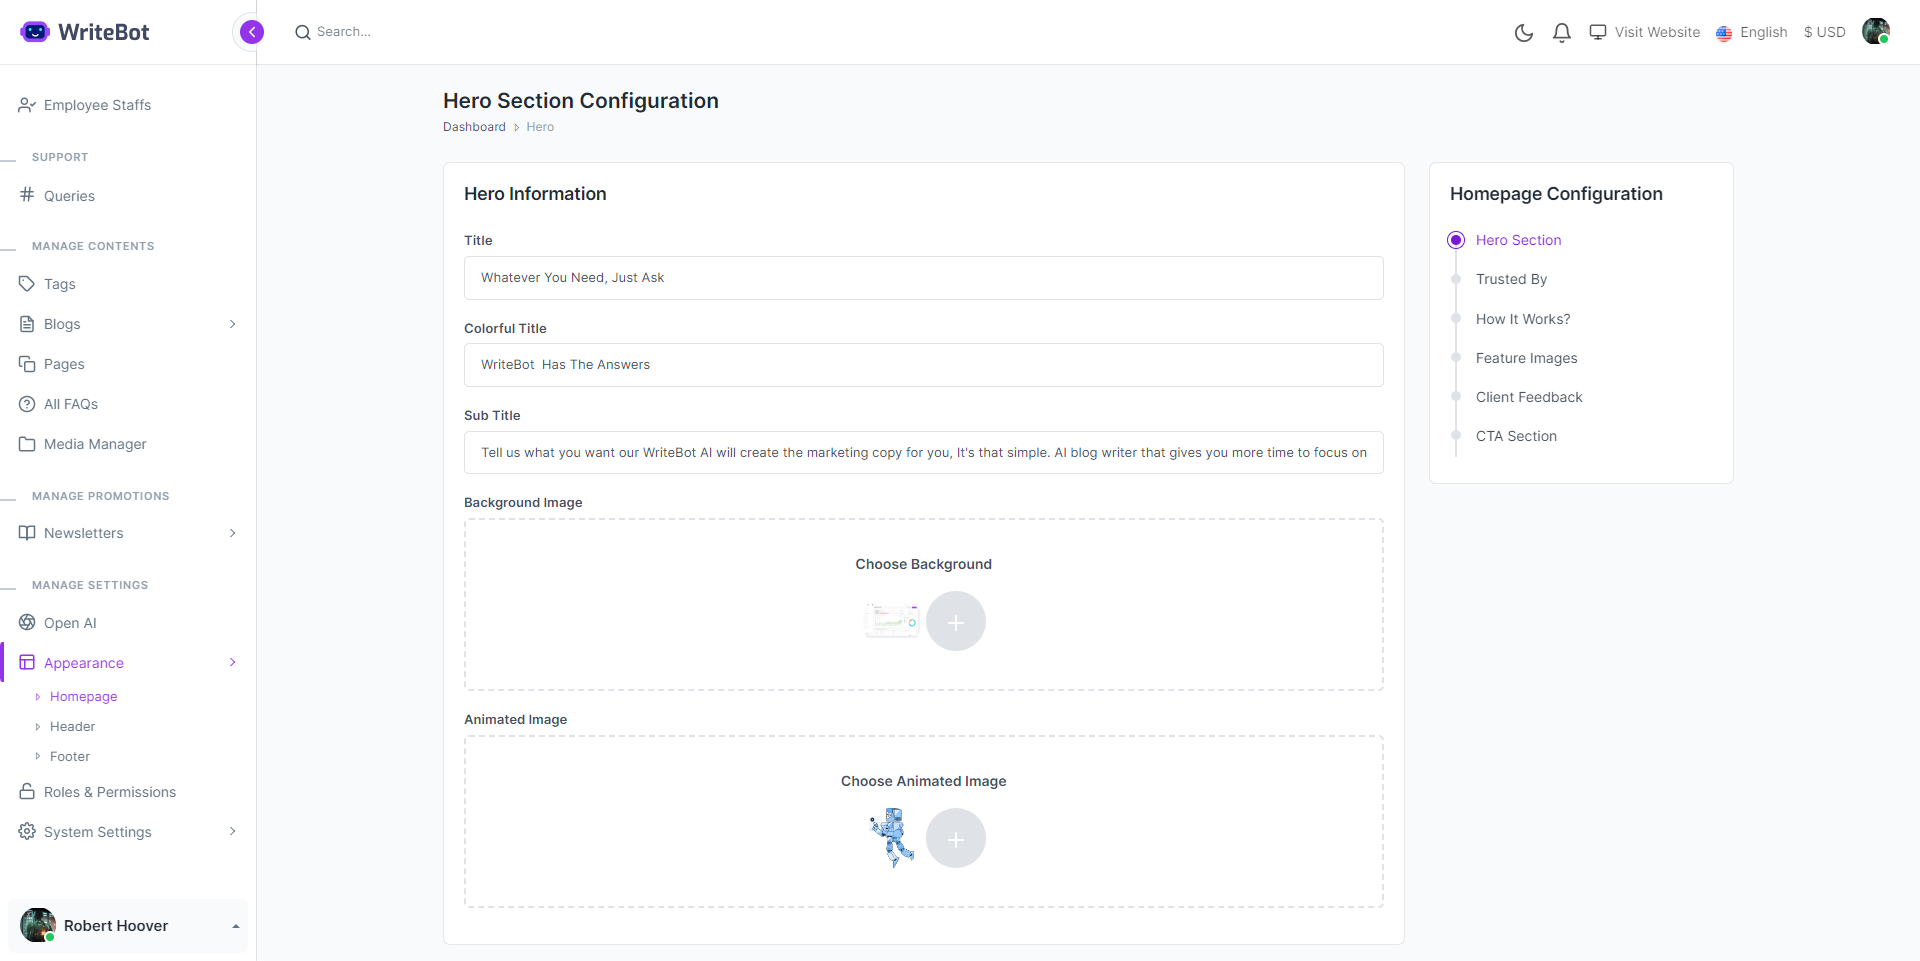
Configure Homepage
Here you can configure all the sections of homepage of the website
- Login to the system as Admin
- https://yourdomain.com/dashboard
- Go to Appearance > Homepage
- Update the field with your changes
Change Admin Logo
- Login to the system as Admin
- https://yourdomain.com/dashboard
- Go to System Settings > General Settings
- Update the field with your changes
- Click Save Changes
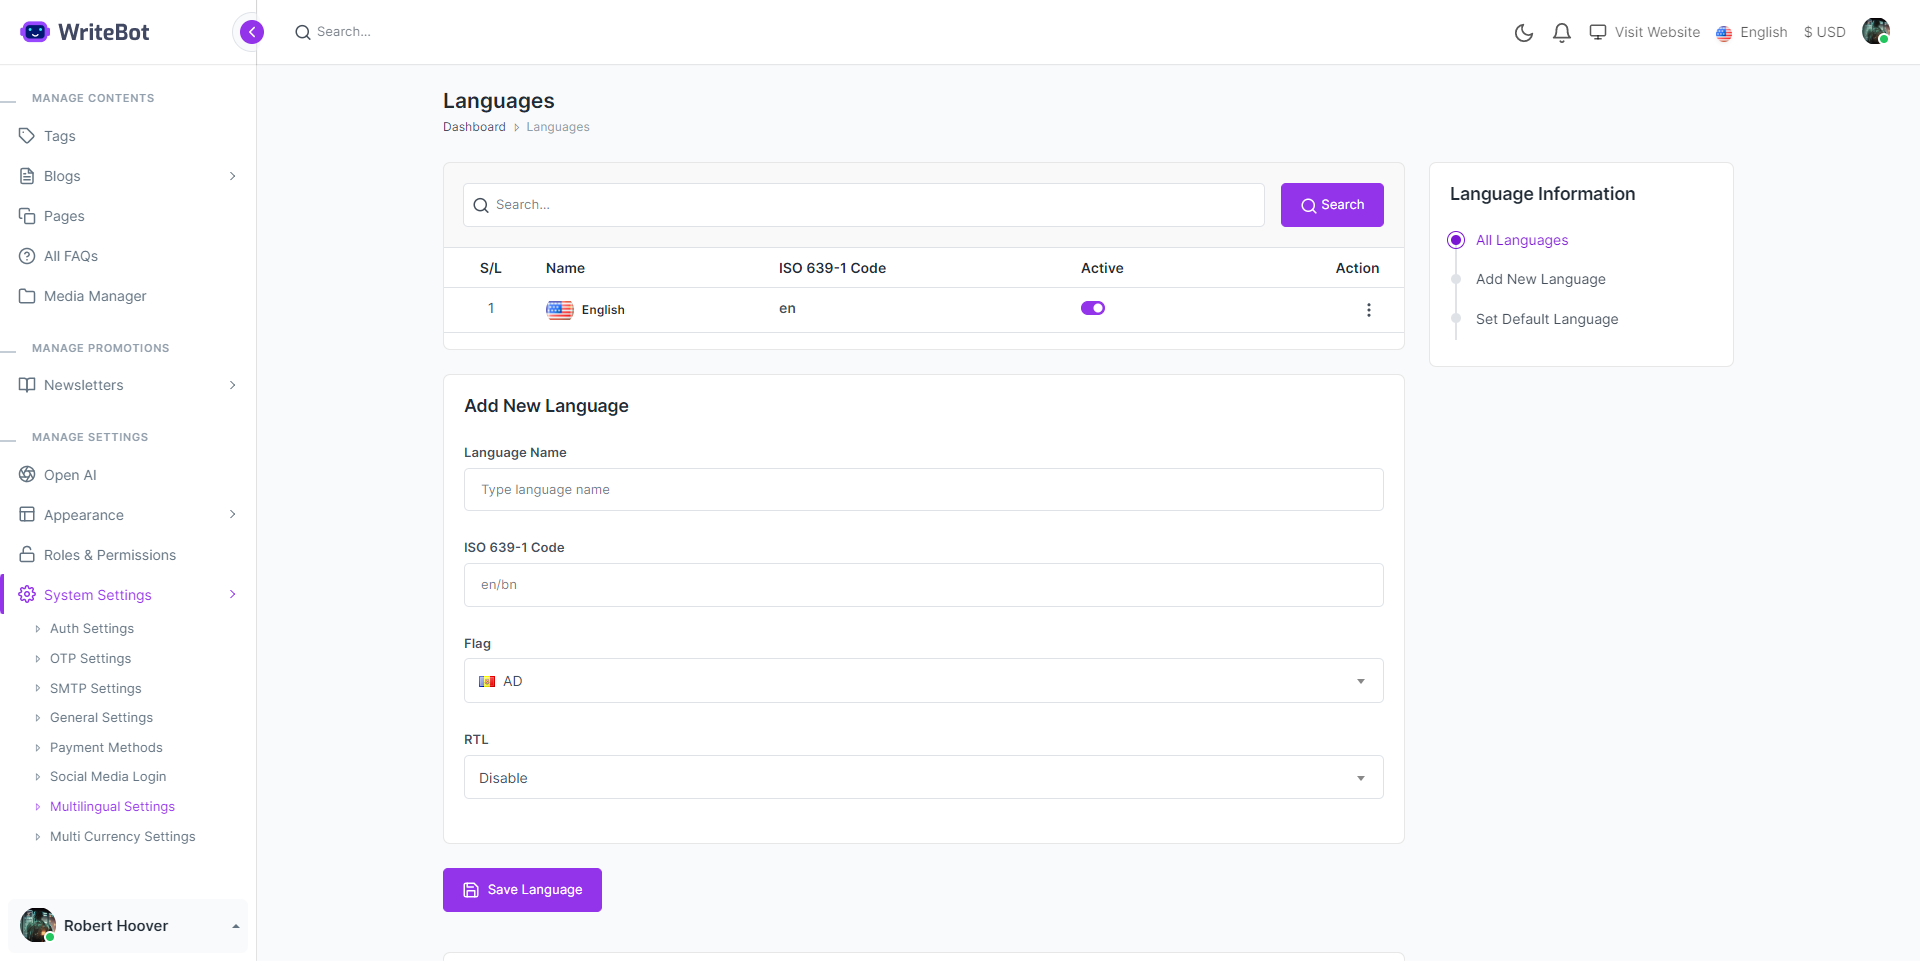
Add New Language
- Login to the system as Admin
- https://yourdomain.com/dashboard
- Go to System Settings > Multilingual Settings
- Fill the form with required data
- Click "Save Language"
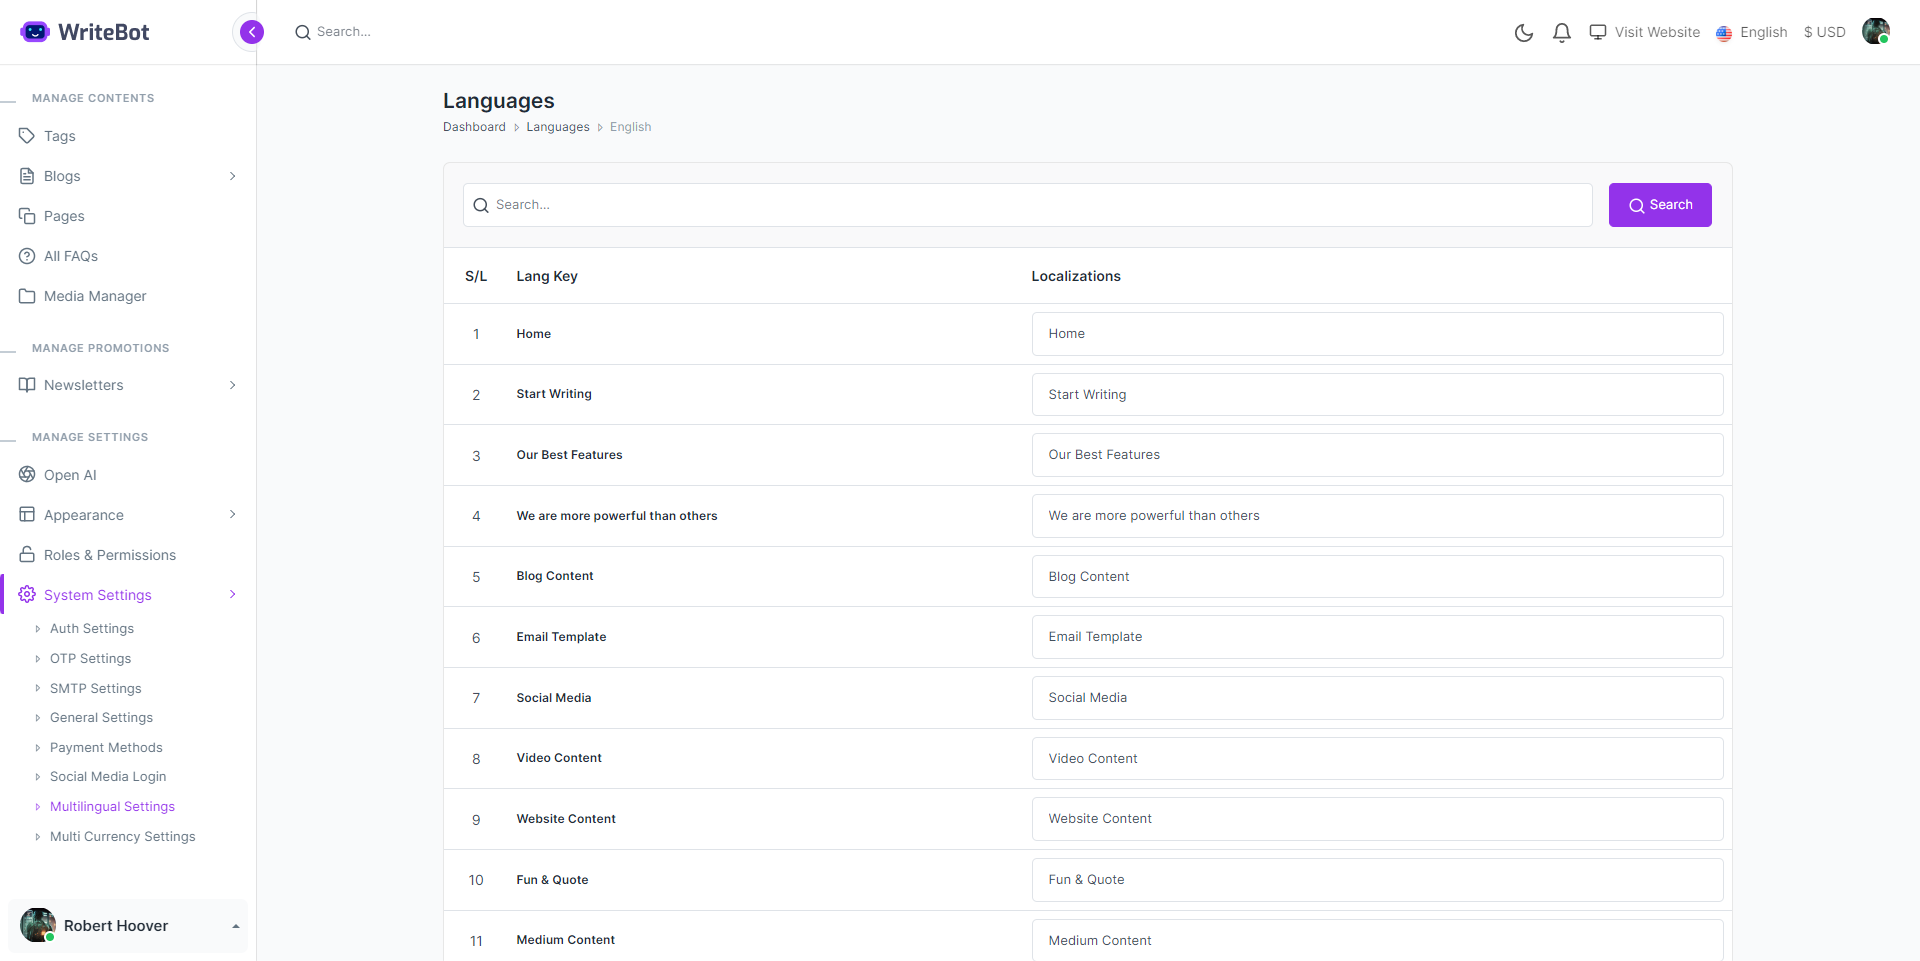
Add Localizations / Translations for a Language
- Login to the system as Admin
- https://yourdomain.com/dashboard
- Go to System Settings > Multilingual Settings
- Click on three dots (...) of your targeted language
- Fill the form with translated data
- You can your Google Translator to translate the whole page & then click copy button to do it faster
- Click "Save"
Add New Currency
- Login to the system as Admin
- https://yourdomain.com/dashboard
- Go to System Settings > Multi Currency Settings
- Fill the form with required data
- Click "Save Currency"

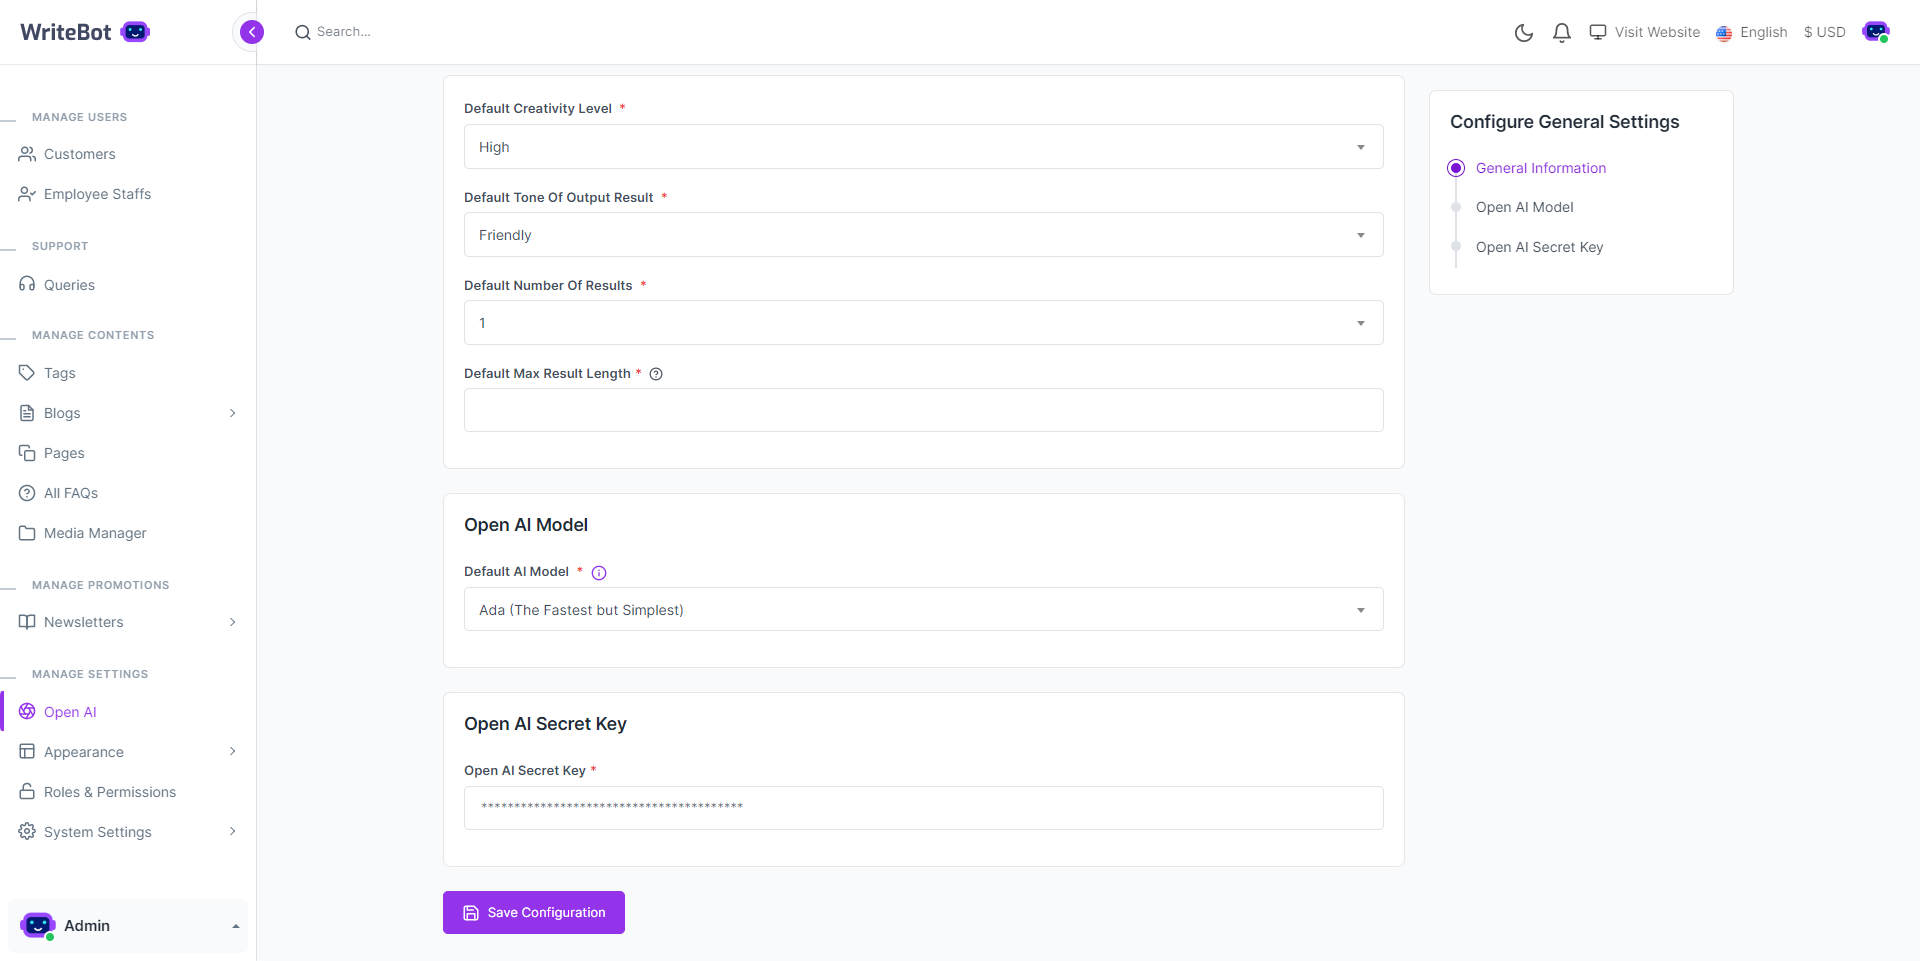
Configure AI Settings
- Login to the system as Admin
- https://yourdomain.com/dashboard
- Go to AI Settings
- Fill the form with required data
- Click "Save Configuration"
- Check how you can get OPEN AI api key - Check Here.
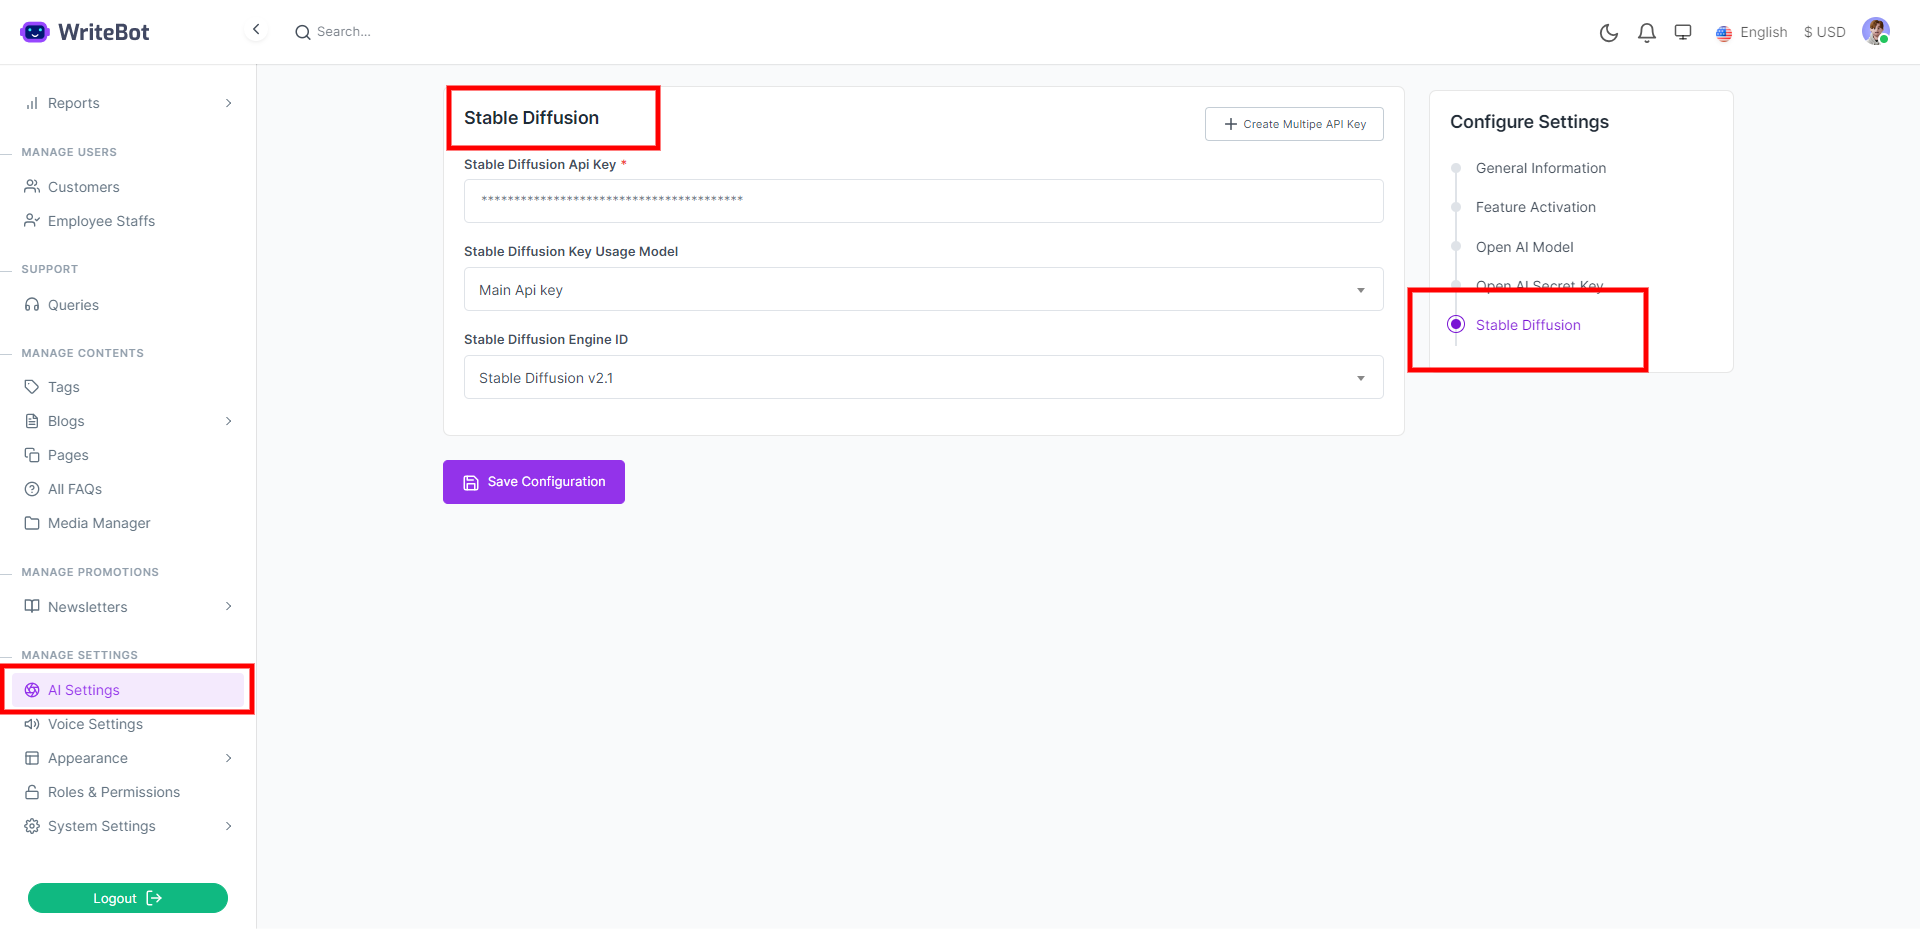
Configure Stable Diffusion
- Login to the system as Admin
- https://yourdomain.com/dashboard
- Go to AI Settings
- Fill the form with required data
- Click "Save Configuration"
- Check how you can get Stable Diffusion api key - Check Here.
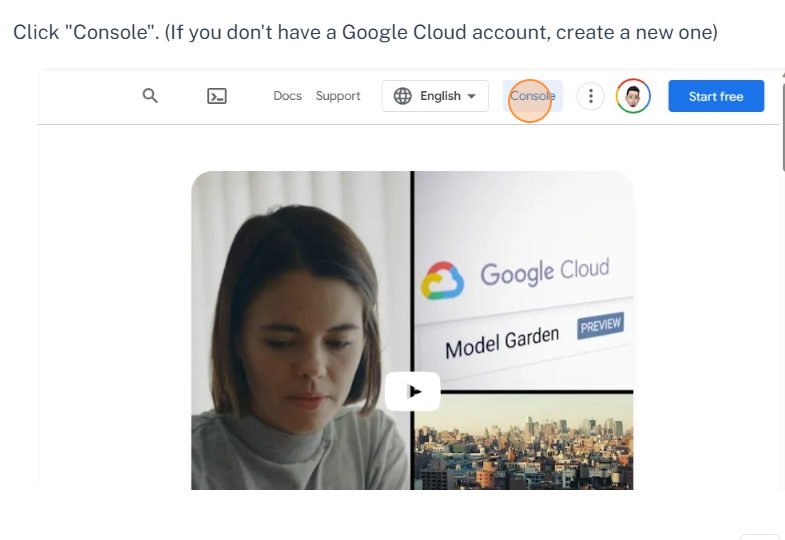
Google TTS Setup
- Navigate to - https://cloud.google.com
-
Click "Console". (If you don't have a Google Cloud account, create a new one)
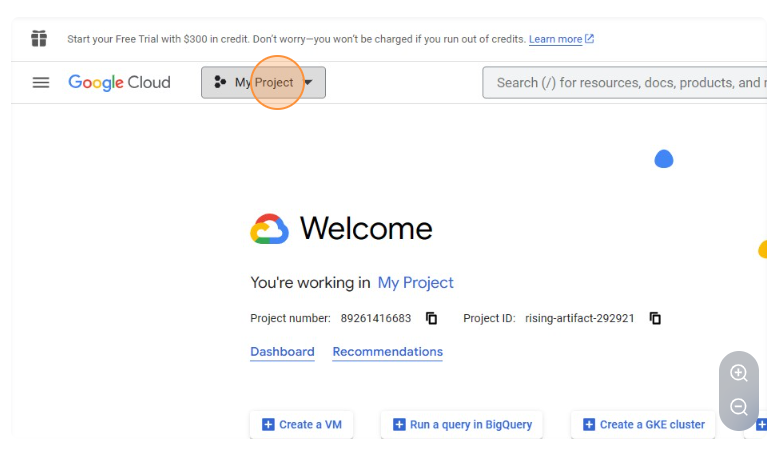
-
Click "My Project"
-
Click "NEW PROJECT"

-
Enter the name of your project and click "Create".
-
Click "My Project".
-
Click on the project you just created.
-
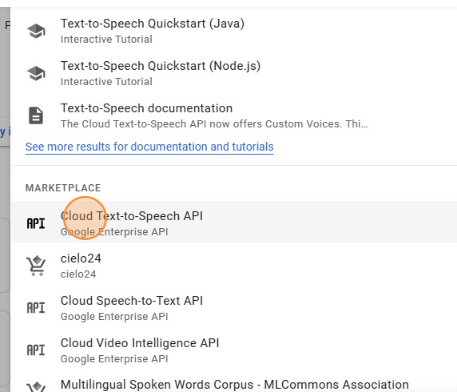
Click the "Search (/) for resources, docs, products, and more" field.

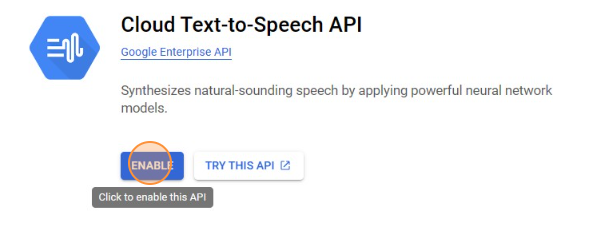
- Type "text-to-speech".
-
Click "Cloud Text-to-Speech API".
-
Click "ENABLE".
-
If you have not enabled billing in your Google Cloud account, you will be prompted to
enable it, please fill in your information and enable billing.

-
After enabling billing, click "Enable" again.
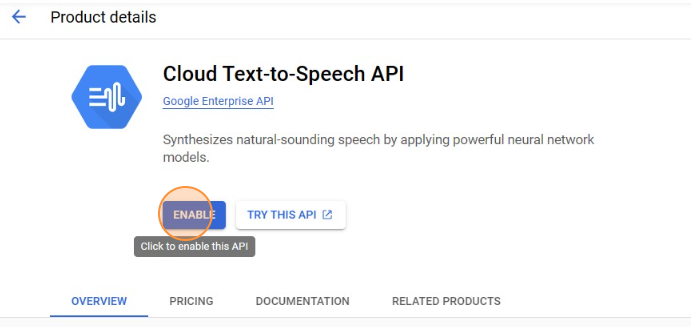
- After enabling Cloud Text-to-Speech API, you will be redirected to a page.
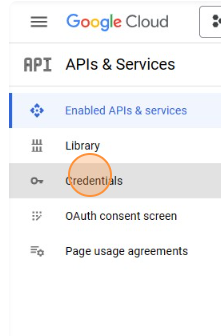
-
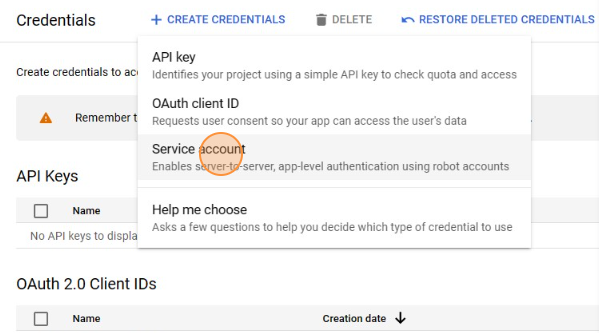
Click "Credentials".
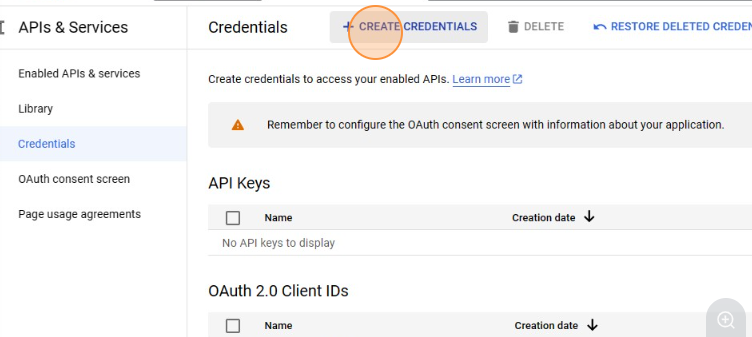
-
Click "CREATE CREDENTIALS".
-
Click "Service account".
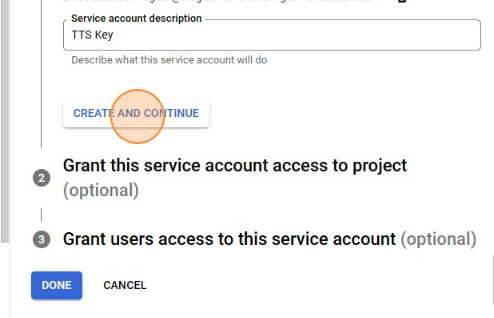
- Click the "Service account name" field and enter the name of your project.
- Click the "Service account description" field and type "TTS Key".
-
Click "CREATE AND CONTINUE"
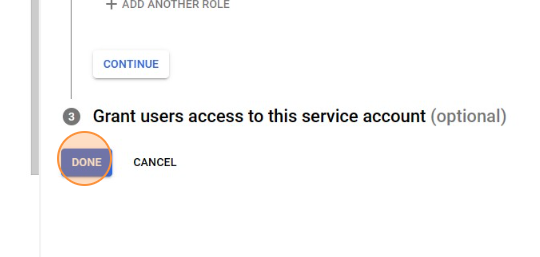
-
Click "DONE"
- Click on the service account you just created from the "Service Accounts" section
-
Click "KEYS"

-
Click "ADD KEY"

- Click "Create new key"
- Select "JSON Recommended" option.
- Click "CREATE".
- After clicking Create, a JSON file will be downloaded to your computer. You can now close the Google Cloud Console..
-
Now Login to your admin panel of Writebot. Goto Voice Settings & fill the form
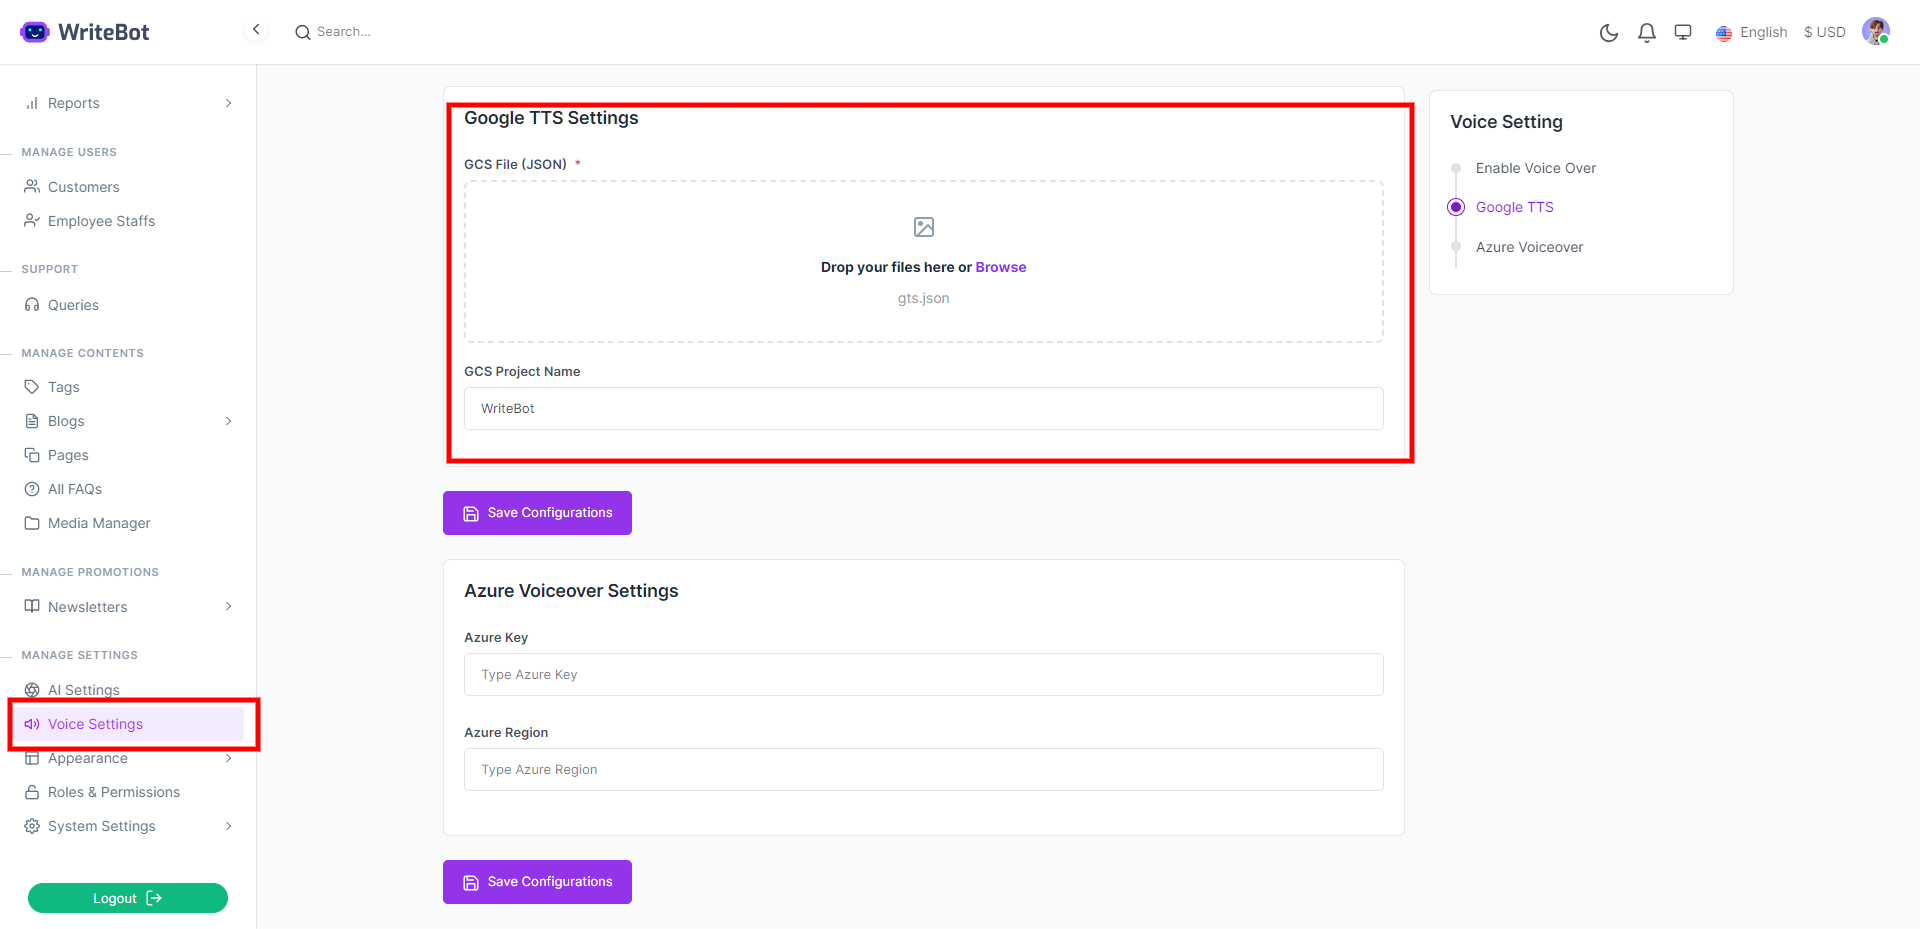
- Click "Save Configurations"
Azure TTS Setup
- Navigate to - https://azure.microsoft.com/en-us/
- Create new account and afterwards sign in into your Azure Portal under your Profile on the top right corner.
-
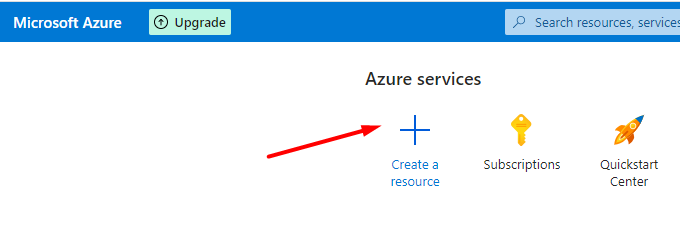
Click on Create a resource.
-
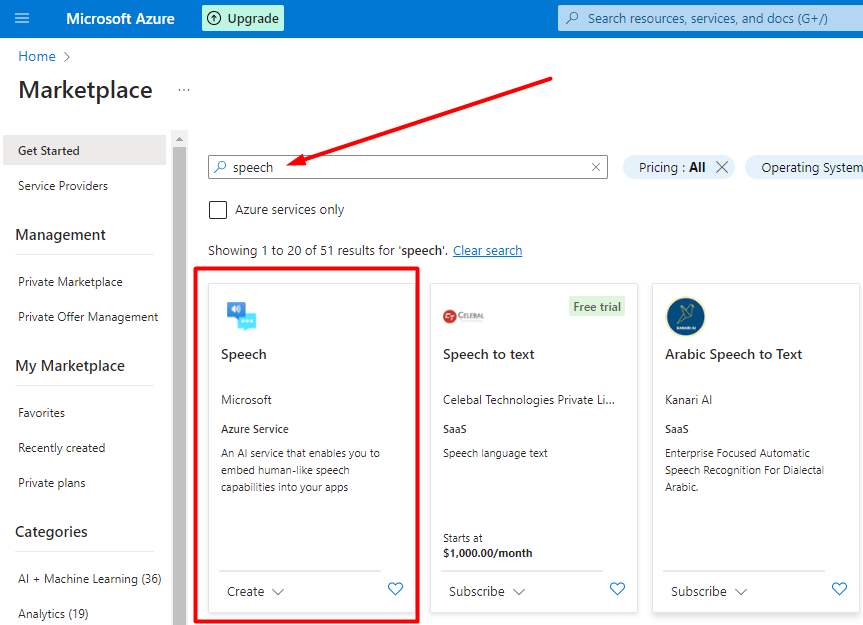
Search for keyword: speech and select the first Speech service from Azure.
-
Afterwards, click Create button.

-
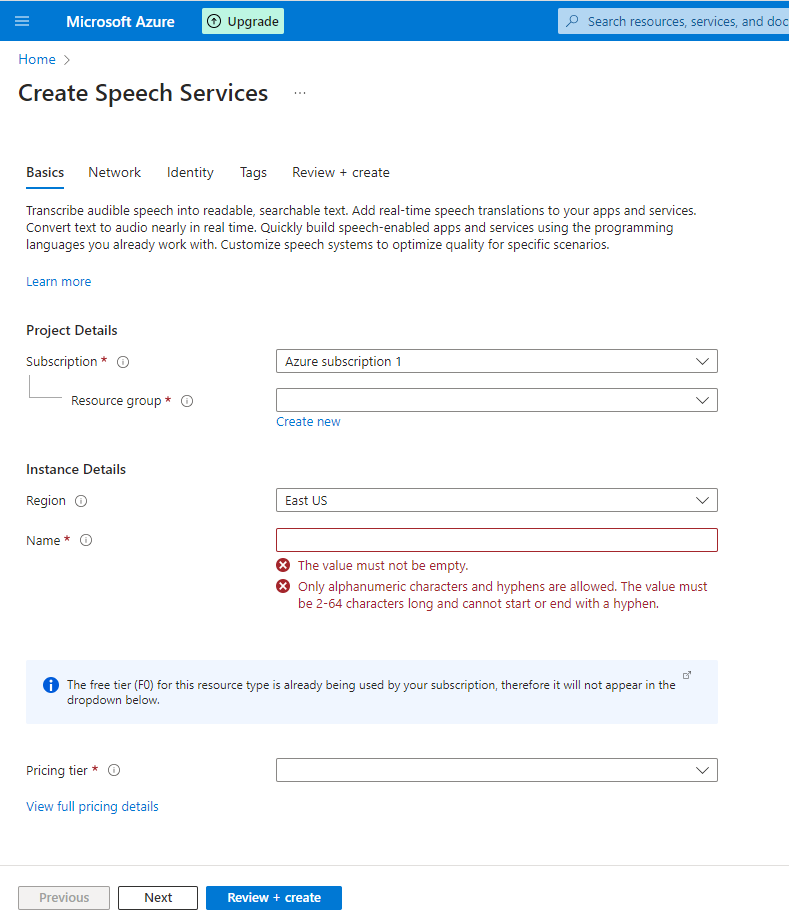
Fill in the required information.
- Name: Any string to identify this resource
- Subscription: Free Trial (default)
- Location:select Azure region as you prefer. Warning! Not every language/voice is available in all Azure regions, we strongly recommend to consider either US East or West Europe regions.
- Pricing Tier: Free F0 is good for starting only, it has limitation in concurrency, refer to Azure Documentations to get exact numbers. Standard S0 will start billing.
- Resource Group: Any string to group your resources.
-
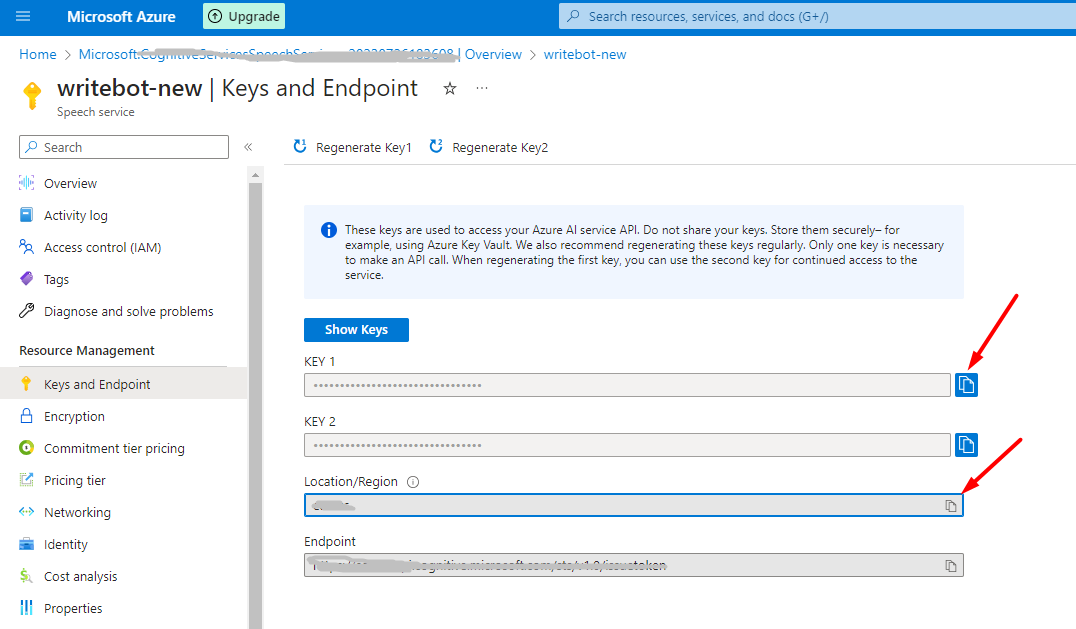
Almost there, on this the next page click on Click here to manage keys.
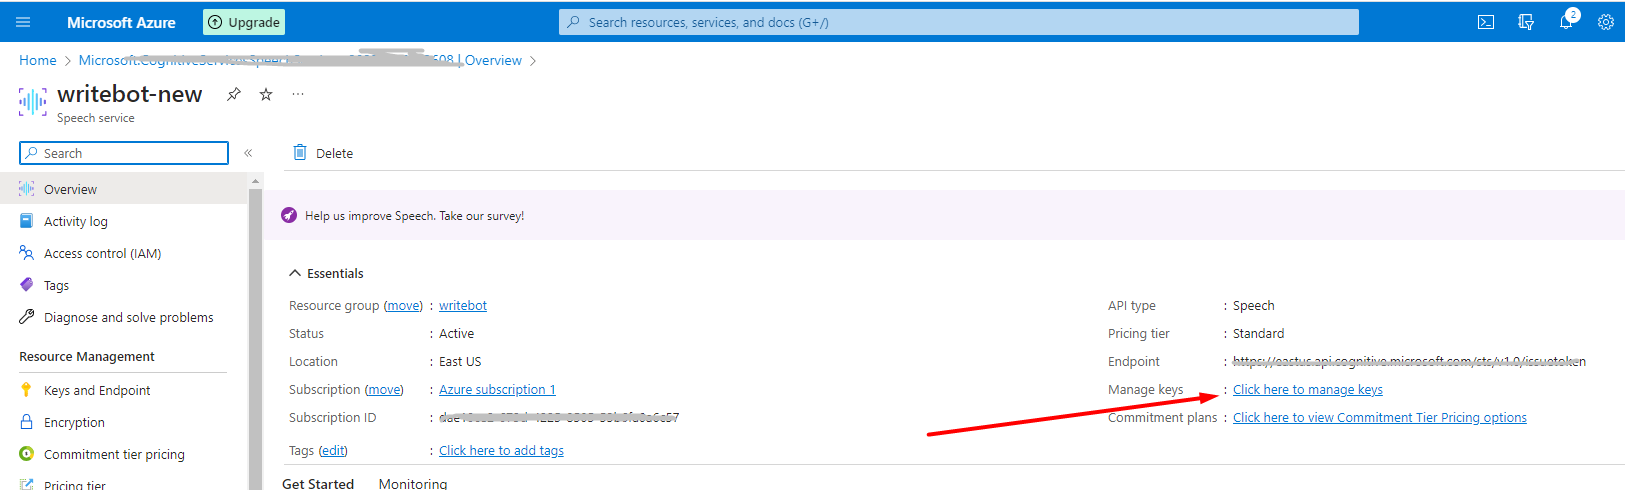
-
Copy one of the keys.
-
Now Login to your admin panel of Writebot. Goto Voice Settings & fill the azure
form
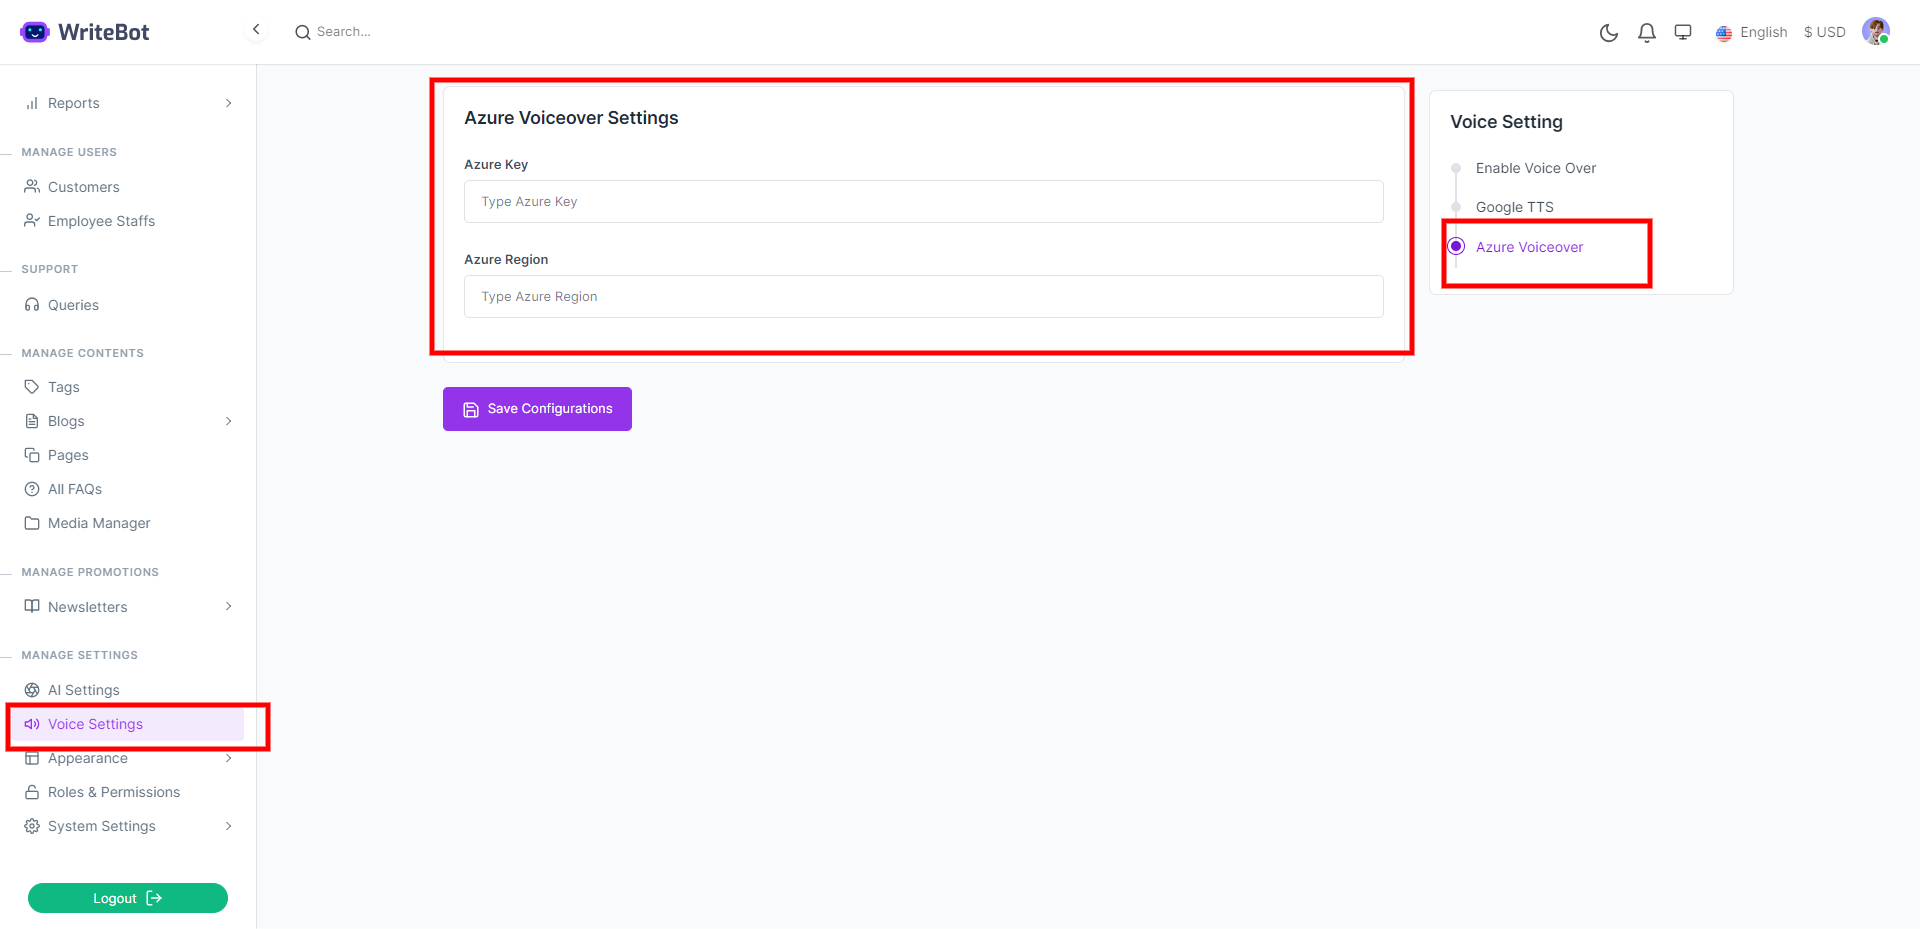
- Click "Save Configurations"
- You can enable Azure or Google TTS from the top of the page
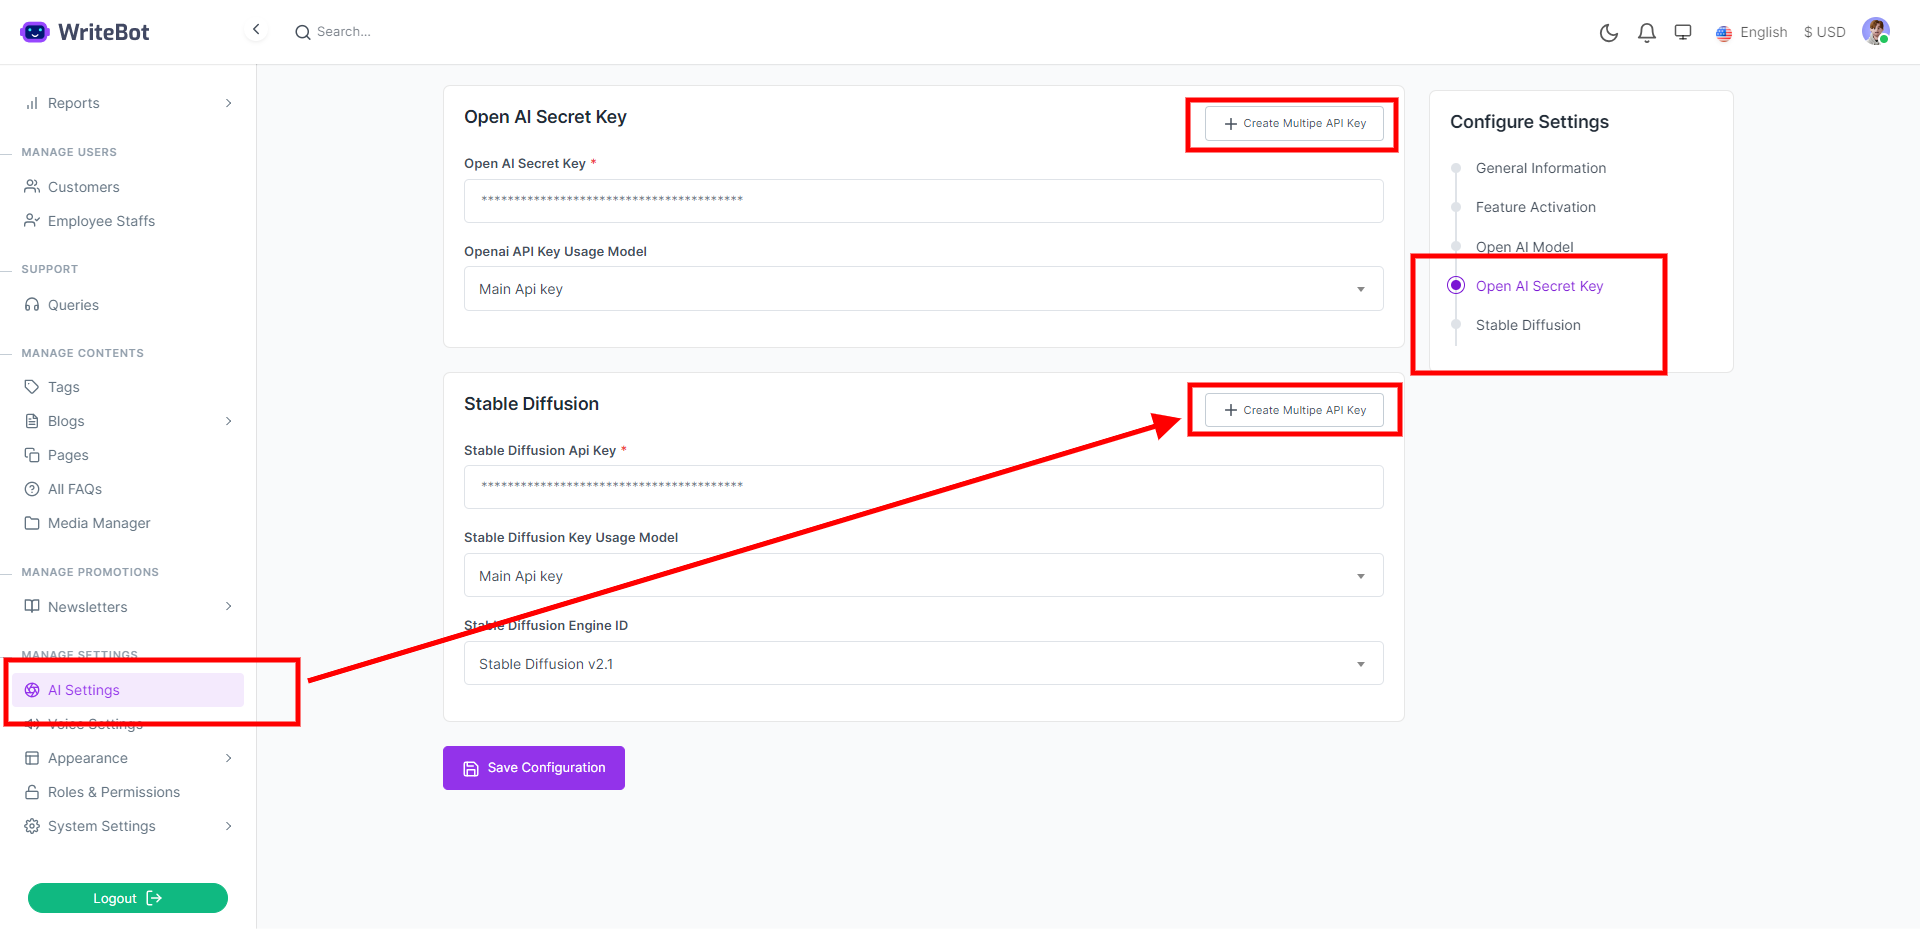
Add Multiple Api key (Open AI & Stable Diffusion)
- Login to the system as Admin
- https://yourdomain.com/dashboard
- Go to AI Settings
- Click on Open AI Secret Key or Stable Diffusion
- Click on Create Multiple API key
- Click "Add New"
- Fill The Form
- Click "Save"
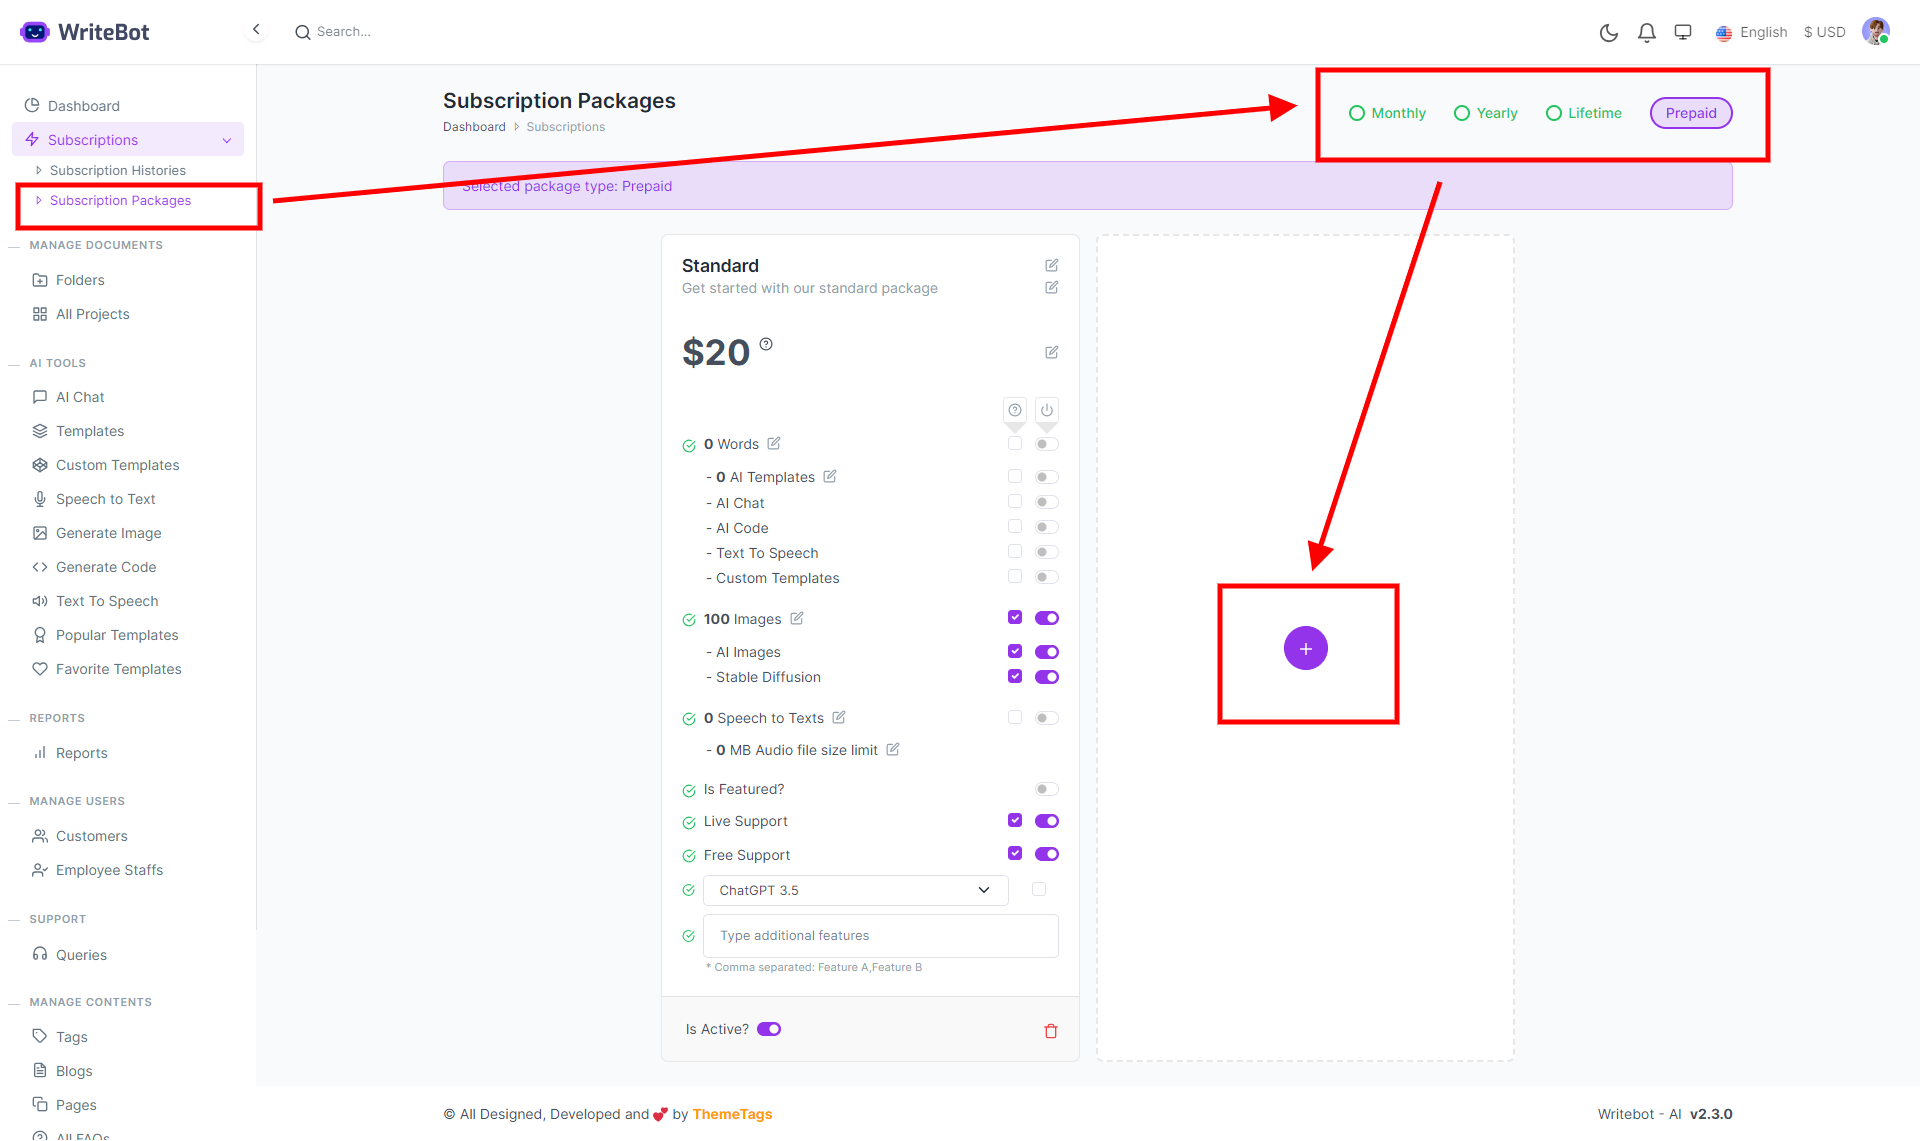
Add Subscription Package
- Login to the system as Admin
- https://yourdomain.com/dashboard
- Go to Subscriptions > Subscription Packages
- Click on the Type - Monthly / Yearly / Lifetime / Prepaid
- Click On Create New or Copy from existing
- Set your features by enabling & disabling (checkbox & switch)
Subscription Settings
- Login to the system as Admin
- https://yourdomain.com/dashboard
- Go to Subscriptions > Subscription Settings
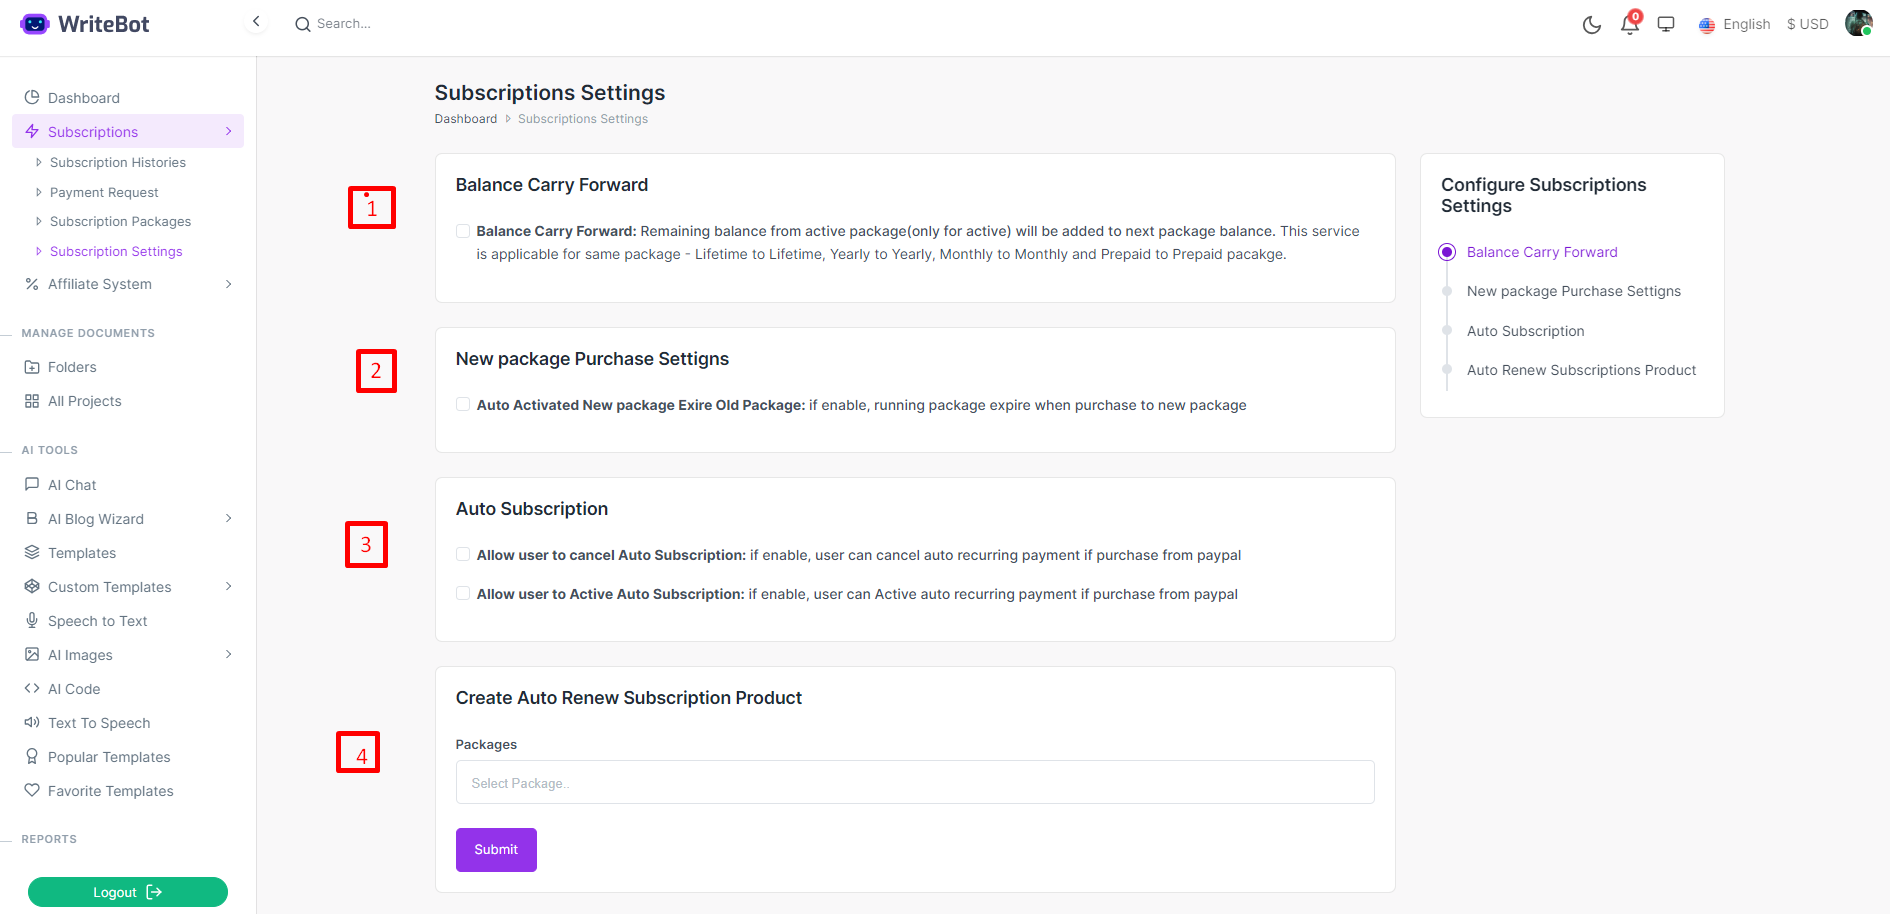
Allow user to Active Auto Subscription : if enable, user can Active auto recurring payment if purchase from paypal
Here Can Create Auto Renewal Product for payment Gateway and customer / user enable recurring payment option don't need buy again.
note: here onlye show which package not added into gateway product. you can see all product and plan into your gateway dashbaord. now only Paypal available for this feature.
Unlimited Package Balance
- Login to the system as Admin
- https://yourdomain.com/dashboard
- Go to Subscriptions > Subscription Packages
- Check the unlimited option
- Unlimited balance is added to user only when the customer subscribe or Renew a subscription package

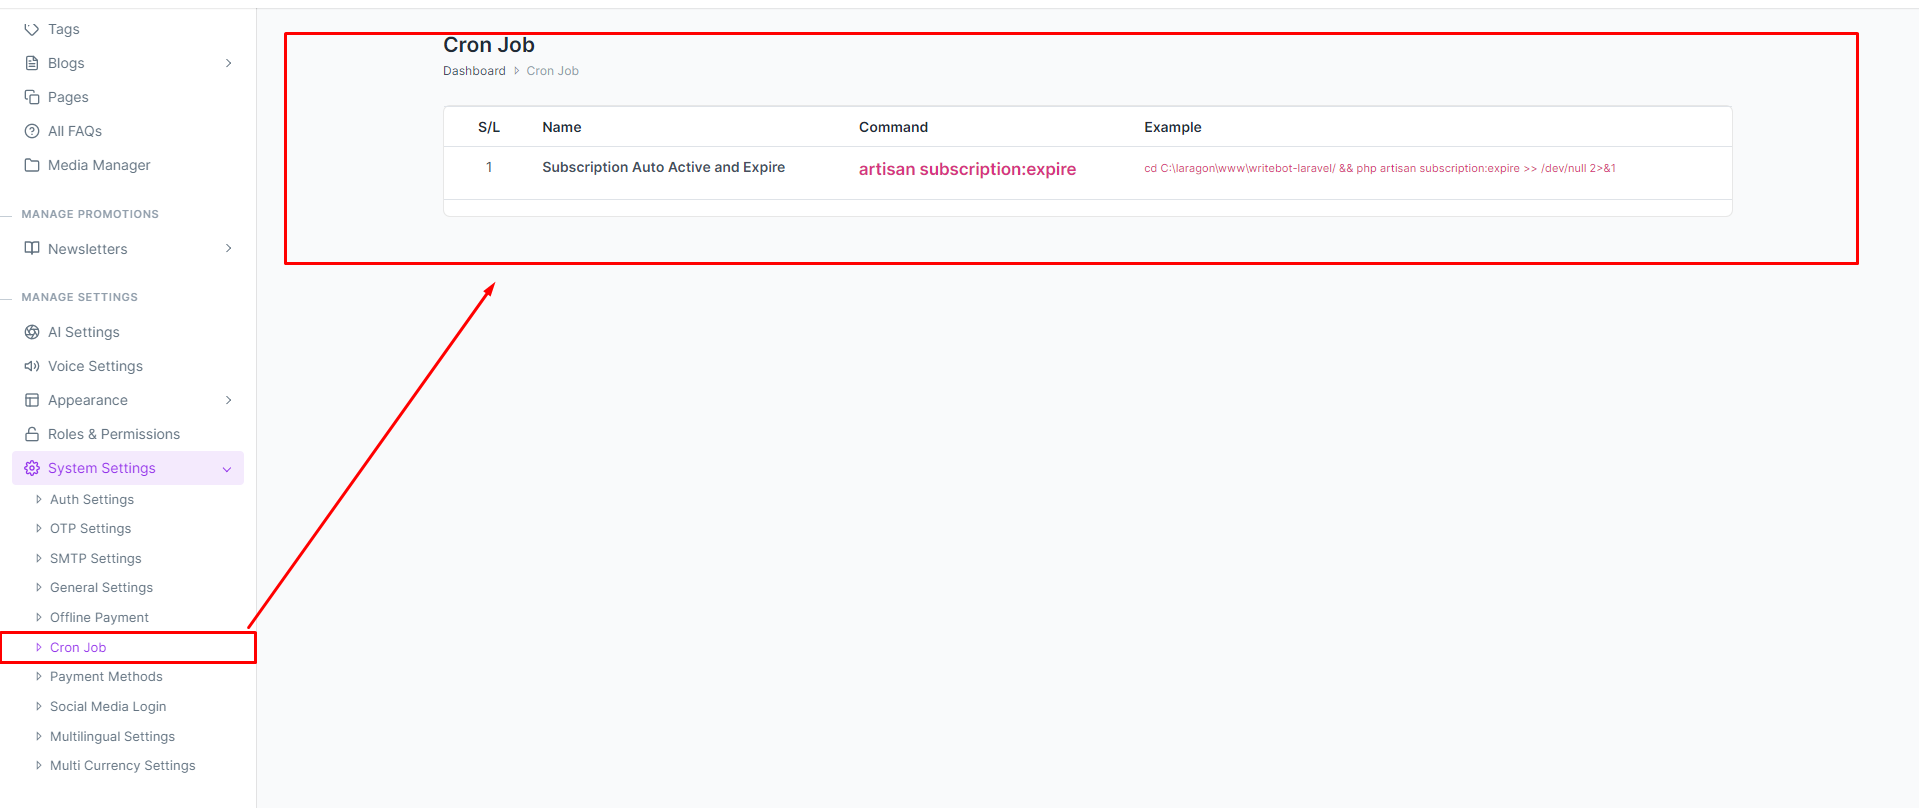
Cron Job
- Login to the system as Admin
- https://yourdomain.com/dashboard
- Go to System Settings > Cron Job
- Cron will run every day at 12 AM
- How To Configure a Cron Job
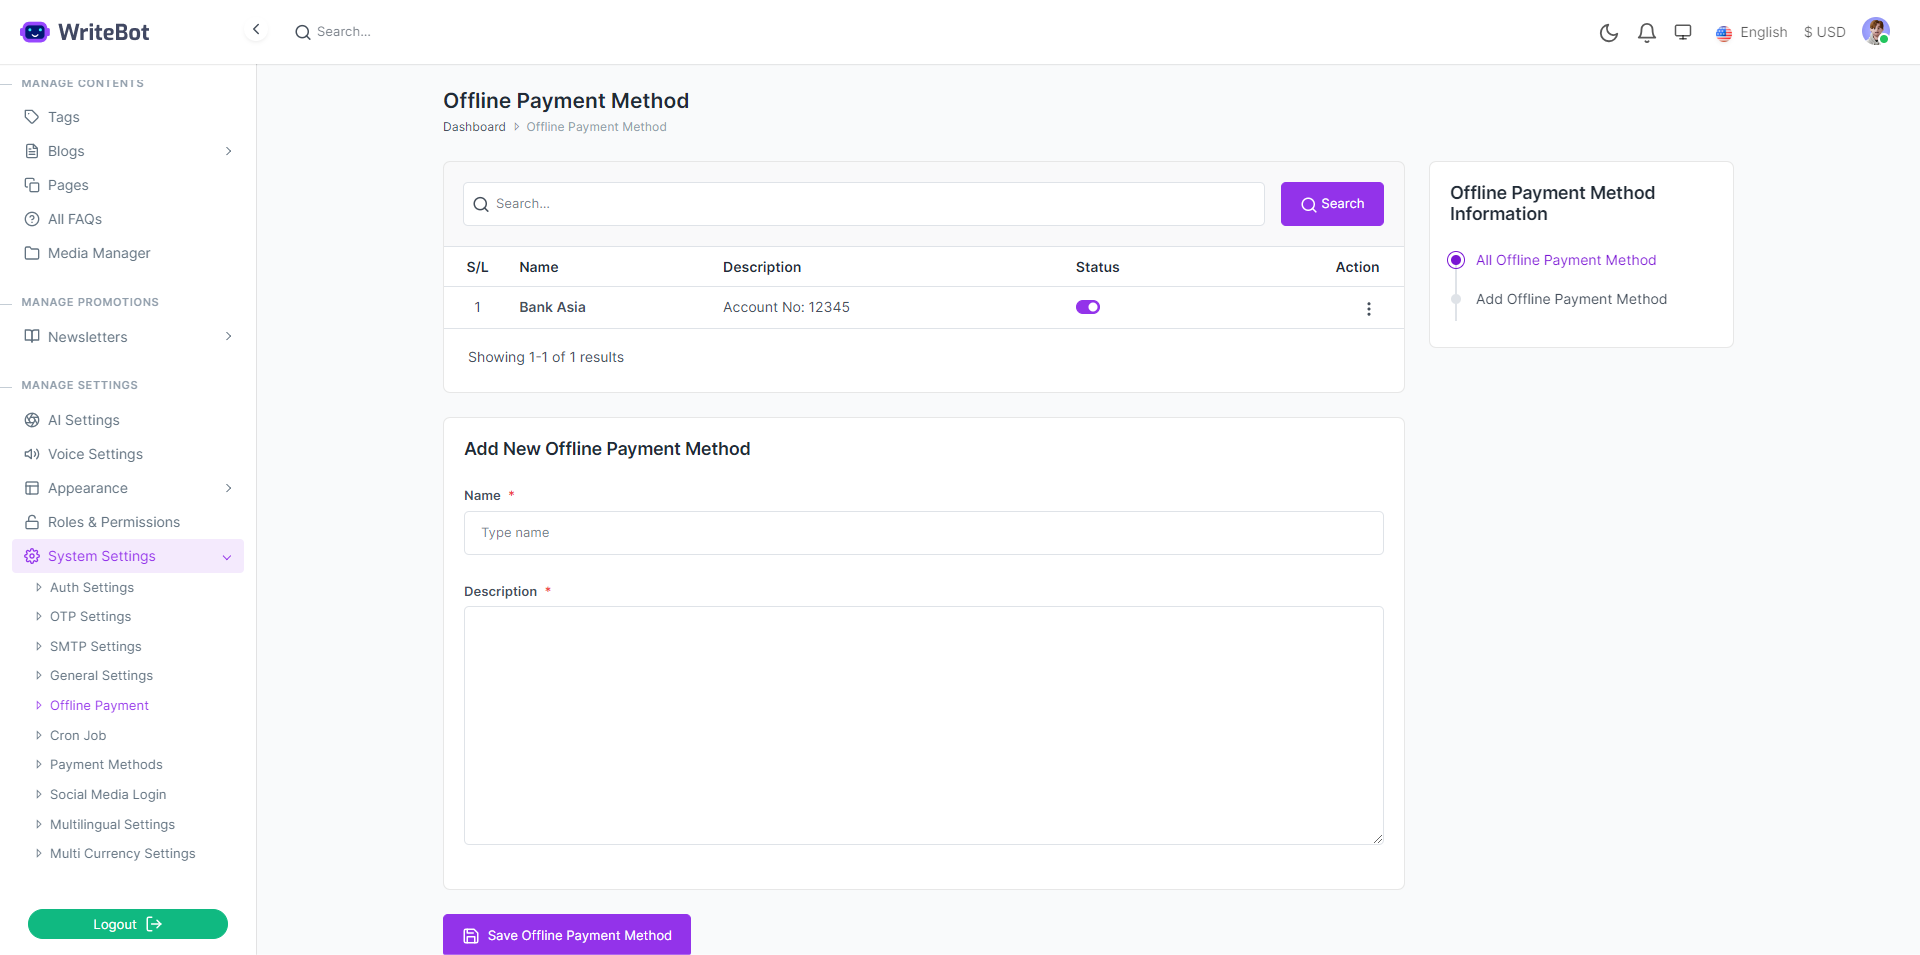
Add Offline Payment
- Login to the system as Admin
- https://yourdomain.com/dashboard
- Go to System Settings > Offline Payment
- Add name & description of the payment account details & process
- Save Offline Payment
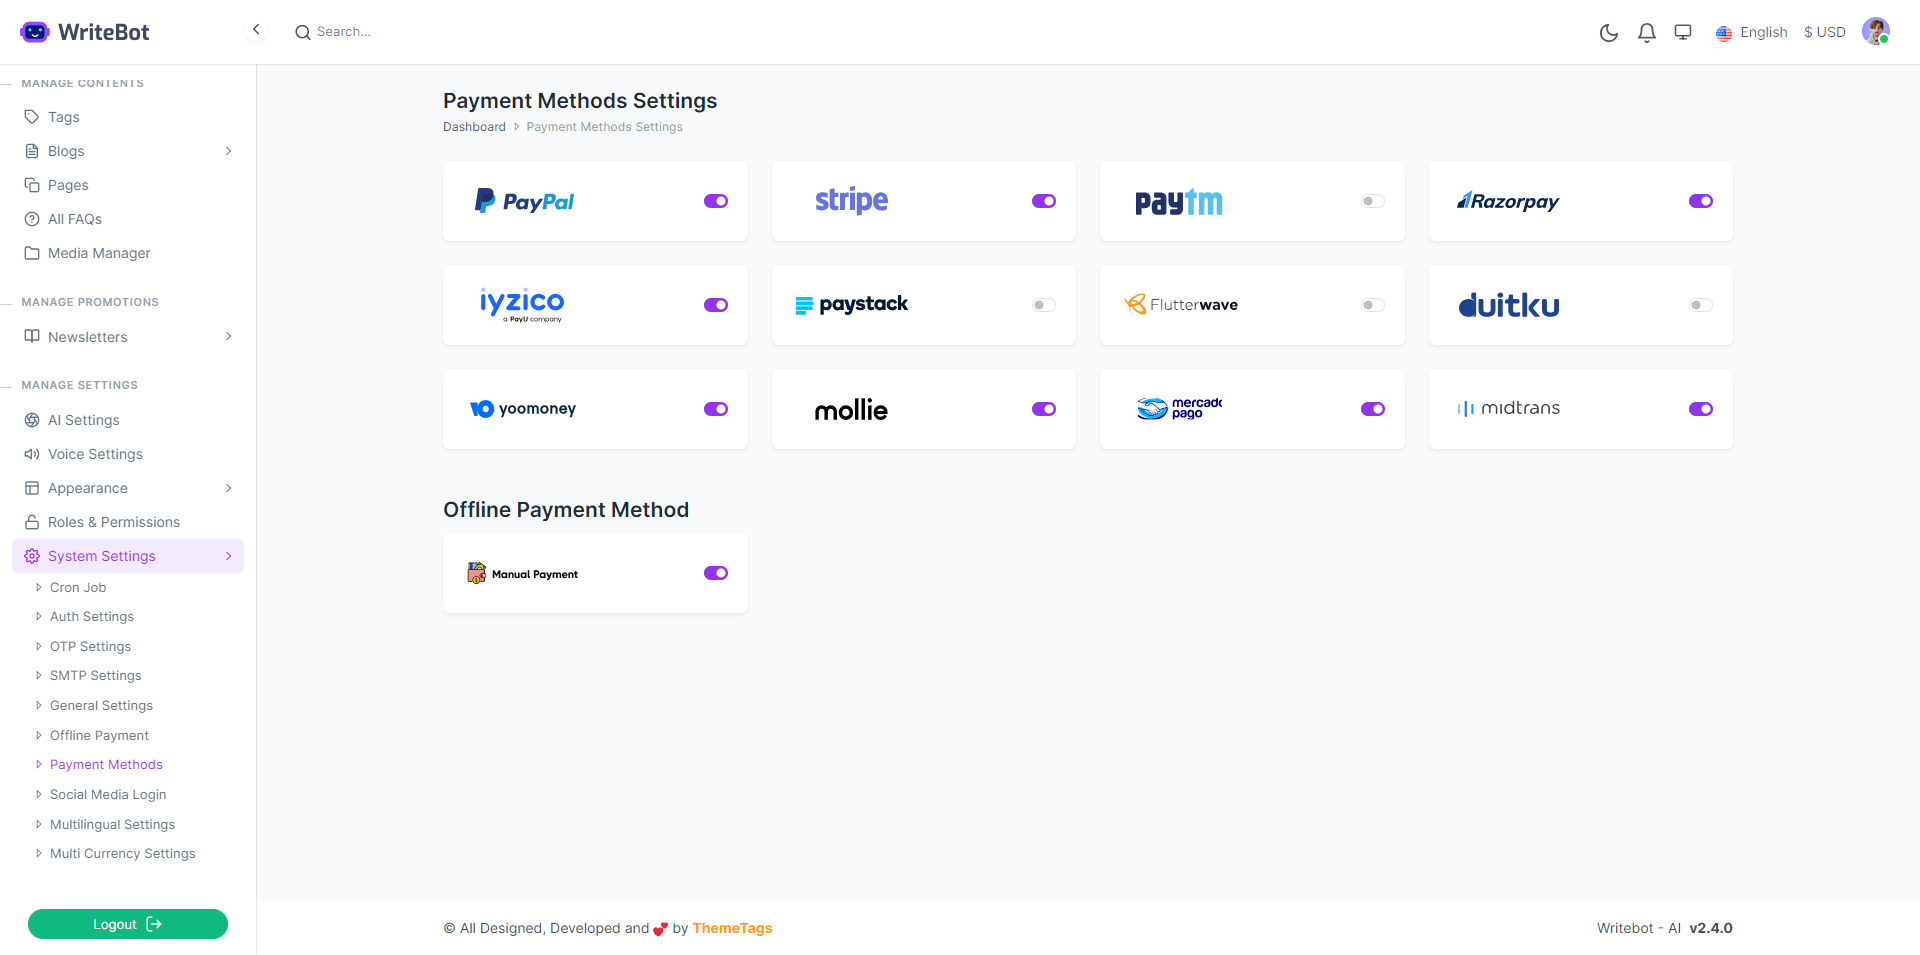
Enable Offline Payment
- Login to the system as Admin
- https://yourdomain.com/dashboard
- Go to System Settings > Payment Methods
- Click on Box of Offline Payment Method
- Enable It
Make Offline Payment
- Login to the system as Customer
- Go to Subscription Packages
- Click on Subscribe Button
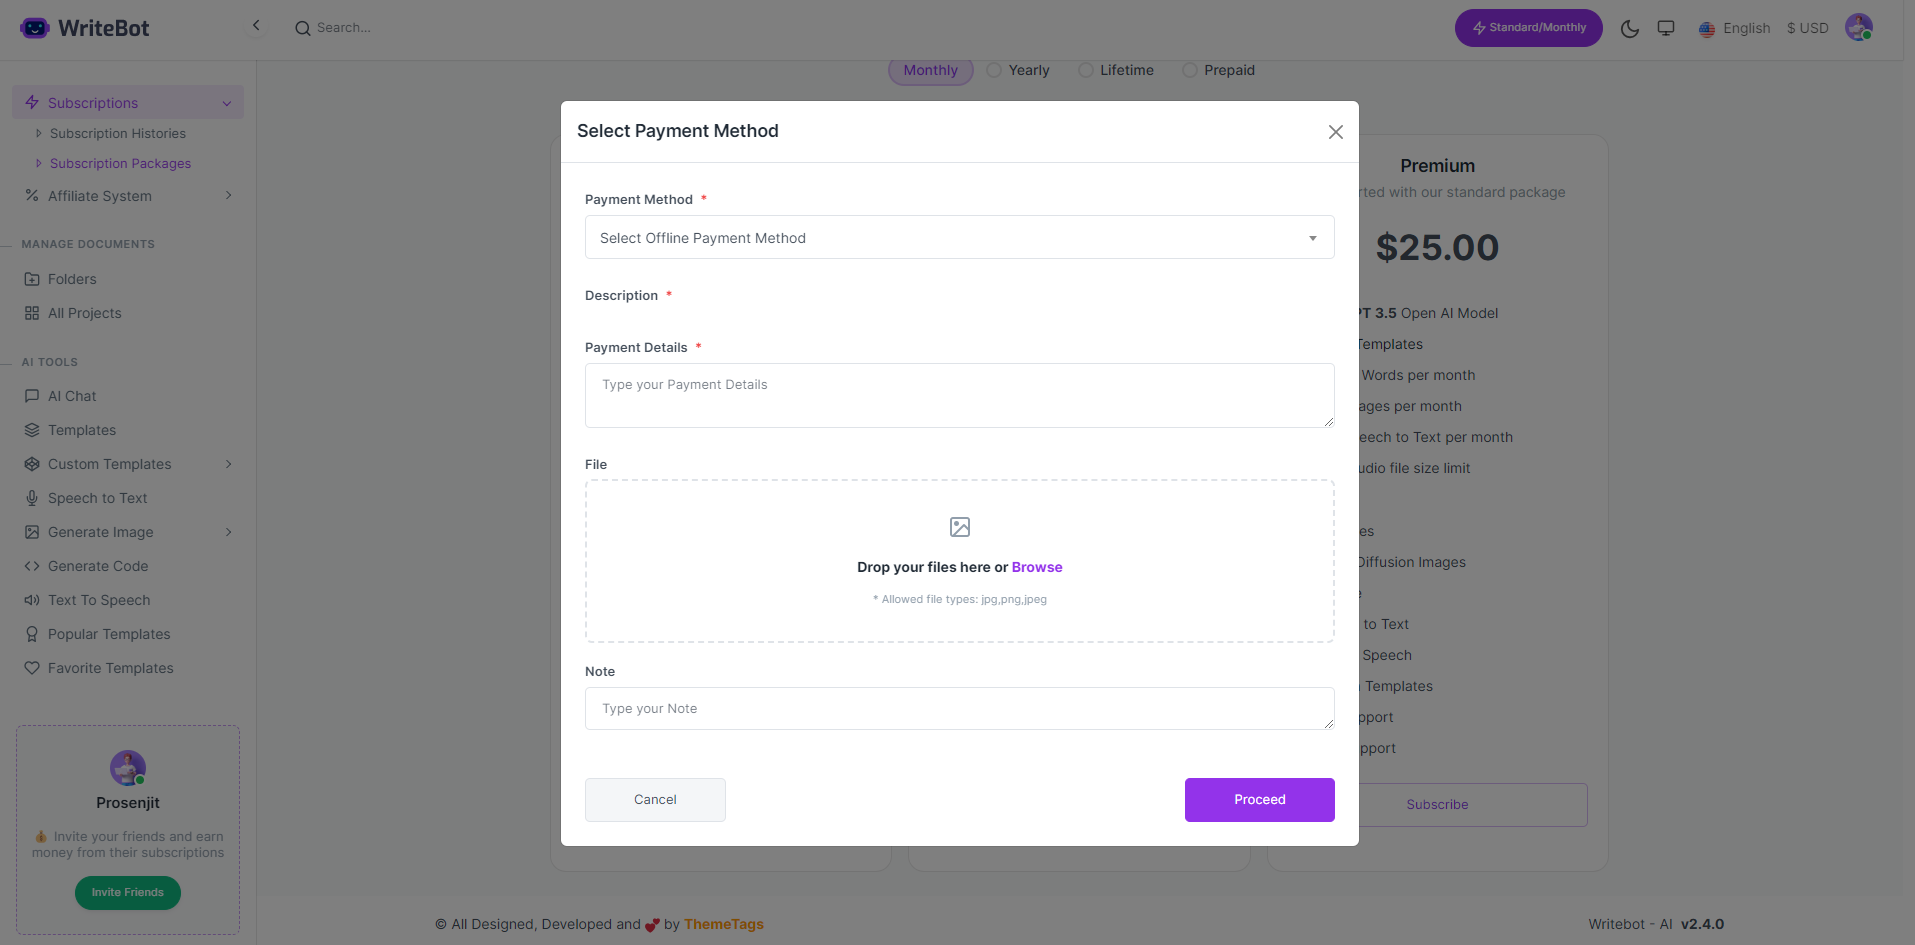
- Click On the Offline Payment Gateway
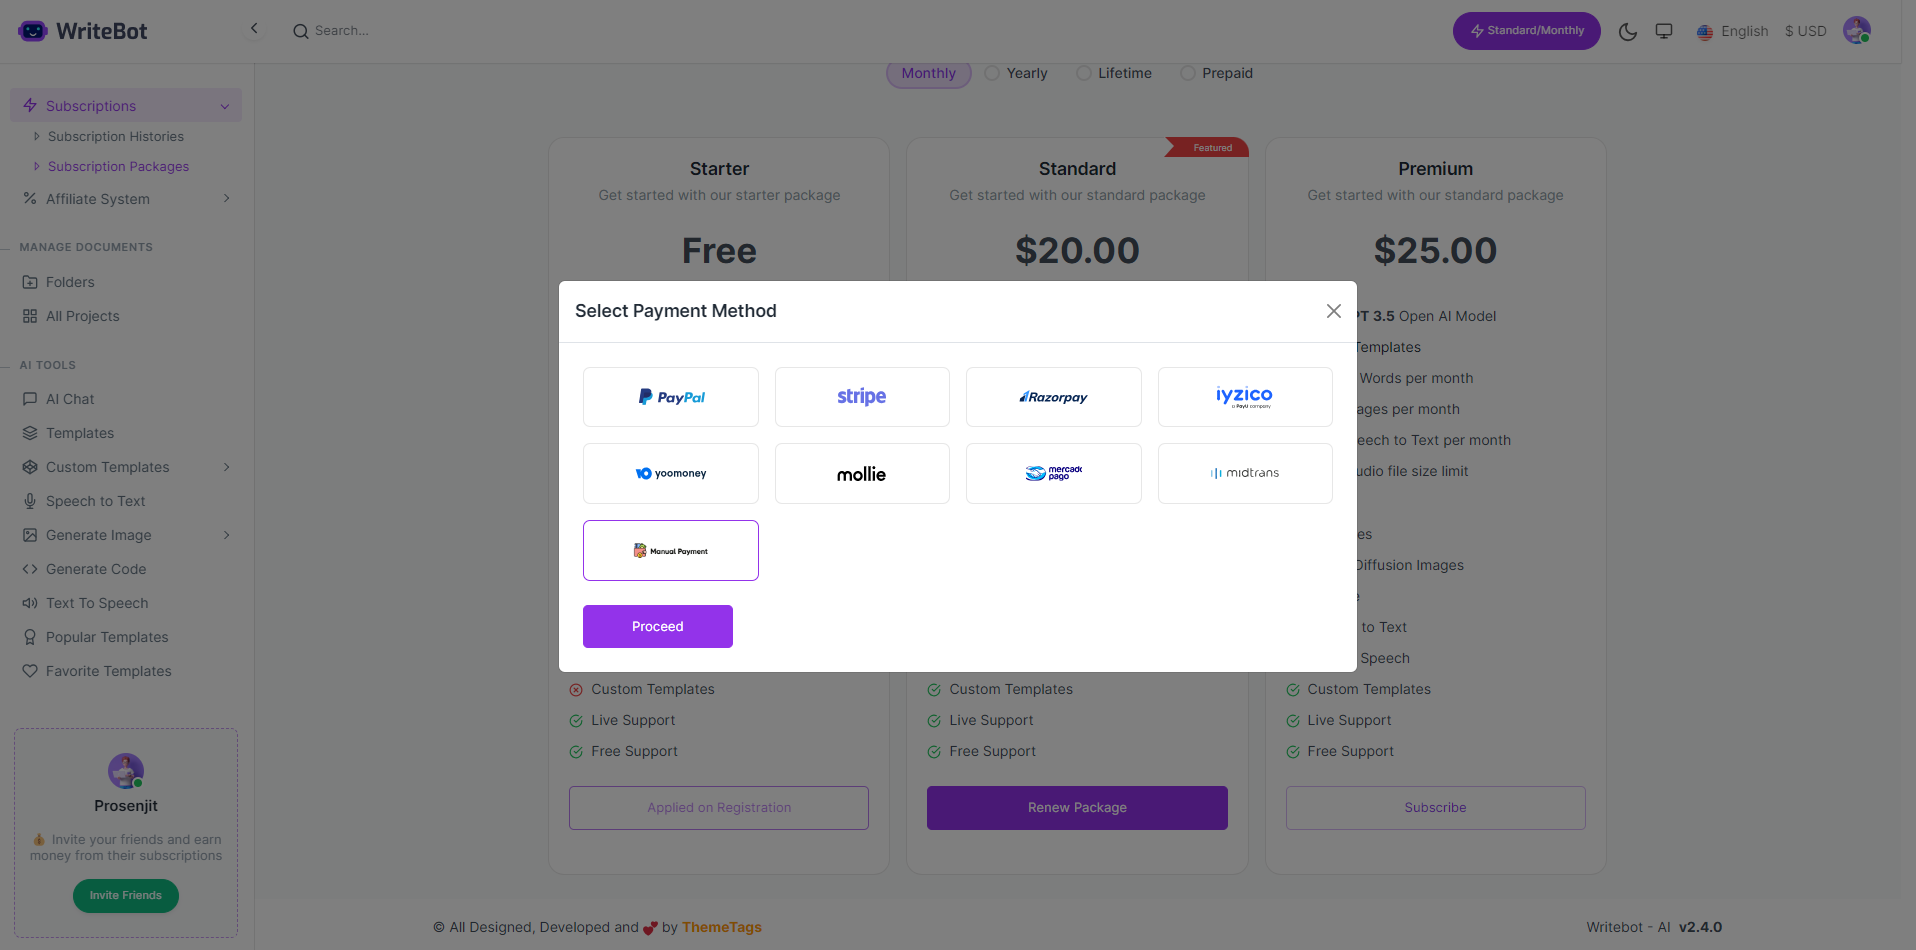
- Fill the form
- Click on Proceed
Payment Request
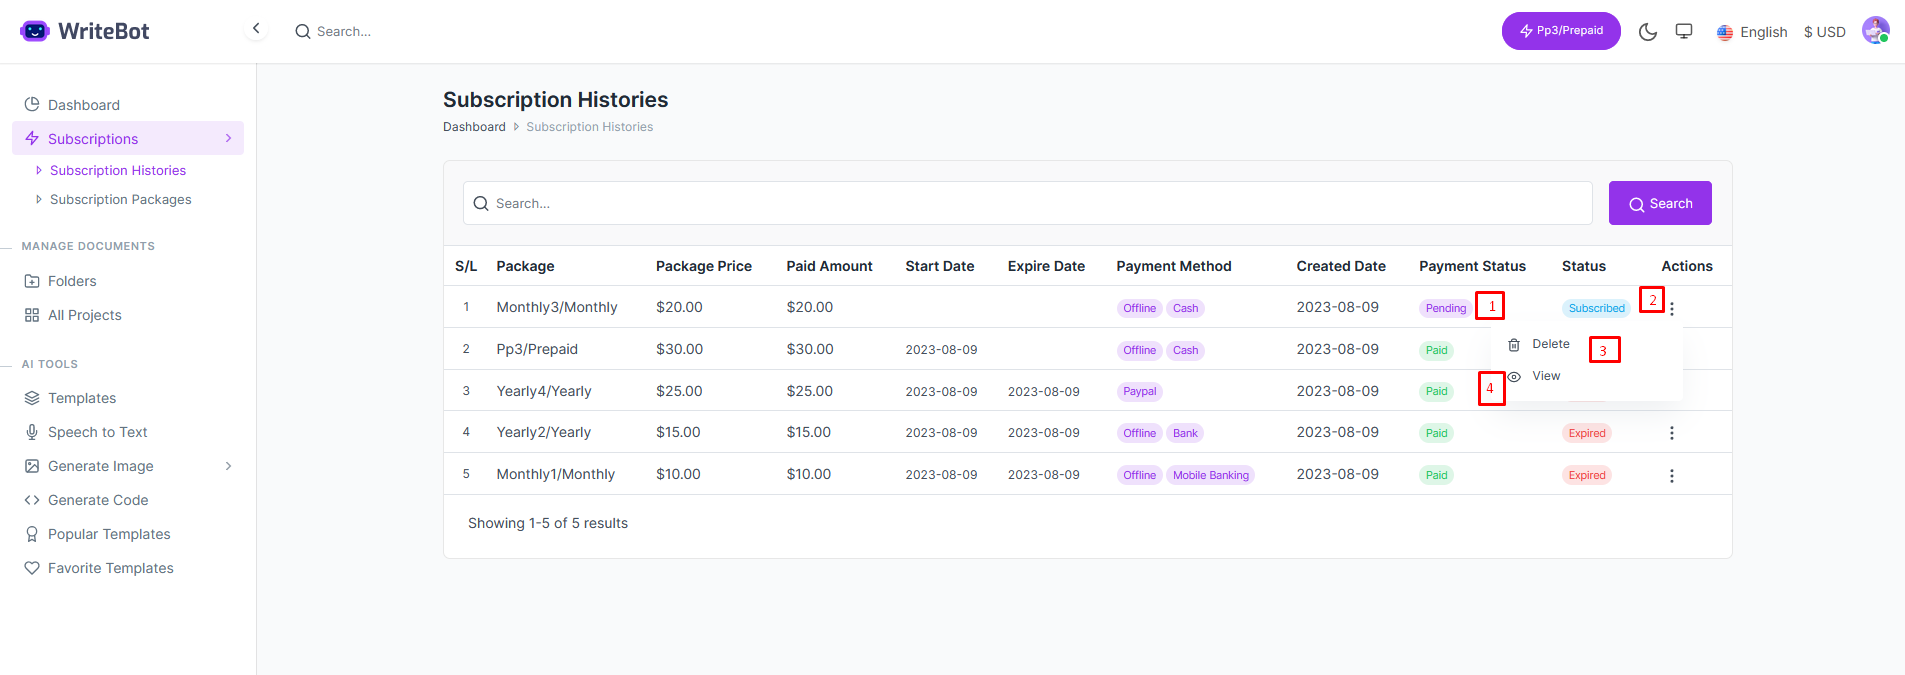
Go to Subscription > Payment RequestAfter Customer Purchase Package Using Offline Payment Method Here showing all as Pending Status and Admin Can Changes Status as Below Steps

- 1. Approve : If Click Approve , Package will be approved and if its first package it will be active other wise status Subscribed
- 2. View : Can View if pay from Offline Method
- 3. Reject : Can Reject if pay from Offline Method
- 4. Add Note : Admin Can Add Note if admin think something missing from customer / wrong info provide custom. When Add Note status will be incomplete and customer Can Edit Option for re-submit payment request
Customer panel
- 1. Pending :After Offline Payment status Pending
- 2. Subscribed :After Offline Payment status
- 3. Delete : Until Admin active Customer Can Delete
- 4.View : Can View Offline Payment Details
After Admin Add Note
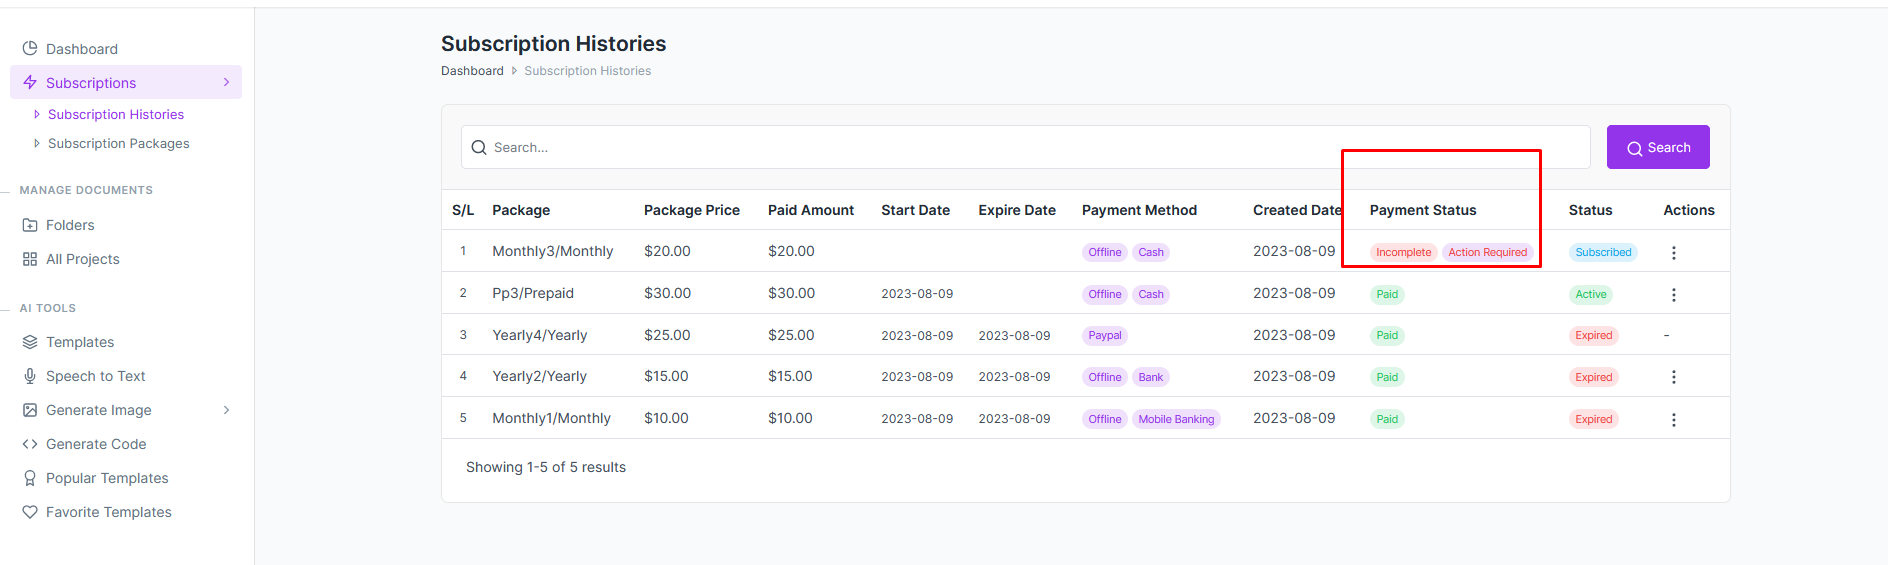
- After Admin Add Note status incomplete and have an option to re-submit
After Admin approved and Customer have an already active package
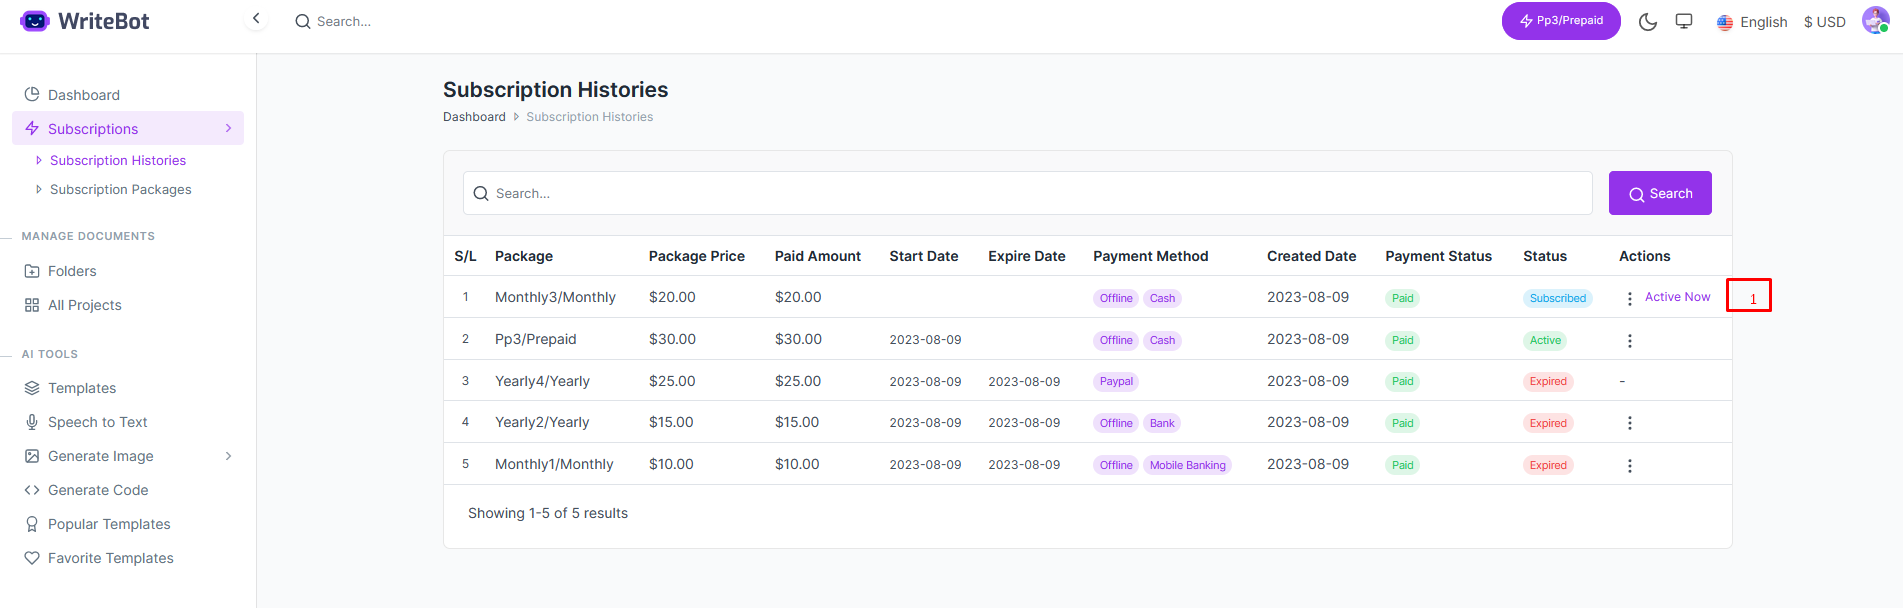
- 1 Active Now : if Click , Package will be active and previous package will be Expire
Add Customer
- Login to the system as Admin
- https://yourdomain.com/dashboard
- Go to Dashboard > Customers
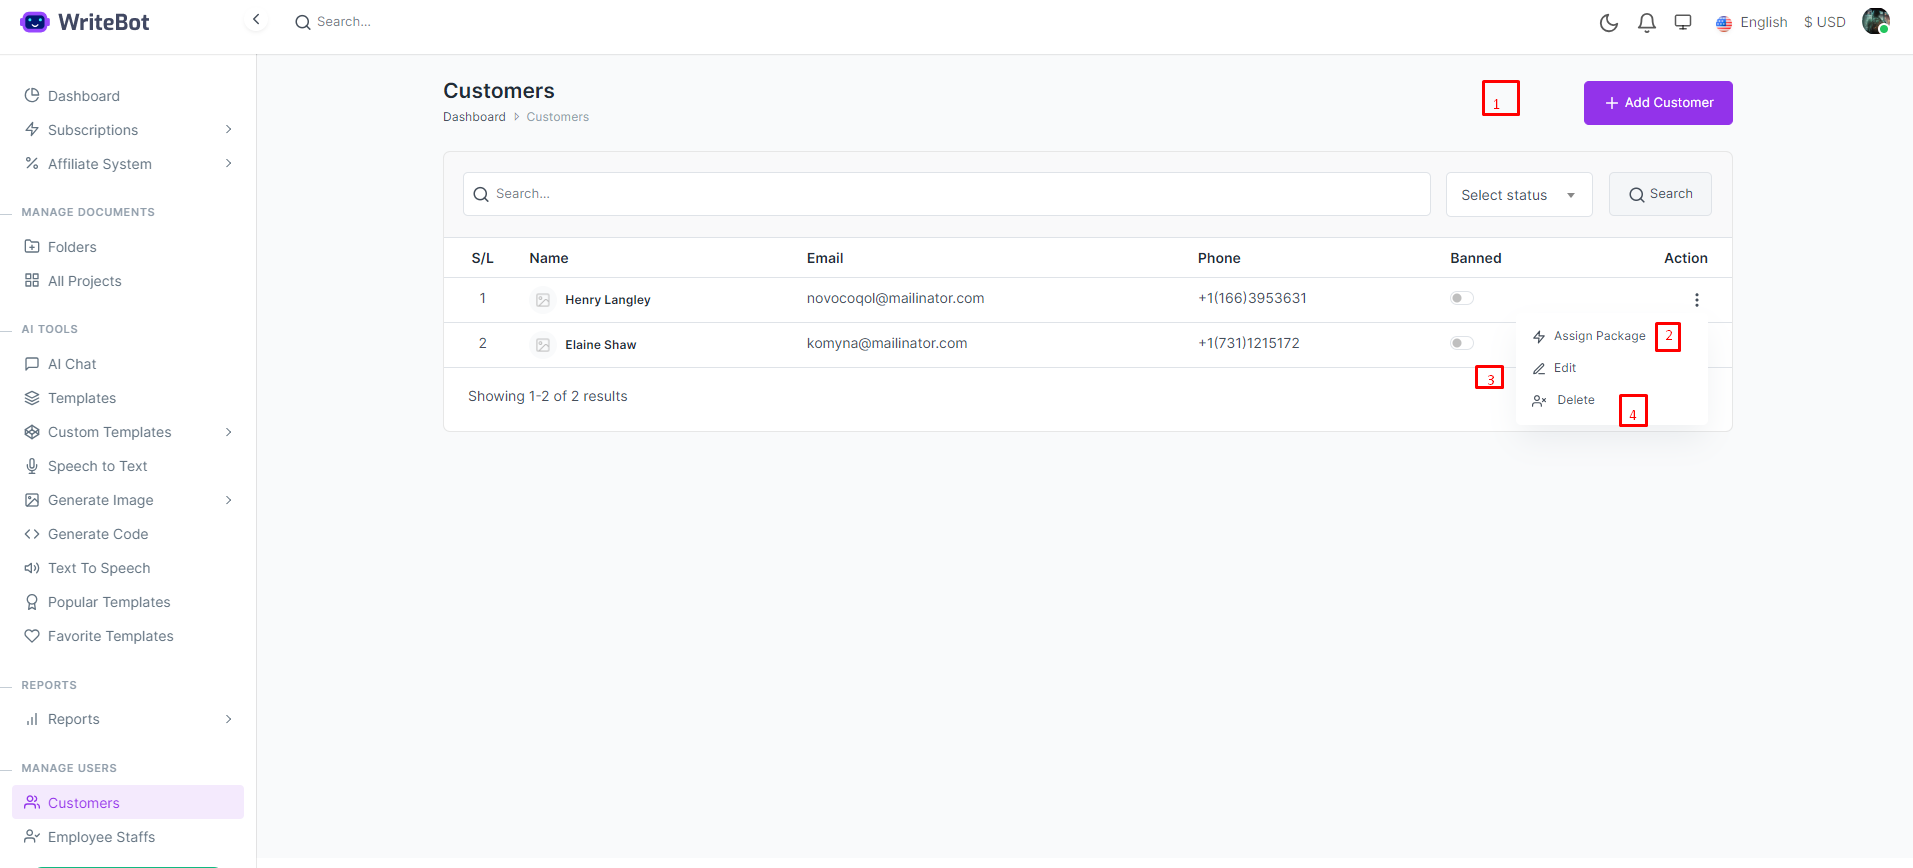
1:Customer
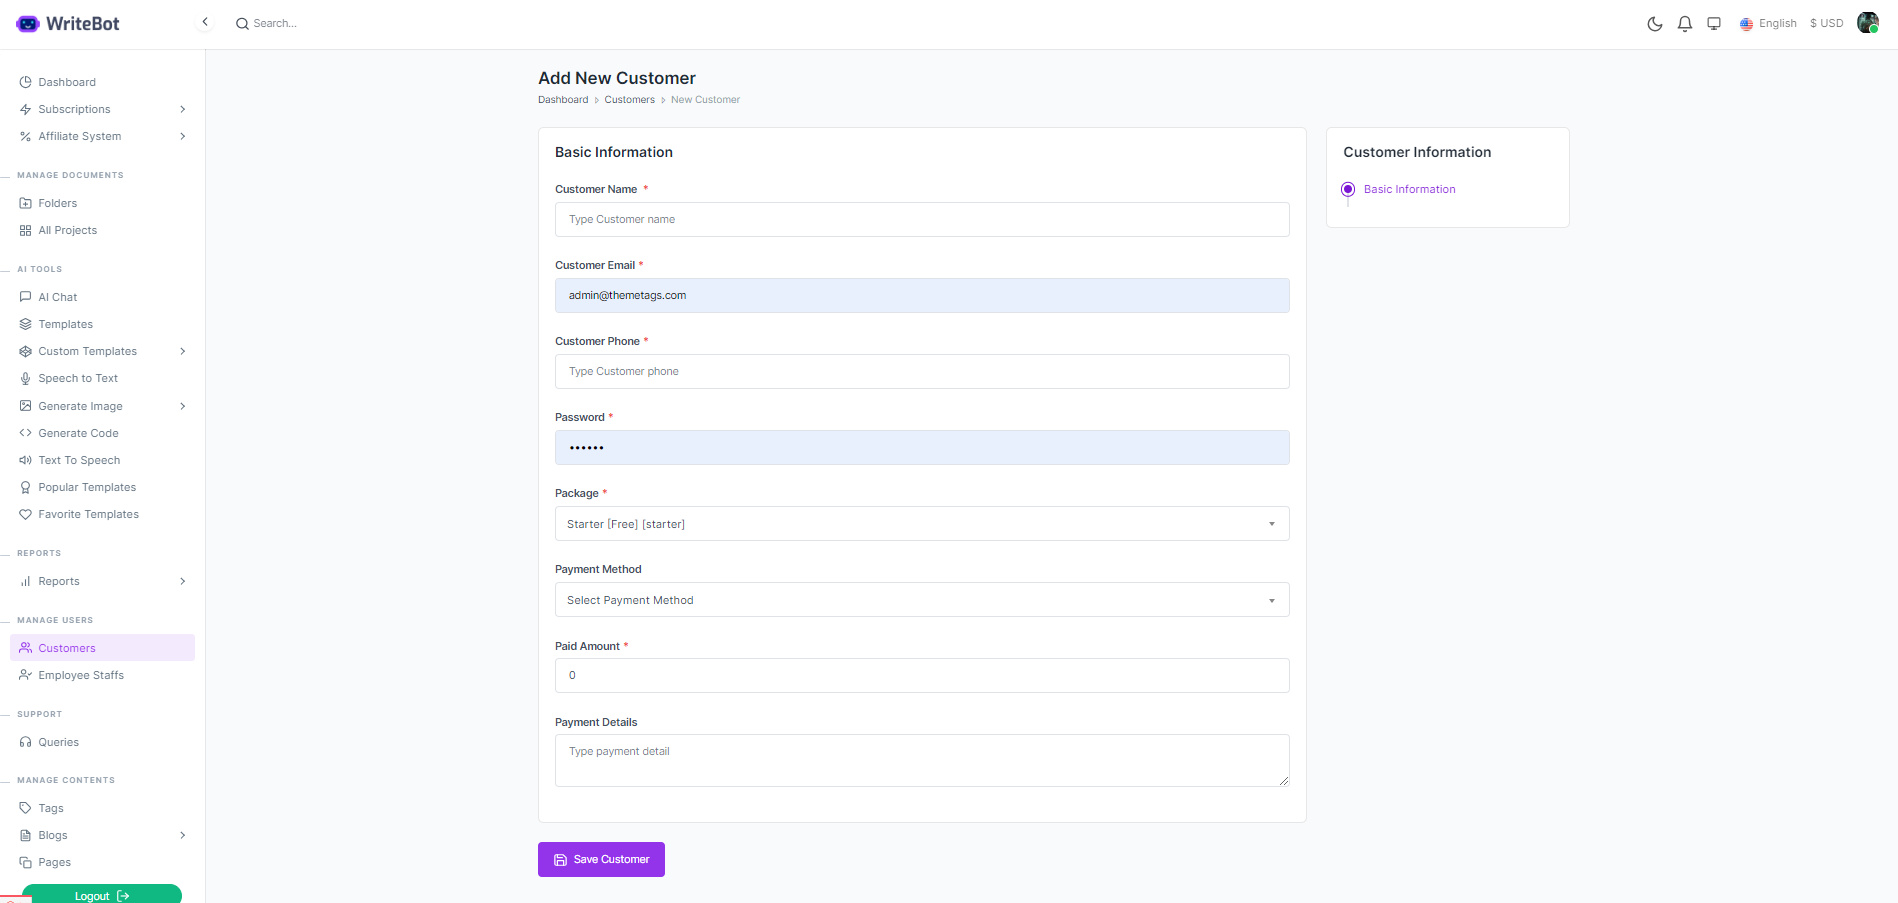
- 1. Add Customer : Fill up the all field and If package have no price put zero(0)
2Assign Package
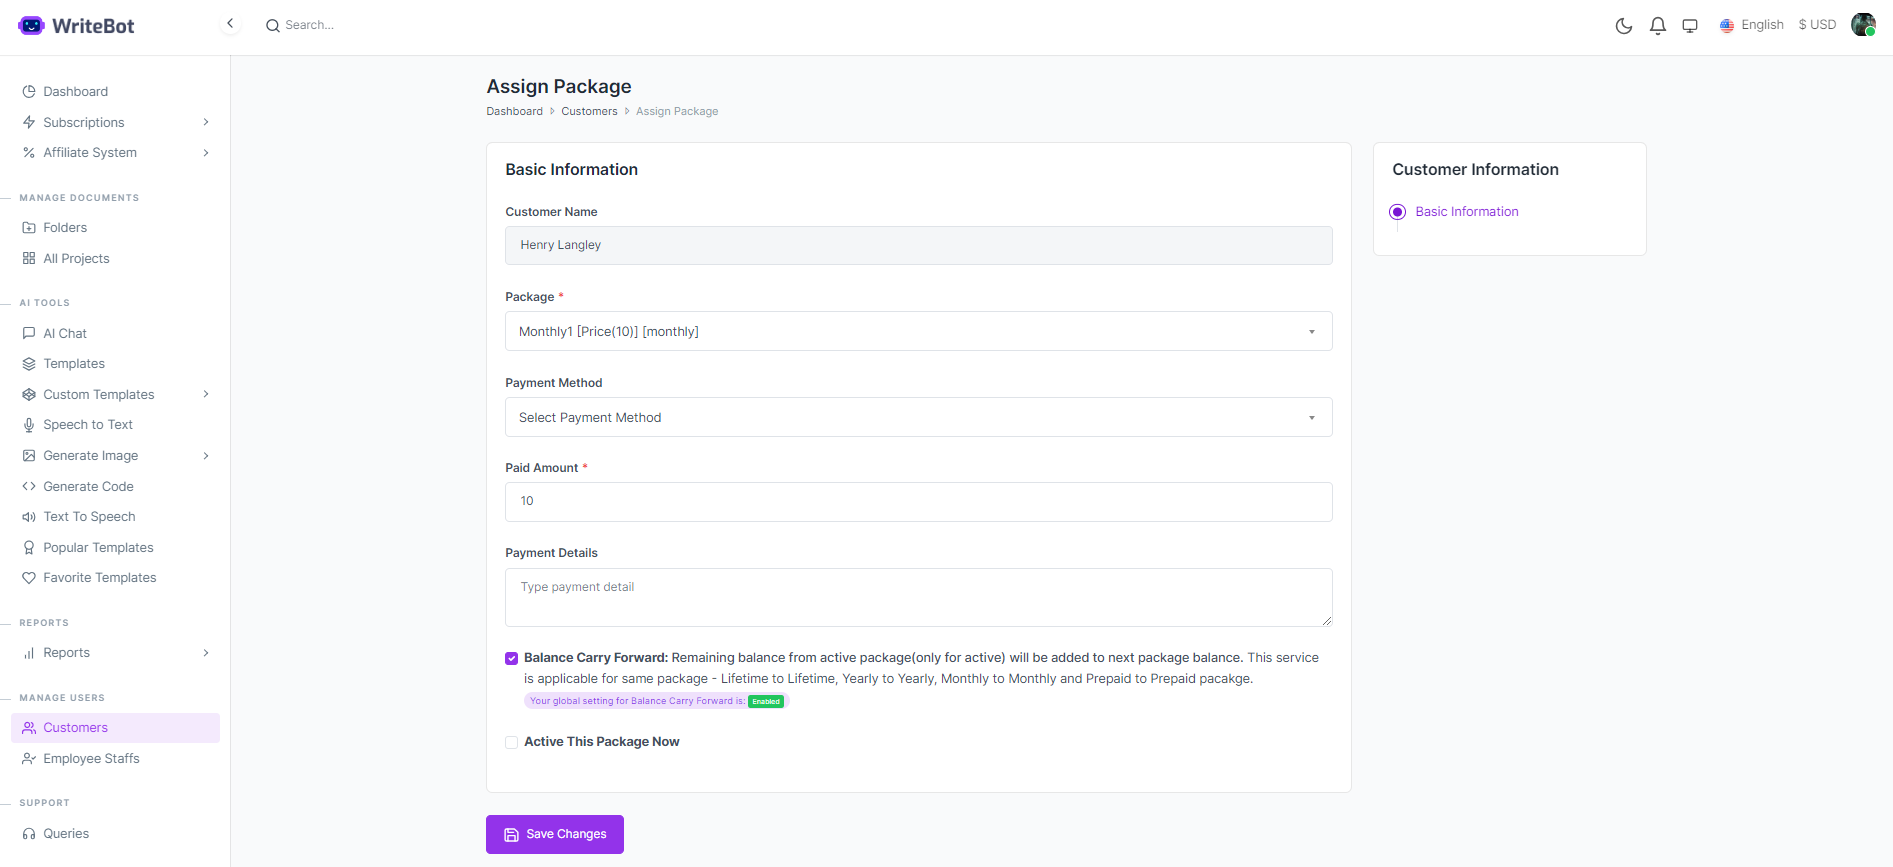
- If Check Active Now package automatically Active and previous package will be Expire
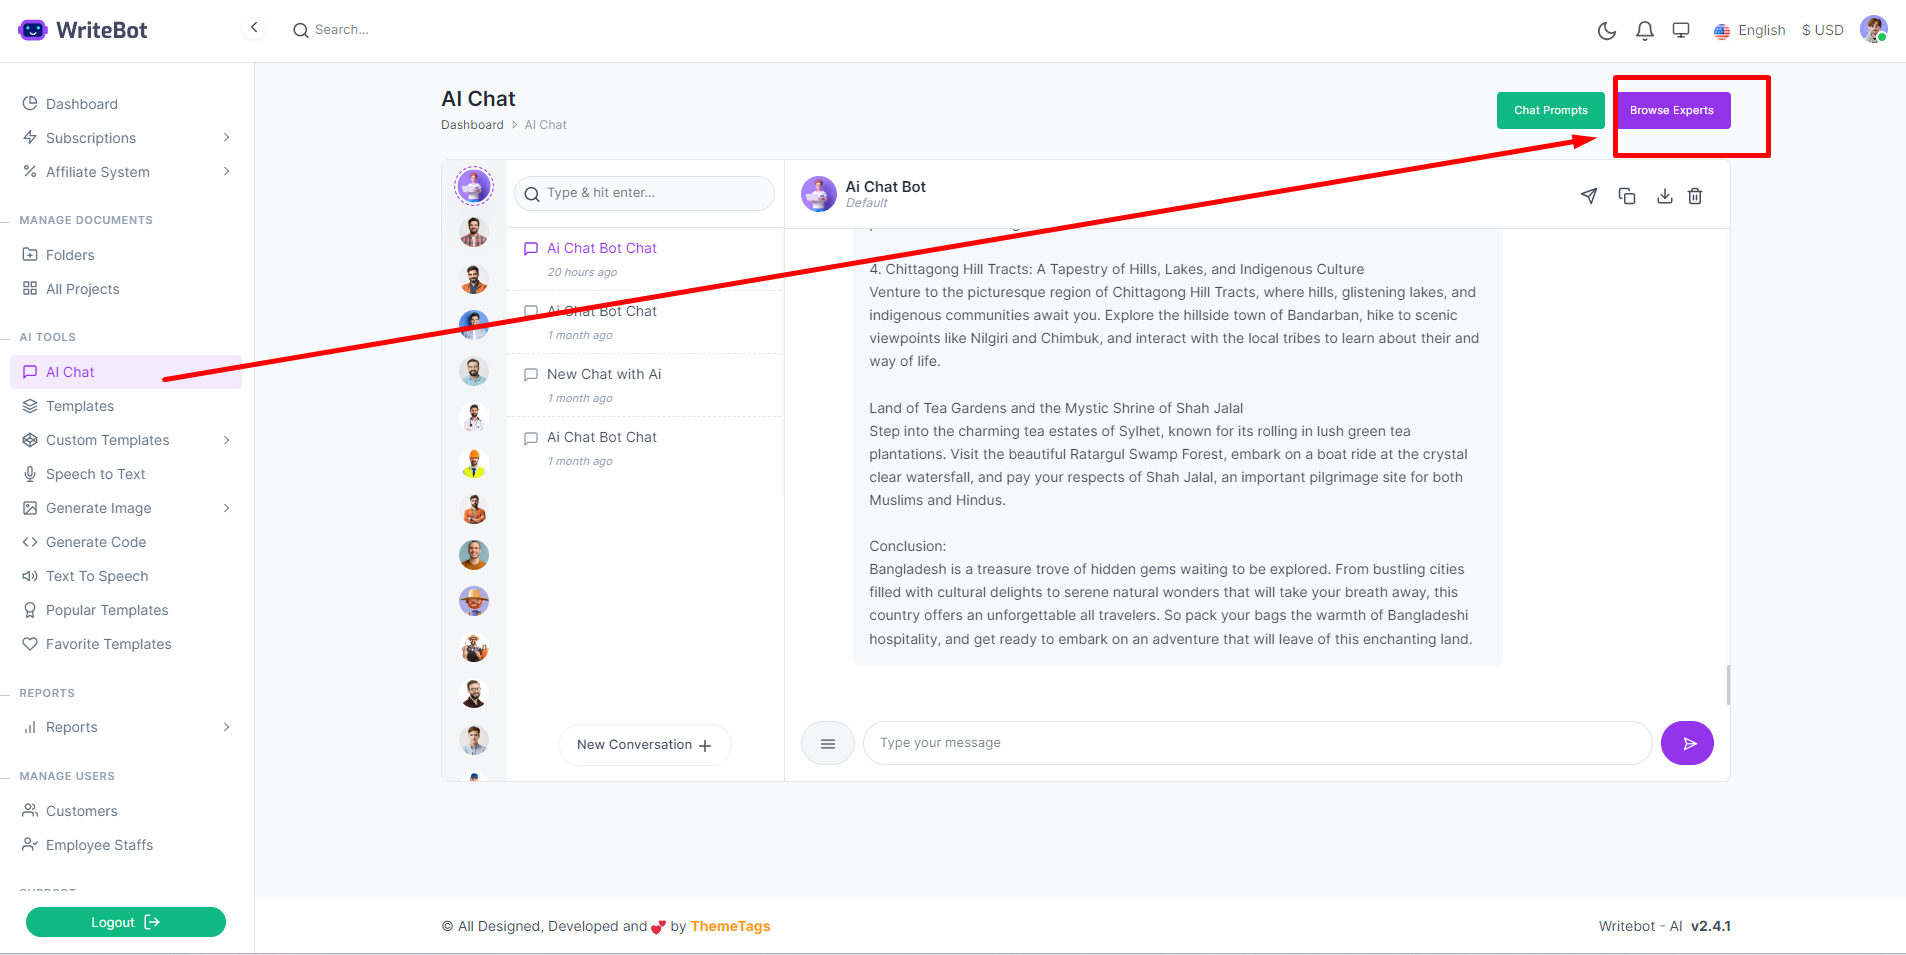
Train AI ChatBot
- Login to the system as Admin
- https://yourdomain.com/dashboard
- Go to AI Chat
- Click on Browse Expert
- Click on Edit icon of expert
- Click on Train Expert
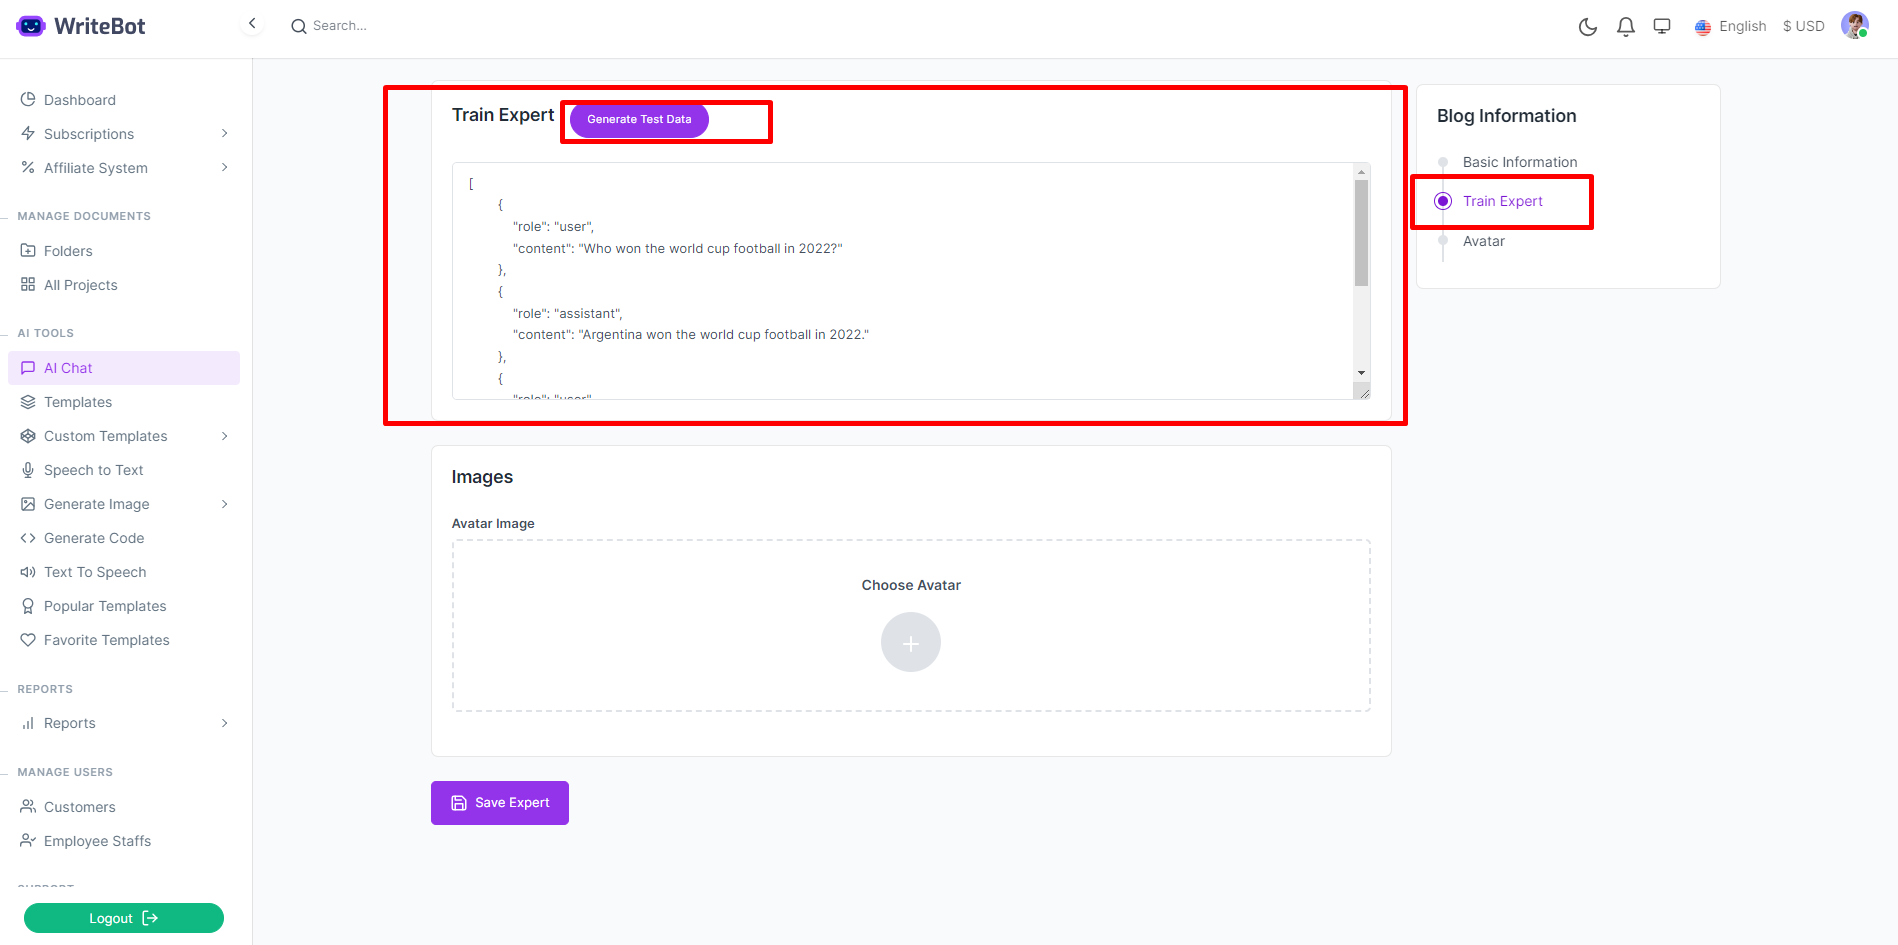
- Click on generate test data to see example json data format. You have to add questions & answer in this format
-
There are 3 different roles you can use when training your chatbot: User, Assistant and System.
- User: The User role is responsible for the human input or messages in the conversation. Users interact with ChatGPT by asking questions, making requests, or providing prompts. They initiate the conversation and provide context for the Assistant to generate relevant replies.
- Assistant: The Assistant role represents the language model (e.g., ChatGPT) that generates responses based on user messages. It uses its training on vast amounts of text data to understand the user’s input, generate coherent and relevant responses, and maintain the conversation flow. The Assistant aims to assist, provide information, and engage in conversation with the user.
- System: The System role involves instructions or guidance given to the Assistant to influence its behavior during the conversation. System messages are introduced by external systems or rules and are not based on user input. They serve to provide instructions, clarify context, or guide the Assistant’s responses. System messages help steer the conversation or modify the Assistant’s behavior to achieve desired outcomes.
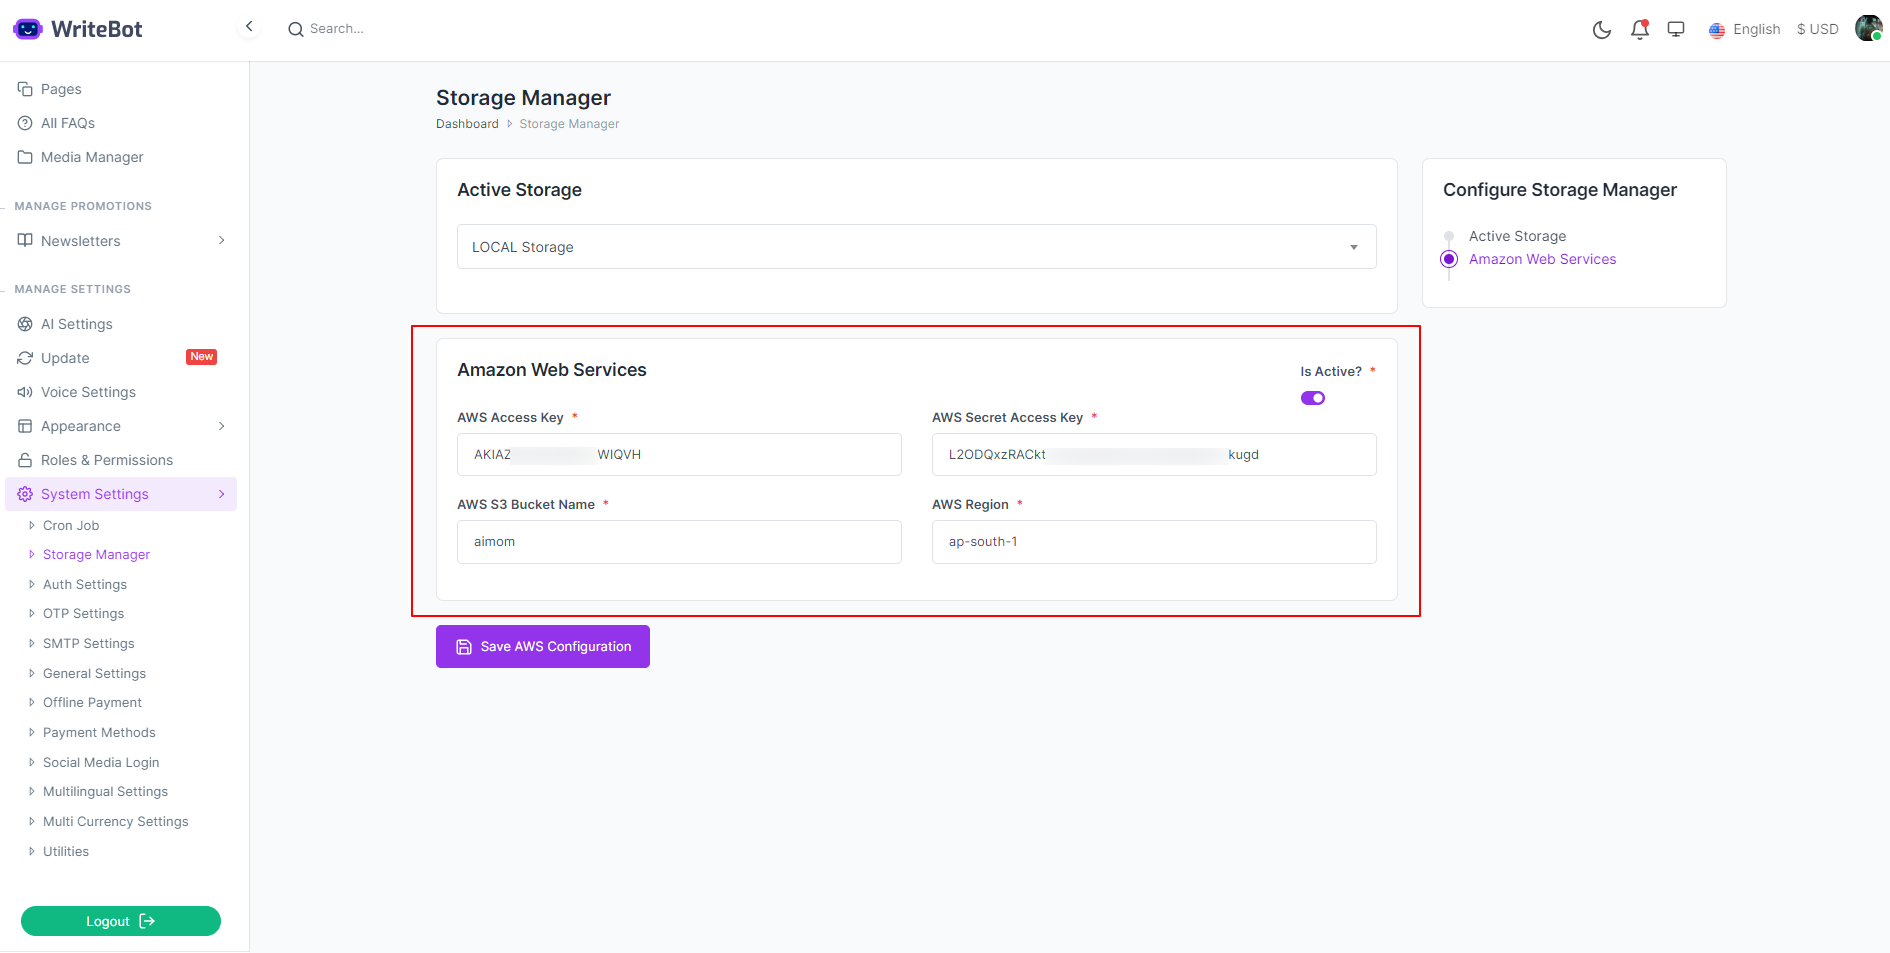
storage Manager
- Login to the system as Admin
- https://yourdomain.com/dashboard
- Go to System Settings
- Click on Storage Manager
-
AWS storage uses for Text to Speech and Genearet Image
- Active Storage
-
AWS Configuration
How to create & IAM permissions here . AWS Configuration Within AWS, you need to do 2 things:
Create a bucket within the S3 service
Create an IAM User to get a Key/Secret Key,
and then attach a Policy to that user that allows access to the S3 API. Like anything in AWS, creating a bucket in S3 involves looking at a ton of configuration options and wondering if you need any of them. For most use cases, you don't! Head to the S3 console, create a bucket name (it has to be globally unique, not just unique to your AWS account), choose the region you operate in, and leave all the defaults (including the ones that labeled "Block Public Access settings for this bucket"). Yes, some of these options are ones you may want to use, but you can choose them later. After creating a bucket, we need permission to do things to it. Let's pretend we created a bucket named "my-awesome-bucket". We can create an IAM User, select "programmatic access", but don't attach any policies or setup anything else. Make sure to record the secret access key, as they'll only show it once. I've created a video showing the process of creating a bucket and setting up IAM permissions here: